Dell PowerConnect W-IAP175P Installation Guide - Page 25
Connecting the Ethernet Cable (W-IAP175AC),
 |
View all Dell PowerConnect W-IAP175P manuals
Add to My Manuals
Save this manual to your list of manuals |
Page 25 highlights
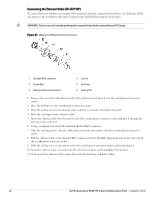
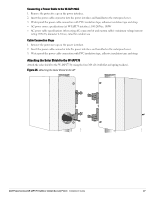
Connecting the Ethernet Cable (W-IAP175AC) To ensure that your outdoor access point (AP) maintains ethernet connectivity and Power over Ethernet (PoE), you must use the included weatherproof connector kit and install it using the steps below. WARNING: Failure to use the included weatherproof connector kit can lead to connectivity and PoE issues. Figure 22 Waterproof Ethernet Connector Cover 1 Shielded RJ45 connector 2 Waterproof Connector Socket 3 Locknut 4 Clamp ring 5 Shield rings 6 Sealing Bolt 7 Sealing Nut 1. Hold the clamp ring (4) vertically, with the wide end facing up, and place the locknut (3) over it. 2. Drop the waterproof connector socket (2) into the locknut/clamp ring items (3,4), with the RJ45 connector opening facing up, and screw the socket into the threads on the clamp ring. 3. Place the sealing nut (7) over an ethernet cable (without a connector attached to the end). 4. Place the seal bolt (6) over the ethernet cable. 5. Strip off about 55mm (2 inches) of the outer ethernet cable sheath to expose the ground wire and other pair wires. 6. Insert all pair wires into the two shield rings (5). 7. Make the ground wire attach to the narrow end of the inner ring and place the outer ring over the narrow end of the inner ring. 8. Insert the ethernet cable into the narrow end of the clamp ring and pass it through the opening end of waterproof connector socket. 9. Using a crimping tool, attach the included shielded RJ45 connector. 10. Slide the shield rings up the ethernet cable and insert it into the narrow end of the clamp ring. 11. Pull the ethernet cable so the shielded RJ45 connector fits into the RJ45 shaped opening in the wide end of the weatherproof connector socket. 12. Slide the sealing bolt over the narrow end of the clamp ring and hand tighten it. 13. Thread the sealing nut onto the sealing bolt. 14. Insert the ethernet cable connector into the ethernet interface and hand-tighten the locknut. 15. Water-proof the ethernet cable connection with electrical tape and butyl rubber. Dell PowerConnect W-IAP175 Outdoor Instant Access Point | Installation Guide 25
-
 1
1 -
2
-
3
-
4
-
5
-
6
-
7
-
8
-
9
-
10
-
11
-
12
-
13
-
14
-
15
-
16
-
17
-
18
-
19
-
 20
20 -
 21
21 -
 22
22 -
 23
23 -
 24
24 -
 25
25 -
 26
26 -
 27
27 -
 28
28 -
 29
29 -
 30
30 -
31
-
32
 |
 |
