Dell PowerEdge 1850 Information Update (.pdf) - Page 1
Dell PowerEdge 1850 Manual
 |
View all Dell PowerEdge 1850 manuals
Add to My Manuals
Save this manual to your list of manuals |
Page 1 highlights
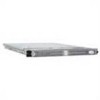
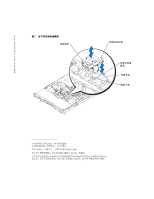
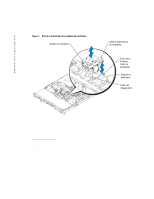
www.dell.com | support.dell.com About Cautions CAUTION: A CAUTION indicates a potential for property damage, personal injury, or death. Removing and Installing a Fan Module CAUTION: Only trained service technicians are authorized to remove the system cover and access any of the components inside the system. See your Product Information Guide for complete information about safety precautions, working inside the computer, and protecting against static discharge. This document provides instructions about removing and installing a cooling fan module. NOTE: See your Installation and Troubleshooting Guide for detailed instructions on removing or installing components. Removing a Fan Module 1 Remove the bezel (if applicable). 2 Turn off the system, including any attached peripherals, and disconnect your system from its electrical outlet. 3 Open the system. 4 Disconnect the fan module's power cable from the system board. See Figure 1. 5 Pull the fan straight up to clear the fan bracket. Installing a Fan Module NOTE: The procedure for installing each individual fan is the same. 1 With the fan power cable facing down and towards the back of the system, route the fan power cable through the opening in the fan bracket and insert the fan module into the fan bracket. See Figure 1. 2 Reconnect the fan power cable to the fan power connector on the system board. See Figure 1. 3 Close the system. See your Installation and Troubleshooting Guide. 4 Reconnect your system and peripherals to their electrical outlets, and turn on the system. 5 Replace the bezel (if applicable). June 2004
-
 1
1 -
 2
2 -
 3
3 -
 4
4 -
 5
5 -
 6
6 -
 7
7 -
8
-
9
-
10
-
11
-
12
-
13
-
14
 |
 |