Dell PowerEdge 1900 Getting Started Guide
Dell PowerEdge 1900 Manual
 |
View all Dell PowerEdge 1900 manuals
Add to My Manuals
Save this manual to your list of manuals |
Dell PowerEdge 1900 manual content summary:
- Dell PowerEdge 1900 | Getting Started Guide - Page 1
Dell™ PowerEdge™ 1900 Systems Getting Started With Your System Guide de mise en route Primeiros passos com o sistema Procedimientos iniciales con el sistema www.dell.com | support.dell.com - Dell PowerEdge 1900 | Getting Started Guide - Page 2
- Dell PowerEdge 1900 | Getting Started Guide - Page 3
Dell™ PowerEdge™ 1900 Systems Getting Started With Your System www.dell.com | support.dell.com - Dell PowerEdge 1900 | Getting Started Guide - Page 4
tells you how to avoid the problem. CAUTION: A CAUTION indicates a potential Dell Inc. is strictly forbidden. Trademarks used in this text: Dell and the DELL logo are trademarks of Dell, Inc.; Intel and Xeon are registered trademarks of Intel Dell Inc. disclaims any proprietary interest in trademarks and - Dell PowerEdge 1900 | Getting Started Guide - Page 5
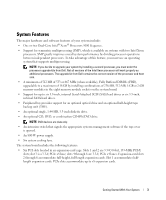
Fully Buffered DIMMs (FBD), upgradable to a maximum of 16 GB by installing combinations of 256-MB, 512-MB, 1-GB or 2-GB memory modules in the eight memory module sockets on the system board. • Support for up to six 3.5-inch, internal Serial-Attached SCSI (SAS) hard drives or six 3.5-inch, internal - Dell PowerEdge 1900 | Getting Started Guide - Page 6
video subsystem with an ATI ES1000, 33-MHz PCI video controller. This video subsystem contains 16 MB of DDR SDRAM video memory (nonupgradable). Maximum resolution is 1600 x 1200 with 64 K colors; true-color graphics are supported in the following resolutions: 640 x 480, 800 x 600, 1024 x 768 - Dell PowerEdge 1900 | Getting Started Guide - Page 7
how to troubleshoot the system and install or replace system components. The Hardware Owner's Manual is available on the CDs that came with your system or from support.dell.com. • CDs included with your system provide documentation and tools for configuring and managing your system. • Updates are - Dell PowerEdge 1900 | Getting Started Guide - Page 8
Unpacking the System Unpack your system and identify each item. Keep all shipping materials in case you need them later. Installing the Stabilizer Feet See the documentation included with your system on installing the system stabilizer feet. 6 Getting Started With Your System - Dell PowerEdge 1900 | Getting Started Guide - Page 9
into each connector. Be sure to tighten the screws (if any) on the monitor's cable connector. Connecting the Power Attach the system's power cable to the cable clasp at the top of the power supply and connect it to the system. Plug the other end of the cable into a grounded electrical outlet or - Dell PowerEdge 1900 | Getting Started Guide - Page 10
on the System Turn on the system and monitor (optional). Press the power button on the system and the monitor. The power indicators should light. Adjust the monitor's controls until the displayed image is satisfactory. Installing the Bezel Install the bezel. 8 Getting Started With Your System - Dell PowerEdge 1900 | Getting Started Guide - Page 11
Memory Architecture Memory module sockets Memory module capacities Minimum RAM Maximum RAM Drives Hard drives Diskette drive One or two Dual-Core Intel Xeon Processors 5000 Sequence PCI, PCI-X, PCIe one full-height, half-length 3.3-V, 64-bit, 133-MHz (slot 1) one full-height, full-length 3.3-V, 64 - Dell PowerEdge 1900 | Getting Started Guide - Page 12
(continued) Optical drive Flash drive Connectors Back NIC Serial USB Video Front Video USB Video Video type Video memory Power AC power supply Wattage Voltage Heat dissipation Maximum inrush current Batteries System battery RAID battery (optional) one optional CD, DVD, or combination CD-RW/DVD - Dell PowerEdge 1900 | Getting Started Guide - Page 13
Physical Tower (without bezel) Height Width Depth Weight (maximum configuration) 47.89 cm (18.85 in) with feet, no casters 22.66 cm (8.92 in) 66.13 cm (26.04 in) does not include control panel or bezel; control panel adds an additional 1.3 cm (.51 in) 49.9 kg (110 lb) Environmental NOTE: For - Dell PowerEdge 1900 | Getting Started Guide - Page 14
12 Getting Started With Your System - Dell PowerEdge 1900 | Getting Started Guide - Page 15
Systèmes Dell™ PowerEdge™ 1900 Guide de mise en route www.dell.com | support.dell.com - Dell PowerEdge 1900 | Getting Started Guide - Page 16
Dell Inc. est strictement interdite. Marques utilisées dans ce document : Dell et le logo DELL sont des marques de Dell, Inc. ; Intel et Xeon sont des marques déposées de Intel étaires des marques et des noms de ces produits. Dell Inc. décline tout intérêt dans l'utilisation des marques déposées et - Dell PowerEdge 1900 | Getting Started Guide - Page 17
REMARQUE : si vous décidez de mettre le système à niveau en installant un second processeur, vous devez commander les kits de mise à niveau de processeur chez Dell. Certaines versions du processeur Intel Xeon ne fonctionnent pas correctement comme processeurs supplémentaires. Le kit de mise à niveau - Dell PowerEdge 1900 | Getting Started Guide - Page 18
SAS ou SCSI n'est pas pris en charge (cartes SAS 5/E, PERC 5/E et PERC 4e/DC incluses). Adressez-vous à votre prestataire de support technique pour pour Intel x86 • Red Hat Enterprise Linux AS et ES (version 4) pour Intel EM64T • SUSE® Linux Enterprise Server 9 pour Intel EM64T 16 Guide de - Dell PowerEdge 1900 | Getting Started Guide - Page 19
ème, ainsi que des instructions relatives au dépannage et à l'installation ou au remplacement de composants. Il se trouve sur les CD fournis avec le système et sur le site support.dell.com. • Les CD fournis avec le système contiennent des documents et des outils relatifs à la configuration et à la - Dell PowerEdge 1900 | Getting Started Guide - Page 20
élément fourni. Conservez les matériaux d'emballage au cas où vous en auriez besoin ultérieurement. Installation des pieds stabilisateurs Consultez la documentation fournie avec le système pour obtenir les instructions d'installation relatives aux pieds stabilisateurs. 18 Guide de mise en route - Dell PowerEdge 1900 | Getting Started Guide - Page 21
extrémité du cordon sur une prise de courant mise à la terre ou sur une source d'alimentation autonome (onduleur ou unité de distribution de l'alimentation). Guide de mise en route 19 - Dell PowerEdge 1900 | Getting Started Guide - Page 22
bouton d'alimentation du système et sur celui du moniteur. Les voyants d'alimentation doivent s'allumer. Réglez le moniteur jusqu'à ce que l'image affichée soit correcte. Installation du cadre Installez le cadre. 20 Guide de mise en route - Dell PowerEdge 1900 | Getting Started Guide - Page 23
Installation Guide (Guide d'installation rapide). Veillez à installer Supports de barrette de mémoire Barrettes de mémoire compatibles RAM minimale RAM maximale Lecteurs Disques durs Lecteur de disquette Un ou deux processeurs double cœur Intel Xeon 5000 PCI, PCI-X, PCIe Emplacement 1 : 64 bits - Dell PowerEdge 1900 | Getting Started Guide - Page 24
Flash Connecteurs À l'arrière NIC Série USB Vidéo À l'avant Vidéo USB Vidéo Type de vidéo Mémoire vidéo Alimentation Alimentation en CA Puissance Tension Dissipation thermique Appel de courant maximal 22 Guide tension, 47-63 Hz 2320 BTU/h (680 kcal/h) maximum Dans des conditions de lignes typiques - Dell PowerEdge 1900 | Getting Started Guide - Page 25
RAID (en option) Pile bouton au lithium-ion CR 2032 (3,0 V) 4,1 V au lithium-ion Caractéristiques physiques Tour (sans cadre) Hauteur Largeur Profondeur Poids (configuration maximale) 47,89 cm (18,85 pouces) pieds compris, roulettes non install (dans tous les sens) Guide de mise en route 23 - Dell PowerEdge 1900 | Getting Started Guide - Page 26
2 ms sur l'axe z positif (une impulsion de chaque côté du système) Six chocs consécutifs de 71 G pendant un maximum de 2 ms en positif et négatif sur les axes x, y et z (une impulsion de chaque côté du système) De -16 à 3 048 m (-50 à 10 000 pieds) De - - Dell PowerEdge 1900 | Getting Started Guide - Page 27
Sistemas Dell™ PowerEdge™ 1900 Primeiros passos com o sistema www.dell.com | support.dell.com - Dell PowerEdge 1900 | Getting Started Guide - Page 28
Dell Inc. Marcas comerciais mencionadas neste texto: Dell e o logotipo da DELL são marcas comerciais da Dell, Inc.; Intel e Xeon são marcas comerciais da Intel às entidades proprietárias das marcas e nomes ou seus produtos. A Dell Inc. renuncia ao direito de qualquer participação em nomes e marcas - Dell PowerEdge 1900 | Getting Started Guide - Page 29
Dell. Nem todas as versões de processador Intel Xeon irão funcionar de forma adequada como processadores adicionais. O kit de atualização da Dell de disco rígido Serial-Attached SCSI (SAS) ou SATA internas de Os slots 1 e 2 são slots PCI-X de 3,3 V, 64 bits, 133 MHz; o slot 3 é um slot PCIe de 3,3 - Dell PowerEdge 1900 | Getting Started Guide - Page 30
• Slot PCI dedicado para uma placa controladora RAID opcional integrada. NOTA: A inicialização do sistema não tem suporte de dispositivos externos conectados ao adaptador SAS ou SCSI, incluindo SAS 5/E, PERC 5/E ou PERC 4e/DC. Entre em contato com o fornecedor de suporte técnico para obter as - Dell PowerEdge 1900 | Getting Started Guide - Page 31
sistema e descreve como solucionar problemas do sistema e instalar ou substituir seus componentes. O Hardware Owner's Manual está disponível nos CDs fornecidos com o sistema ou no site support.dell.com (em Inglês). • Os CDs incluídos com o sistema fornecem documentação e ferramentas para a configura - Dell PowerEdge 1900 | Getting Started Guide - Page 32
Remoção do sistema da embalagem Remova o sistema da embalagem e identifique cada item. Guarde todos os materiais de envio caso sejam necessários mais tarde. Instalação dos pés estabilizadores Consulte a documentação fornecida com o sistema para saber como instalar os pés estabilizadores no sistema - Dell PowerEdge 1900 | Getting Started Guide - Page 33
Conecte o cabo de alimentação do sistema ao colchete do cabo localizado na parte superior da fonte de alimentação e conecte-o ao sistema. Conecte a por exemplo, uma UPS (Uninterruptible Power Supply - fonte de alimentação ininterrupta) ou uma PDU (Power Distribution Unit - unidade de distribuição - Dell PowerEdge 1900 | Getting Started Guide - Page 34
Ligue o sistema e o monitor (opcional). Pressione o botão Liga/Desliga do sistema e do monitor. As luzes indicadoras de energia deverão se acender. Ajuste os controles do monitor até que a imagem exibida seja satisfatória. Instalação do painel Instale o painel. 32 Primeiros passos com o sistema - Dell PowerEdge 1900 | Getting Started Guide - Page 35
Unidades Unidades de disco rígido Unidade de disquete Um ou dois processadores Intel Xeon Dual Core Série 5000 PCI, PCI-X, PCIe Uma placa de 133 MHz de 64 bits e 3,3 V, com altura total e meio-comprimento Uma placa de 133 MHz de 64 bits e 3,3 V, com altura e comprimento total Um slot de pista x8 de - Dell PowerEdge 1900 | Getting Started Guide - Page 36
(continuação) Unidade óptica Unidade flash Conectores Parte posterior NIC Serial USB Vídeo Parte frontal Vídeo USB Vídeo SDRAM 800 W 90-264 VCA, variação automática, 47-63 Hz Máxima de 2320 BTU/h Sob condições de linha típicas e dentro de todo o intervalo de temperatura ambiente de funcionamento - Dell PowerEdge 1900 | Getting Started Guide - Page 37
Energia (continuação) Baterias Bateria do sistema Bateria RAID (opcional) Físicas Torre (sem o painel) Altura Largura Profundidade Peso (26,04 pol.) não inclui o painel de controle ou o painel; o painel de controle adiciona mais 1,3 cm (0,51 pol.) 49,9 kg (110 lb) Primeiros passos com o sistema 35 - Dell PowerEdge 1900 | Getting Started Guide - Page 38
Ambientais NOTA: Para obter informações adicionais sobre os valores ambientais para configurações de sistema específicas, entre em contato com o fornecedor de suporte técnico. Temperatura Operacional 10 °C a 35 °C (50 °F a 95 °F) Armazenamento -40 °C a 65 °C (-40 °F a 149 °F) Umidade relativa - Dell PowerEdge 1900 | Getting Started Guide - Page 39
Sistemas Dell™ PowerEdge™ 1900 Procedimientos iniciales con el sistema www.dell.com | support.dell.com - Dell PowerEdge 1900 | Getting Started Guide - Page 40
Dell Inc. Marcas comerciales utilizadas en este texto: Dell y el logotipo de DELL son marcas comerciales de Dell, Inc.; Intel y Xeon son marcas comerciales registradas de Intel a las entidades que los poseen o a sus productos. Dell Inc. renuncia a cualquier interés sobre la propiedad de marcas - Dell PowerEdge 1900 | Getting Started Guide - Page 41
Intel Xeon funcionarán correctamente como procesadores adicionales. El kit de actualización de Dell máximo de seis unidades internas de disco duro SCSI conectadas en serie (SAS) de 3,5 pulgadas de expansión. Las ranuras 1 y 2 son PCI-X de 3,3 V y 64 bits a 133 MHz; la ranura 3 es PCIe x8 de 3,3 V, y - Dell PowerEdge 1900 | Getting Started Guide - Page 42
• Ranura PCI dedicada para una tarjeta controladora RAID integrada opcional. NOTA: no es posible iniciar el sistema desde un dispositivo externo conectado a un adaptador SAS o SCSI, incluidos SAS 5/E, PERC 5/E o PERC 4e/DC. Póngase en contacto con su proveedor de asistencia técnica para obtener la - Dell PowerEdge 1900 | Getting Started Guide - Page 43
y se describe cómo solucionar problemas del sistema e instalar o sustituir componentes del sistema. El Manual del propietario del hardware está disponible en los CD incluidos con el sistema o en support.dell.com. • Los CD que se facilitan con el sistema proporcionan documentación y herramientas para - Dell PowerEdge 1900 | Getting Started Guide - Page 44
Desembalaje del sistema Desembale el sistema e identifique cada elemento. Guarde el material de embalaje por si lo necesitara más adelante. Instalación del pie estabilizador Consulte las instrucciones de la documentación incluida con el sistema acerca de la instalación del pie estabilizador del - Dell PowerEdge 1900 | Getting Started Guide - Page 45
los hubiera) del conector del cable del monitor. Conexión de la alimentación Conecte el cable de alimentación del sistema a la abrazadera situada en la parte superior de la fuente de alimentación y conéctelo al sistema. Conecte el extremo opuesto del cable a una toma eléctrica con conexión a tierra - Dell PowerEdge 1900 | Getting Started Guide - Page 46
monitor (opcional). Presione el botón de encendido del sistema y del monitor. Deberán encenderse los indicadores de alimentación. Ajuste los controles del monitor hasta que la imagen mostrada sea satisfactoria. Instalación del embellecedor Coloque el embellecedor. 44 Procedimientos iniciales con - Dell PowerEdge 1900 | Getting Started Guide - Page 47
de disco duro Unidad de disquete Uno o dos procesadores Intel Xeon de doble núcleo 5000 Sequence PCI, PCI-X, PCIe Una ranura de 3,3 V, 64 bits a 133 MHz (ranura 1) de altura completa y de media longitud Una ranura de 3,3 V, 64 bits a 133 MHz (ranura 2) de altura y longitud completas Una ranura - Dell PowerEdge 1900 | Getting Started Guide - Page 48
Unidades (continuación) Unidad óptica Unidad flash Conectores Parte posterior NIC Serie USB Vídeo Parte frontal Vídeo USB Vídeo Tipo de vídeo 16 MB de SDRAM DDR 800 W 90-264 V CA, autoajustable, 47-63 Hz 2 320 BTU/h (305 W) como máximo En condiciones normales de línea y en todo el ambiente del rango - Dell PowerEdge 1900 | Getting Started Guide - Page 49
continuación) Batería RAID (opcional) Ion-litio de 4,1 V Características físicas Torre (sin embellecedor) Altura Anchura Profundidad Peso (configuración máxima) 47,89 cm (con pies y sin ruedas) 22,66 cm 66,13 cm (no incluye el panel de control ni el embellecedor; el panel de control supone 1,3 cm - Dell PowerEdge 1900 | Getting Started Guide - Page 50
48 Procedimientos iniciales con el sistema
-
 1
1 -
 2
2 -
 3
3 -
 4
4 -
 5
5 -
 6
6 -
 7
7 -
8
-
9
-
10
-
11
-
12
-
13
-
14
-
15
-
16
-
17
-
18
-
19
-
20
-
21
-
22
-
23
-
24
-
25
-
26
-
27
-
28
-
29
-
30
-
31
-
32
-
33
-
34
-
35
-
36
-
37
-
38
-
39
-
40
-
41
-
42
-
43
-
44
-
45
-
46
-
47
-
48
-
49
-
50
 |
 |

www.dell.com | support.dell.com
Dell™ PowerEdge™ 1900 Systems
Getting Started
With Your System
Guide de mise en route
Primeiros passos com o sistema
Procedimientos iniciales con el sistema