Dell PowerEdge 2400 Rack Installation Guide - Page 20
One Rack Unit, WARNING: If you are installing more than one computer, install the slide
 |
View all Dell PowerEdge 2400 manuals
Add to My Manuals
Save this manual to your list of manuals |
Page 20 highlights
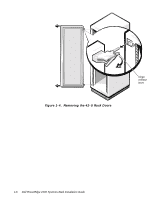
1 unit (1.75 inches) Figure 1-6. One Rack Unit For more information, see the Dell Rack Advisor software available on the Dell Web site at http://www.dell.com. WARNING: If you are installing more than one computer, install the slide assemblies so that the first computer is installed in the lowest available position in the rack. To install the slide assemblies in the rack, perform the following steps: 1. Place the front of the template over the front of the front rack rails (see Figure 1-7). Position the bottom of the template in line with the desired bottom position of the computer chassis. 2. Mark the upper- and lower-mounting positions for the slide brackets. 3. Turn over the template and place the back of the template over the front side of the back rack rails in the same position as you placed it on the front rack rail. 4. Mark the upper- and lower-mounting positions for the slide brackets as shown on the template. After determining where to install the PowerEdge system, mark the rack's front and back vertical rails with a felt-tip marker or masking tape where the system's lower edge will be located. 1-8 Dell PowerEdge 2400 Systems Rack Installation Guide
-
 1
1 -
2
-
3
-
4
-
5
-
6
-
7
-
8
-
9
-
10
-
11
-
12
-
13
-
14
-
 15
15 -
 16
16 -
 17
17 -
 18
18 -
 19
19 -
 20
20 -
 21
21 -
 22
22 -
 23
23 -
 24
24 -
 25
25 -
26
-
27
-
28
-
29
-
30
-
31
-
32
 |
 |
