Dell PowerEdge 2800 Installing the SCSI Backplane Daughter Card - Page 5
Installing the SCSI Backplane Daughter Card in a PowerEdge 2800 System - hard drives
 |
View all Dell PowerEdge 2800 manuals
Add to My Manuals
Save this manual to your list of manuals |
Page 5 highlights
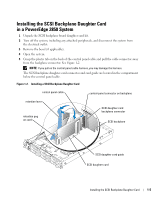
This document provides information about how to configure the split SCSI backplane in your Dell™ PowerEdge™ 2800 or 2850 system by installing a backplane daughter card. In a split backplane configuration, the hard-drives are arranged in two separate groups of drives. CAUTION: Only trained service technicians are authorized to remove the system cover and access any of the components inside the system. See your Product Information Guide for complete information about safety precautions, working inside the computer, and protecting against electrostatic discharge. NOTE: See your Installation and Troubleshooting Guide for detailed instructions on removing or replacing components. Installing the SCSI Backplane Daughter Card in a PowerEdge 2800 System 1 Remove the bezel (if applicable). 2 Unpack the SCSI backplane daughter card kit. 3 Turn off the system, including any attached peripherals, and disconnect the system from the electrical outlet. 4 Open the system. 5 Slide the drive tray to the maintenance position. a Use a #2 Phillips screwdriver to loosen the captive screw that secures the drive tray release handle to the chassis. b Rotate the drive tray release lever toward the front of the system. c Grasp both sides of the front panel and slide the drive tray forwards until the tray is in the maintenance position. 6 Hold the daughter card by its edges with the card connector facing the SCSI backplane board. 7 Insert the card connector into the daughter card connector on the SCSI backplane board. Ensure that the standoffs on the daughter card are fully seated into the SCSI backplane board. See Figure 1-1. Installing the SCSI Backplane Daughter Card 1-3
-
 1
1 -
 2
2 -
 3
3 -
 4
4 -
 5
5 -
 6
6 -
 7
7 -
 8
8 -
 9
9 -
 10
10 -
 11
11 -
12
-
13
-
14
-
15
-
16
-
17
-
18
-
19
-
20
-
21
-
22
-
23
-
24
-
25
-
26
-
27
-
28
-
29
-
30
-
31
-
32
-
33
-
34
-
35
-
36
-
37
-
38
-
39
-
40
-
41
-
42
-
43
-
44
-
45
-
46
-
47
-
48
-
49
-
50
-
51
-
52
-
53
-
54
 |
 |
