Dell PowerEdge 2950 Installing a SATA Optical Drive - Page 4
Preparing the Optical Drive Tray - PowerEdge 2970 - 2 5 sata
 |
View all Dell PowerEdge 2950 manuals
Add to My Manuals
Save this manual to your list of manuals |
Page 4 highlights
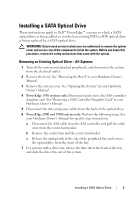
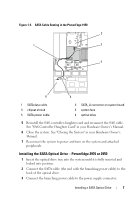
Preparing the Optical Drive Tray - PowerEdge 2970, 2950, and 1950 For PowerEdge 2970 and 2950 systems, the optical drive tray that shipped with the system is used for the SATA optical drive. If you are replacing an existing IDE optical drive, you must remove the old drive and interposer card from the drive carrier and install the new SATA drive in the same carrier. On PowerEdge 1950 systems, the existing optical drive tray must be replaced with the drive tray provided with the SATA drive installation kit. The PowerEdge 2900 and 1900 systems do not require optical drive trays. Replacing a PowerEdge 2950 or 2970 Optical Drive NOTE: If you are replacing an existing optical drive, do not reuse the interposer board attached to the old drive. 1 Pull outward on the interposer board release tab at the back of the drive tray to release the interposer board connected to the optical drive. See Figure 1-1. 2 Pull the interposer board connector from the optical drive connector and rotate the interposer board outward to detach the board from the tray. 3 Pull outward again on the interposer board release tab and simultaneously pull up on the left side of the optical drive to separate the drive from the tray. 4 Attach the SATA optical drive to the tray by lowering the right side of the drive onto the right side of the tray. See Figure 1-1. 5 Lower the left side of the drive into the tray and press the drive down to lock it into place. The pins on the carrier fit into the corresponding holes in the side of the drive. 4 Installing a SATA Optical Drive
-
 1
1 -
 2
2 -
 3
3 -
 4
4 -
 5
5 -
 6
6 -
 7
7 -
 8
8 -
 9
9 -
 10
10
 |
 |