Dell PowerEdge 350 Rack Installation Guide - Page 30
Replacing the Rack Doors, Replacing the Rack Doors on a 42-U Rack
 |
View all Dell PowerEdge 350 manuals
Add to My Manuals
Save this manual to your list of manuals |
Page 30 highlights
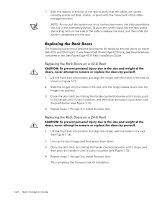
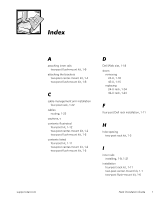
7. Slide the system in and out of the rack to verify that the cables are routed correctly and do not bind, stretch, or pinch with the movement of the cablemanagement arm. NOTE: As you pull the system out to its furthest extension, the slide assemblies will lock in the extended position. To push the system back into the rack, press the locking latch on the side of the slide to release the locks, and then slide the system completely into the rack. Replacing the Rack Doors The following subsections describe procedures for replacing the rack doors on earlier Dell 42-U and 24-U racks. If you have a Dell PowerEdge 4210 rack, see the procedures contained in the Dell PowerEdge 4210 Rack Installation Guide. Replacing the Rack Doors on a 42-U Rack CAUTION: To prevent personal injury due to the size and weight of the doors, never attempt to remove or replace the doors by yourself. 1. Lift the front door into position and align the hinges with the holes in the rack as shown in Figure 1-12. 2. Slide the hinges into the holes in the rack until the hinge release levers lock the hinges into position. 3. Close the door latch by rotating the handle counterclockwise until it stops, push in the handle until it locks in position, and then slide the button cover down over the push button (see Figure 1-11). 4. Repeat steps 1 through 3 to install the back door. Replacing the Rack Doors on a 24-U Rack CAUTION: To prevent personal injury due to the size and weight of the doors, never attempt to remove or replace the doors by yourself. 1. Lift the front door into position and align the hinges with the holes in the rack (see Figure 1-14). 2. Line up the door hinges and then press them down. 3. Close the door latch by rotating the handle counterclockwise until it stops, and then push the handle in until it locks in position (see Figure 1-13). 4. Repeat steps 1 through 3 to install the back door. This completes the four-post rack kit installation. 1-24 Rack Installation Guide
-
 1
1 -
2
-
3
-
4
-
5
-
6
-
7
-
8
-
9
-
10
-
11
-
12
-
13
-
14
-
15
-
16
-
17
-
18
-
19
-
20
-
21
-
22
-
23
-
24
-
 25
25 -
 26
26 -
 27
27 -
 28
28 -
 29
29 -
 30
30 -
 31
31 -
 32
32
 |
 |