Dell PowerEdge 4600 Removing the Back Fan Assembly
Dell PowerEdge 4600 Manual
 |
View all Dell PowerEdge 4600 manuals
Add to My Manuals
Save this manual to your list of manuals |
Dell PowerEdge 4600 manual content summary:
- Dell PowerEdge 4600 | Removing the Back Fan Assembly - Page 1
dell.com | support.dell.com CAUTION: A CAUTION indicates a potential for property damage, personal injury, or death. Removing the Back Fan Assembly CAUTION: Only trained service technicians are authorized to remove the system cover and access any of the components inside the system. See your System - Dell PowerEdge 4600 | Removing the Back Fan Assembly - Page 2
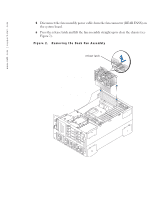
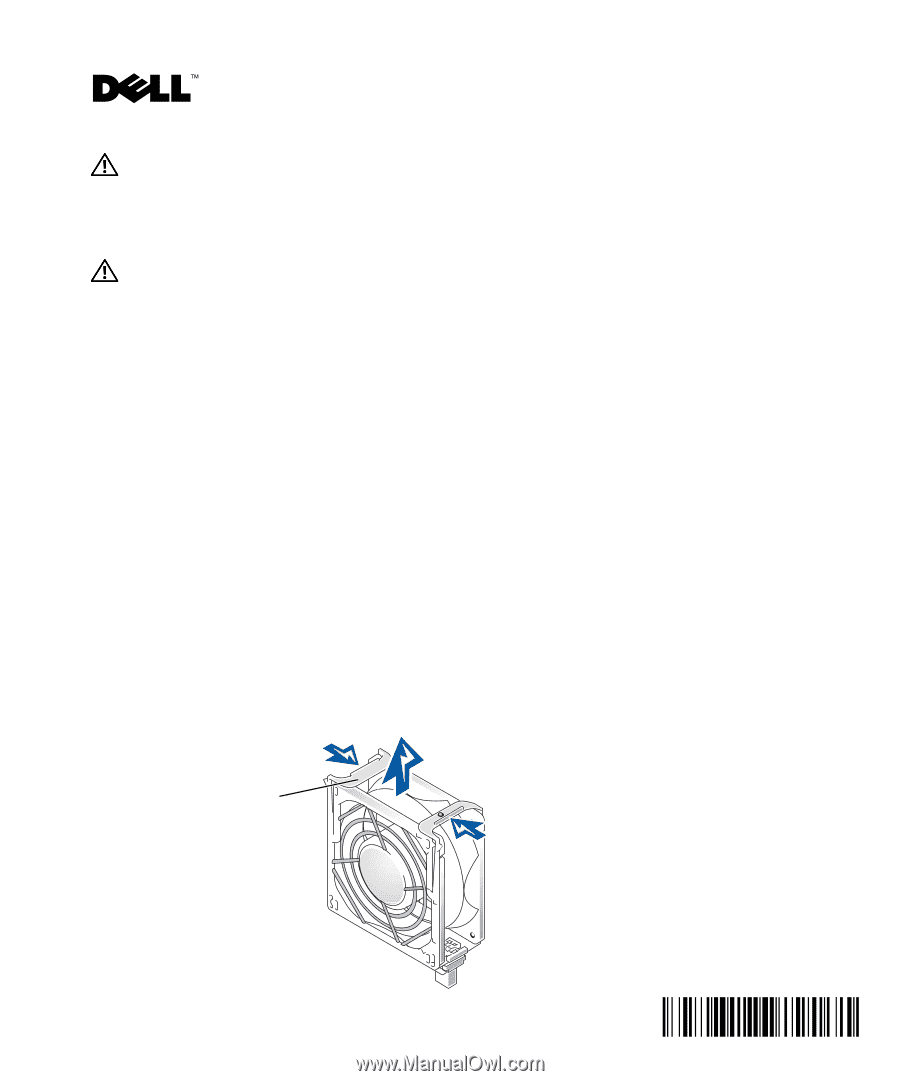
www.dell.com | support.dell.com 5 Disconnect the fan assembly power cable from the fan connector (REAR FANS) on the system board. 6 Press the release latch and lift the fan assembly straight up to clear the chassis (see Figure 2). Figure 2. Removing the Back Fan Assembly release latch - Dell PowerEdge 4600 | Removing the Back Fan Assembly - Page 3
www.dell.com | support.dell.com Replacing the Back Fan Assembly 1 Align the new fan assembly with the fan assembly guide on the back panel, and push down until the fan assembly is firmly seated and the latch is engaged (see Figure 2). 2 Connect the fan assembly power cable to the fan connector ( - Dell PowerEdge 4600 | Removing the Back Fan Assembly - Page 4
www.dell.com | support.dell.com - Dell PowerEdge 4600 | Removing the Back Fan Assembly - Page 5
www.dell.com | support.dell.com 1 2 a b c 3 4 1 图 1 释放拉杆 2003 年 4 月 - Dell PowerEdge 4600 | Removing the Back Fan Assembly - Page 6
www.dell.com | support.dell.com 5 REAR FANS 6 2 图 2 释放闩锁 - Dell PowerEdge 4600 | Removing the Back Fan Assembly - Page 7
www.dell.com | support.dell.com 1 2 2 REAR FANS) 3 1 4 5 a b c 6 2003 Dell Computer Corporation Dell Computer Corporation Dell 和 DELL 徽标是 Dell Computer Corporation Dell Computer Corporation - Dell PowerEdge 4600 | Removing the Back Fan Assembly - Page 8
www.dell.com | support.dell.com - Dell PowerEdge 4600 | Removing the Back Fan Assembly - Page 9
www.dell.com | support.dell.com ATTENTION : Le message ATTENTION indique une situation potentiellement à retirer le capot du système et à accéder aux composants du système. Reportezvous au Guide Informations sur le système pour obtenir des informations complètes sur les précautions en matière de - Dell PowerEdge 4600 | Removing the Back Fan Assembly - Page 10
www.dell.com | support.dell.com Figure 1. Retrait/Réinstallation d'un ventilateur levier de dégagement 5 Déconnectez le câble d'alimentation du ventilateur du connecteur de ventilateur (REAR FANS) sur la carte systè - Dell PowerEdge 4600 | Removing the Back Fan Assembly - Page 11
www.dell.com | support.dell.com Figure 2. Retrait du module de ventilateur arrière loquet de dégagement Réinstallation du module de ventilateur arrière 1 Alignez le nouveau module de ventilateur avec le guide du module de ventilateur du panneau arrière et exercez une pression jusqu'à ce que le - Dell PowerEdge 4600 | Removing the Back Fan Assembly - Page 12
www.dell.com | support.dell.com 3 Abaissez chaque ventilateur dans le module jusqu'à enclenchement (voir la informations fournies dans ce document sont susceptibles d'être modifiées sans préavis. © 2003 Dell Computer Corporation. Tous droits réservés. Imprimé au Etats-Unis. La reproduction de ce - Dell PowerEdge 4600 | Removing the Back Fan Assembly - Page 13
www.dell.com | support.dell.com VORSICHT: VORSICHT weist darauf hin, dass Gefahr eines Sach- am Kühlkörper. b Lösen Sie die zwei Flügelschrauben, die den Kühlkörper mit dem System verbinden. c Heben Sie den Kühlkörper von den Riser-Speicherkarten und dem Gehäuse. Weitere Informationen finden - Dell PowerEdge 4600 | Removing the Back Fan Assembly - Page 14
www.dell.com | support.dell.com Abbildung 1. Entfernen/Austauschen eines Lüfters Freigabehebel 5 Trennen Sie das Netzkabel der Lüfterbaugruppe vom Lüfteranschluss (HINTERE LÜFTER) auf der Systemplatine. 6 Drücken Sie die Sperrklinke, - Dell PowerEdge 4600 | Removing the Back Fan Assembly - Page 15
www.dell.com | support.dell.com Abbildung 2. Entfernen der hinteren Lüfterbaugruppe Sperrklinke Austauschen der hinteren Lüfterbaugruppe 1 Richten Sie die neue Lüfterbaugruppe an der entsprechenden Führung auf der Rückwand aus. Drü - Dell PowerEdge 4600 | Removing the Back Fan Assembly - Page 16
www.dell.com | support.dell.com 3 Setzen Sie alle Lüfter so in die Baugruppe ein, dass sie einrasten (siehe ausgerichtet ist. b Ziehen Sie die zwei Flügelschrauben fest, die den Kühlkörper mit dem System verbinden. c Führen Sie die Kabel wieder über die Halteklemmen zum Kühlkörper. 6 Bringen - Dell PowerEdge 4600 | Removing the Back Fan Assembly - Page 17
www.dell.com | support.dell.com 1 Installation and Troubleshooting Guide 2 a b 2 c Installation and Troubleshooting Guide 3 Installation and Troubleshooting Guide 4 4 1 2003 年 4 月 - Dell PowerEdge 4600 | Removing the Back Fan Assembly - Page 18
www.dell.com | support.dell.com 図 1 5 REAR FANS 6 2 - Dell PowerEdge 4600 | Removing the Back Fan Assembly - Page 19
www.dell.com | support.dell.com 図 2 1 (図 2 2 REAR FANS - Dell PowerEdge 4600 | Removing the Back Fan Assembly - Page 20
www.dell.com | support.dell.com 3 1 4 5 a b 2 c 6 2003 Dell Computer Corporation Printed in the U.S.A. Dell Computer Corporation Dell および DELL ロゴは Dell Computer Corporation Dell Computer Corporation - Dell PowerEdge 4600 | Removing the Back Fan Assembly - Page 21
www.dell.com | support.dell.com 1 2 a b 2 c 3 4 4 1 1 2003년 4월 - Dell PowerEdge 4600 | Removing the Back Fan Assembly - Page 22
www.dell.com | support.dell.com 5 6 (그림 2 2 - Dell PowerEdge 4600 | Removing the Back Fan Assembly - Page 23
www.dell.com | support.dell.com 1 2 참조). 2 3 1 참조). 4 5 a b 2 c 6 2003 Dell Computer Corporation Dell Computer Corporation Dell 및 DELL 로고는 Dell Computer Corporation Dell Computer Corporation - Dell PowerEdge 4600 | Removing the Back Fan Assembly - Page 24
www.dell.com | support.dell.com - Dell PowerEdge 4600 | Removing the Back Fan Assembly - Page 25
www.dell.com | support.dell.com PRECAUCIÓN: Un mensaje de PRECAUCIÓN indica la posibilidad de que el equipo resulte averiado, de sufrir lesiones personales o incluso la muerte. Extracción del conjunto - Dell PowerEdge 4600 | Removing the Back Fan Assembly - Page 26
www.dell.com | support.dell.com Figura 1. Extracción o sustitución de un ventilador palanca de liberación 5 Desconecte el cable de alimentación del conjunto de ventiladores del conector del ventilador (REAR FANS) - Dell PowerEdge 4600 | Removing the Back Fan Assembly - Page 27
www.dell.com | support.dell.com Figura 2. Extracción del conjunto de ventiladores posteriores pestillo de liberación - Dell PowerEdge 4600 | Removing the Back Fan Assembly - Page 28
www.dell.com | support.dell.com Sustitución del conjunto de ventiladores posteriores 1 Alinee el . La información de este documento está sujeta a modificaciones sin previo aviso. © 2003 Dell Computer Corporation. Reservados todos los derechos. Impreso en EE.UU. Queda prohibida su reproducción
-
 1
1 -
 2
2 -
 3
3 -
 4
4 -
 5
5 -
 6
6 -
 7
7 -
8
-
9
-
10
-
11
-
12
-
13
-
14
-
15
-
16
-
17
-
18
-
19
-
20
-
21
-
22
-
23
-
24
-
25
-
26
-
27
-
28
 |
 |
www.dell.com | support.dell.com
0C1553A01
CAUTION: A CAUTION indicates a potential for property damage, personal
injury, or death.
Removing the Back Fan Assembly
CAUTION: Only trained service technicians are authorized to remove the system
cover and access any of the components inside the system. See your
System
Information Guide
for complete information about safety precautions, working
inside the computer, and protecting against electrostatic discharge.
1
Remove the system cover.
See your
Installation and Troubleshooting Guide
for detailed information.
2
Remove the cooling shroud.
a
Remove the cables from the cooling shroud's retaining clips.
b
Loosen the two thumbscrews securing the cooling shroud to the system.
c
Lift the cooling shroud up to clear the memory riser cards and the chassis.
See your
Installation and Troubleshooting Guide
for detailed information.
3
Remove the memory riser cards by grasping each card by the extractor tabs, located on
the top corners of the card, and lifting it straight up to clear the chassis.
See your
Installation and Troubleshooting Guide
for detailed information.
4
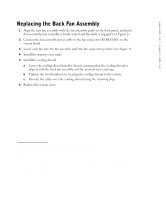
Remove the four fans by squeezing the fan release levers and lifting each fan straight
up to clear the fan assembly (see Figure 1).
Figure 1.
Removing/Replacing a Fan
release lever
April 2003