Dell PowerEdge C6300 Dell PowerEdge C6320 Getting Started With Your System - Page 11
Optional-Connecting the Keyboard, Mouse, and Monitor
 |
View all Dell PowerEdge C6300 manuals
Add to My Manuals
Save this manual to your list of manuals |
Page 11 highlights
Optional-Connecting the Keyboard, Mouse, and Monitor Figure 5. Optional-Connecting the Keyboard, Mouse and Monitor Connect the keyboard, mouse, and monitor (optional). The connectors on the back of your system have icons indicating which cable to plug into each connector. Be sure to tighten the screws (if any) on the monitor's cable connector. NOTE: Note that the system supports only one USB port and a micro USB port. If you require more than one USB outlet at a time, use USB Hub or Adapter Cable. Getting Started With Your System | 11
-
 1
1 -
2
-
3
-
4
-
5
-
 6
6 -
 7
7 -
 8
8 -
 9
9 -
 10
10 -
 11
11 -
 12
12 -
 13
13 -
 14
14 -
 15
15 -
 16
16 -
17
-
18
-
19
-
20
-
21
-
22
-
23
-
24
-
25
-
26
-
27
-
28
-
29
-
30
-
31
-
32
-
33
-
34
-
35
-
36
-
37
-
38
-
39
-
40
-
41
-
42
-
43
-
44
-
45
-
46
-
47
-
48
-
49
-
50
-
51
-
52
-
53
-
54
-
55
-
56
-
57
-
58
-
59
-
60
-
61
-
62
-
63
-
64
-
65
-
66
-
67
-
68
-
69
-
70
-
71
-
72
-
73
-
74
 |
 |

Getting Started With Your System
|
11
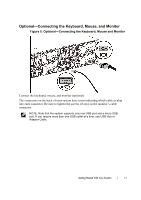
Optional—Connecting the Keyboard, Mouse, and Monitor
Figure 5. Optional—Connecting the Keyboard, Mouse and Monitor
Connect the keyboard, mouse, and monitor (optional).
The connectors on the back of your system have icons indicating which cable to plug
into each connector. Be sure to tighten the screws (if any) on the monitor’s cable
connector.
NOTE: Note that the system supports only one USB port and a micro USB
port. If you require more than one USB outlet at a time, use USB Hub or
Adapter Cable.