Dell PowerEdge R760XA Secured Component Verification Version 1.5 1.5.1 1.6 1.7 - Page 11
Secured Component Verification on WinPE, Creating an ISO image to run SCV using WinPE
 |
View all Dell PowerEdge R760XA manuals
Add to My Manuals
Save this manual to your list of manuals |
Page 11 highlights
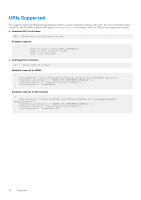
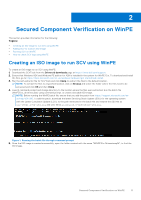
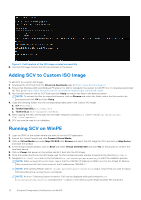
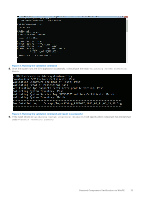
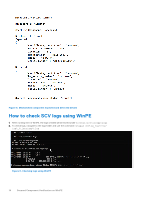
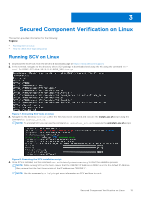
2 Secured Component Verification on WinPE This section provides information for the following: Topics: • Creating an ISO image to run SCV using WinPE • Adding SCV to Custom ISO Image • Running SCV on WinPE • How to check SCV logs using WinPE Creating an ISO image to run SCV using WinPE To create an ISO image to run SCV using WinPE: 1. Download the SCVTools from the Drivers & downloads page at https://www.dell.com/support. 2. Ensure that Windows ADK and Windows PE add-on for ADK is installed in the system for WinPE 10.x. To download and install the files, go to https://docs.microsoft.com/en-us/windows-hardware/get-started/adk-install. 3. Run the self-extractor file for SCVTools and click Unzip to extract the files to the default location. NOTE: To extract the files to a specified location, click on Browse and select the folder where the files need to be extracted and click OK and then Unzip. 4. Launch command prompt and change directory to the location where the files were extracted. Run the batch file (WinPE10.x_driverinst.bat) using command prompt to create a bootable ISO image. NOTE: Before running the WinPE batch file, ensure that you add the patch from https://support.microsoft.com/enus/help/5017380. To add the patch, download the latest Servicing Stack Update (SSU) for the operating system with the Latest Cumulative Update (LCU), to the path mentioned in the batch file and rename the SSU file as ssu-19041.1704-x64.msu and LCU file as windows10.0-kb5018410-x64.msu. Figure 1. Running the batch file through command prompt 5. Once the ISO image is created successfully, open the folder created with the name "WINPE10.x-%timestamp%", to find the ISO image. Secured Component Verification on WinPE 11
-
 1
1 -
2
-
3
-
4
-
5
-
 6
6 -
 7
7 -
 8
8 -
 9
9 -
 10
10 -
 11
11 -
 12
12 -
 13
13 -
 14
14 -
 15
15 -
 16
16 -
17
-
18
-
19
-
20
-
21
-
22
-
23
-
24
-
25
-
26
-
27
-
28
-
29
-
30
-
31
 |
 |
