Dell PowerEdge R905 Installation Instructions AMD™ Opteron™ - Page 1
Dell PowerEdge R905 Manual
 |
View all Dell PowerEdge R905 manuals
Add to My Manuals
Save this manual to your list of manuals |
Page 1 highlights
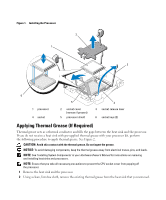
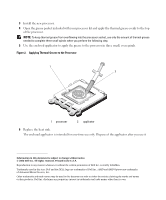
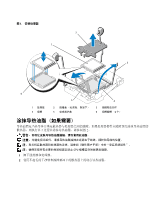
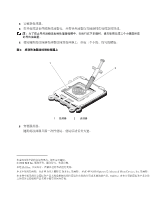
About Cautions CAUTION: A CAUTION indicates a potential for property damage, personal injury, or death. Installation Instructions AMD™ Opteron™ 2000 and 8000 Series Processors CAUTION: Any installation that requires removal of the system cover is intended solely to be performed by trained service technicians. See your Product Information Guide for complete information about safety precautions, working inside the computer, and protecting against electrostatic discharge. NOTICE: When installing or removing a processor, follow these guidelines to avoid damaging the pins in the processor socket. Bending the pins can permanently damage the socket and system board. For complete installation and removal procedures, see "Installing System Components" in the system Hardware Owner's Manual. NOTE: Ensure that the system board is installed in the chassis before installing the DIMMs or the processor. • Note the position of the socket keys. Positioning the processor incorrectly can permanently damage the system board or the processor when you turn the system on. See Figure 1. • Do not use force to seat the processor. When the processor is positioned correctly, it fits easily into the socket. • Never press on the processor shield or the processor surface when closing the release lever. Opening the Processor Socket Lever When removing or installing the processor, be sure to position your finger or thumb firmly on the socket release lever and control the lever when releasing it so that the lever does not spring up suddenly. The lever locks down the processor with considerable force to ensure a good socket connection. Releasing the lever without control can cause the lever to spring up suddenly and forcefully. November 2006
-
 1
1 -
 2
2 -
 3
3 -
 4
4 -
 5
5 -
 6
6 -
 7
7 -
8
-
9
-
10
-
11
-
12
-
13
-
14
-
15
-
16
-
17
-
18
-
19
-
20
-
21
 |
 |
