Dell PowerEdge R920 Dell PowerEdge R920 Getting Started Guide - Page 3
Installation And Configuration, Unpacking A Rack System, Optional—Connecting The Keyboard, Mouse
 |
View all Dell PowerEdge R920 manuals
Add to My Manuals
Save this manual to your list of manuals |
Page 3 highlights
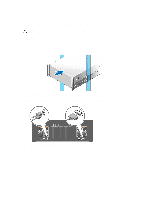
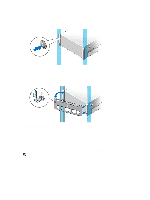
Installation And Configuration WARNING: Before performing the following procedure, review the safety instructions that came with the system. Unpacking A Rack System Unpack your system and identify each item. Assemble the rails and install the system in the rack following the safety instructions and the rack installation instructions provided with your system. Figure 1. Installing the Rails and System in a Rack Optional-Connecting The Keyboard, Mouse, And Monitor Figure 2. Optional-Connecting Keyboard, Mouse, and Monitor Connect the keyboard, mouse, and monitor (optional). The connectors on the back of your system have icons indicating the type of cable to be plugged into each connector. Be sure to tighten the screws (if any) on the monitor's cable connector. 3
-
 1
1 -
 2
2 -
 3
3 -
 4
4 -
 5
5 -
 6
6 -
 7
7 -
 8
8 -
 9
9
 |
 |
