Dell PowerVault 132T LTO Upgrading to LTO-3 Tape Drive Modules - Page 5
Installing Drives, for details on how to enable this feature. - tape library
 |
View all Dell PowerVault 132T LTO manuals
Add to My Manuals
Save this manual to your list of manuals |
Page 5 highlights
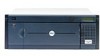
This document provides information about upgrading the Dell™ PowerVault™ 132T tape library from LTO-1 or LTO-2 tape drives to LTO-3 tape drives. You must perform the following procedures: • Install drives • Update the tape library firmware • Configure the tape library (native Fibre Channel drives only) Installing Drives LTO-3 tape drives for the PV132T tape library are offered as SCSI drives or native Fibre Channel (FC) drives. Configuration options will vary depending on the type of LTO-3 drive you have. • SCSI drives - An LTO-3 tape drive may co-exist with an LTO-1 or LTO-2 tape drive in the PV132T if the logical unit number (LUN) partitioning feature is enabled. See the system documentation on support.dell.com for details on how to enable this feature. • Native FC drives - These drives cannot be placed in the same library with SCSI drives; therefore, when upgrading to a native FC LTO-3 drive, all existing LTO-1 or LTO-2 drives must be removed from the tape library. NOTE: If you are installing only one drive module in the library, that module must be in the centermost drive bay. In addition, if partitioning was previously enabled, it must be disabled before replacing the drive. CAUTION: Before performing this procedure, read and follow the safety instructions in your Product Information Guide. To install drive modules, perform the following steps: 1 Turn off the tape library and disconnect the power cable. 2 Disconnect the SCSI cable that connects the tape library to the host system. 3 On the back of the library, remove the cover plate (see Figure 1-1) or the drive module that you want to replace by loosening the thumbscrews. NOTE: If you remove the cover plate, store it in a convenient place. The cover plate is required for proper operation and cooling of the library if the optional drive is removed. Upgrading to LTO-3 Tape Drive Modules 3
-
 1
1 -
 2
2 -
 3
3 -
 4
4 -
 5
5 -
 6
6 -
 7
7 -
 8
8 -
 9
9 -
 10
10 -
 11
11 -
12
-
13
-
14
-
15
-
16
-
17
-
18
-
19
-
20
-
21
-
22
-
23
-
24
-
25
-
26
-
27
-
28
-
29
-
30
-
31
-
32
-
33
-
34
-
35
-
36
-
37
-
38
-
39
-
40
-
41
-
42
-
43
-
44
-
45
-
46
-
47
-
48
-
49
-
50
-
51
-
52
-
53
-
54
-
55
-
56
-
57
-
58
 |
 |
