Dell PowerVault 210S Dell PowerVault Storage Systems Lock Bar Replacement - Page 7
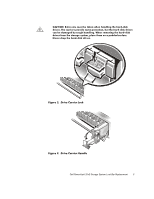
wrap some fabric or paper over the lock bar. Then grasp the wrapped - hard drives
 |
View all Dell PowerVault 210S manuals
Add to My Manuals
Save this manual to your list of manuals |
Page 7 highlights
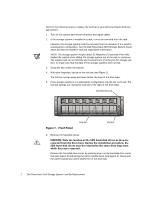
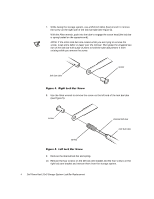
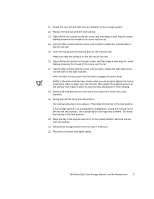
11. Attach the new left and right lock arm brackets to the storage system. 12. Replace the lock bar with the new lock bar. 13. Clean off the old Loctite on the left screw, and then place a new drop of Loctite halfway between the thread of the screw and the tip. 14. Use the Allen wrench and the screw with Loctite to attach the lock bar tube to the left lock arm. 15. Insert the spring and internal lock bar into the lock bar tube. Make sure that the spring is on the left end of the tube. 16. Clean off the old Loctite on the right screw, and then place a new drop of Loctite halfway between the thread of the screw and the tip. 17. Use the Allen wrench and the screw with Loctite to attach the right side of the lock bar tube to the right lock arm. With the Allen wrench, push into the tube to engage the screw head. NOTE: If the entire lock bar tube rotates while you are trying to tighten the screw, wrap some fabric or paper over the lock bar. Then grasp the wrapped section of the lock bar with a pair of pliers to hold the tube and prevent it from rotating. 18. Reinstall all hard-disk drives in the same drive bays from which they were removed. 19. Swing the lock bar up to the lock position. The lock bar slips down into a detent. This holds the lock bar in the lock position. If the storage system is in a stand-alone configuration, swing the lock bar to the left into the lock position. The lock bar slips to the right into a detent. This holds the lock bar in the lock position. 20. Place the key in the keylock and turn it to the locked position. Remove the key from the keylock. 21. Reinstall the storage system into the rack or enclosure. 22. Reconnect all power and signal cables. Dell PowerVault 20xS Storage System Lock Bar Replacement 5
-
 1
1 -
 2
2 -
 3
3 -
 4
4 -
 5
5 -
 6
6 -
 7
7 -
 8
8 -
 9
9
 |
 |
