Dell PowerVault 210S Dell PowerVault 200S and 210S Storage Systems Rack I - Page 22
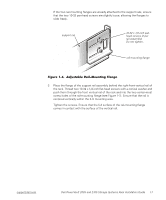
the rack. Ensure that the rail is level from front to back.
 |
View all Dell PowerVault 210S manuals
Add to My Manuals
Save this manual to your list of manuals |
Page 22 highlights
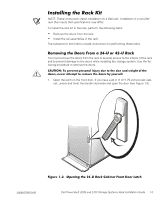
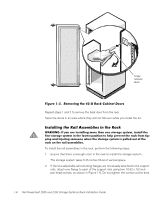
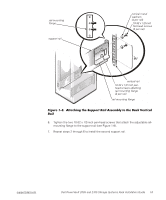
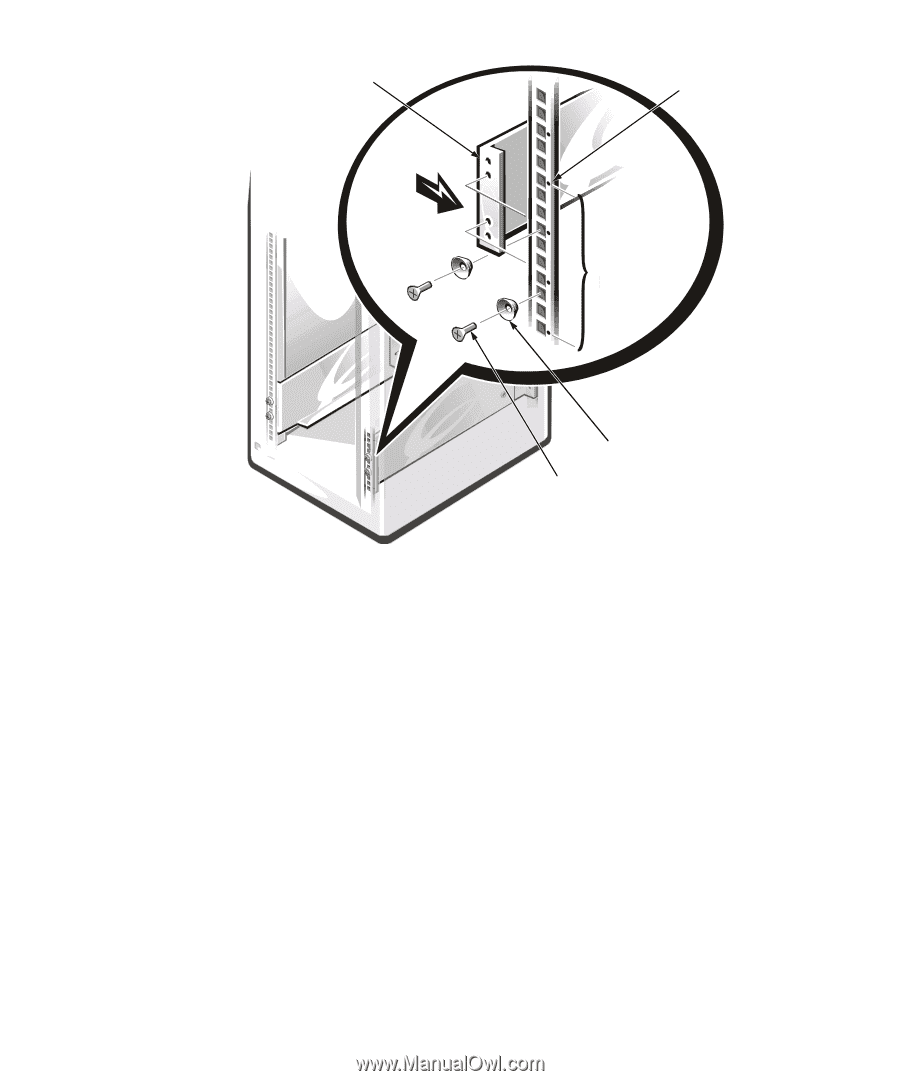
rail-mounting flange vertical rail 3U conical metal washers (4 per rail) 10-32 x 1/2-inch flat-head screws (4 per rail) 4. Slide the adjustable rail-mounting flange out until it meets the back vertical rail of the rack. Ensure that the rail is level from front to back. 5. Thread two 10-32 x 1/2-inch flat-head screws with a conical metal washer and push them through the back vertical rail of the rack and into the two holes of the adjustable rail-mounting flange (see Figure 1-8). Tighten the two screws. 1-8 Dell PowerVault 200S and 210S Storage Systems Rack Installation Guide
-
 1
1 -
2
-
3
-
4
-
5
-
6
-
7
-
8
-
9
-
10
-
11
-
12
-
13
-
14
-
15
-
16
-
 17
17 -
 18
18 -
 19
19 -
 20
20 -
 21
21 -
 22
22 -
 23
23 -
 24
24 -
 25
25 -
 26
26
 |
 |
1-8
Dell PowerVault 200S and 210S Storage Systems Rack Installation Guide
±²³´µ¶·¸¹(º··#ÀÀ¼½È²Ã³·Àȶ·)´ÇǵÀ·»¼²&·#ÄĶÏË&*·À·Àȶ·±µÂÃÀ·+¶µÀ²½¼&·
»¼²&·
4.
Slide the adjustable rail-mounting flange out until it meets the back vertical rail of
the rack. Ensure that the rail is level from front to back.
5.
Thread two 10-32 x 1/2-inch flat-head screws with a conical metal washer and
push them through the back vertical rail of the rack and into the two holes of the
adjustable rail-mounting flange (see Figure 1-8). Tighten the two screws.
rail-mounting flange
vertical rail
conical metal washers
(4 per rail)
10-32 x 1/2-inch flat-head
screws (4 per rail)
3U