Dell Precision 530 Memory Riser Board Replacement - Page 14
the shroud snap securely into place., Close the computer cover. - memory
 |
View all Dell Precision 530 manuals
Add to My Manuals
Save this manual to your list of manuals |
Page 14 highlights
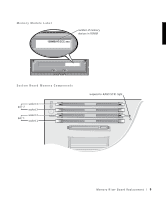
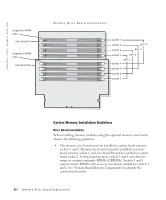
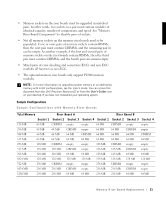
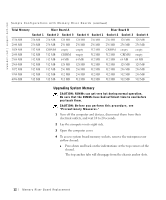
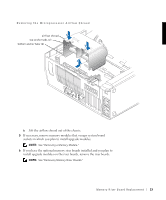
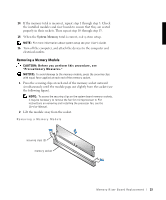
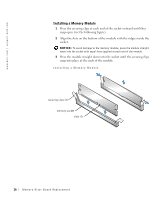
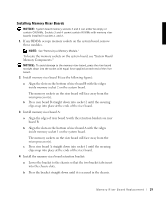
w w w.d el l.co m | su p po rt. d ell. com 7 Install the upgrade modules in system board or riser board sockets. NOTE: See "System Memory Installation Guidelines." NOTE: Without the optional memory riser boards installed, the computer supports a maximum of 64 memory devices on all installed RIMMs. With the memory riser boards installed, the computer supports up to 128 memory devices (64 devices on each riser board). See "Memory Module Label" for the location of the label on the RIMM that identifies the number of memory devices it contains. You can also determine the number of memory devices installed through the System Memory option in system setup. 8 If you removed the memory riser boards, install the riser boards. NOTE: See "Installing Memory Riser Boards." 9 Install the airflow shroud: a Insert the bottom anchor tabs of the shroud into the chassis anchor slots. b Press the shroud toward the chassis until the top anchor tabs on the shroud snap securely into place. 10 Close the computer cover. 11 Stand the computer upright. 12 Reconnect the computer to the electrical outlet, and turn it on. NOTE: If enabled, the Chassis Intrusion option will cause the following message to be displayed at the next system start-up: ALERT! Cover was previously removed. The computer detects that the new memory does not match the existing system configuration information and generates the following message: The amount of system memory has changed. Strike the F1 key to continue, F2 to run the setup utility 13 Enter system setup, and check the value for System Memory. The computer should have already changed the value of System Memory to reflect the newly installed memory. If the new total is correct, skip to step 16. 14 M em o r y Ri s e r B o a rd Rep l a c em e n t
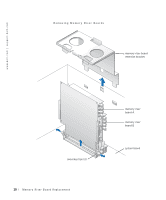
-
 1
1 -
2
-
3
-
4
-
5
-
6
-
7
-
8
-
 9
9 -
 10
10 -
 11
11 -
 12
12 -
 13
13 -
 14
14 -
 15
15 -
 16
16 -
 17
17 -
 18
18 -
 19
19 -
20
-
21
-
22
-
23
-
24
-
25
-
26
-
27
-
28
-
29
-
30
-
31
-
32
-
33
-
34
-
35
-
36
-
37
-
38
-
39
-
40
-
41
-
42
-
43
-
44
-
45
-
46
-
47
-
48
-
49
-
50
-
51
-
52
-
53
-
54
-
55
-
56
-
57
-
58
-
59
-
60
-
61
-
62
-
63
-
64
-
65
-
66
-
67
-
68
-
69
-
70
-
71
-
72
-
73
-
74
-
75
-
76
-
77
-
78
-
79
-
80
-
81
-
82
-
83
-
84
-
85
-
86
-
87
 |
 |
