Dell QLA2200 User Guide - Page 14
Installing the QLA2xxx Boards
 |
View all Dell QLA2200 manuals
Add to My Manuals
Save this manual to your list of manuals |
Page 14 highlights
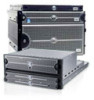
4. Place the QLA2xxx board into the slot. Carefully press the board into the slot until it seats firmly. NOTE: QLA2xxx boards are designed with the components on the opposite side compared with non-PCI boards. Figure 2-4. Installing the QLA2xxx Boards 5. Secure the QLA2xxx board with the slot cover screw. 6. Carefully reinstall the computer cover. Insert and tighten the computer cover screws. 2-4 QLA2xxx User's Guide
-
 1
1 -
2
-
3
-
4
-
5
-
6
-
7
-
8
-
 9
9 -
 10
10 -
 11
11 -
 12
12 -
 13
13 -
 14
14 -
 15
15 -
 16
16 -
 17
17 -
 18
18 -
 19
19 -
20
-
21
-
22
-
23
-
24
-
25
-
26
-
27
-
28
-
29
-
30
-
31
-
32
-
33
 |
 |

2-4
QLA2xxx User’s Guide
4.
Place the QLA2
xxx
board into the slot. Carefully press the board into the slot until it seats
firmly.
NOTE: QLA2xxx boards are designed with the components on the opposite side compared with
non-PCI boards.
5.
Secure the QLA2
xxx
board with the slot cover screw.
6.
Carefully reinstall the computer cover. Insert and tighten the computer cover screws.
Figure 2-4.
Installing the QLA2xxx Boards