Dell Studio One 19 1909 Studio One 19 Setup Guide - Page 19
Locating the Service Tag, Using the Optical Disc Drive
 |
View all Dell Studio One 19 1909 manuals
Add to My Manuals
Save this manual to your list of manuals |
Page 19 highlights
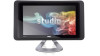
Locating the Service Tag Using Your Studio One Using the Optical Disc Drive 1 1 Service Tag Gently tilt the display upwards to reveal the Service Tag. Insert the disc, with the label facing outwards and gently push the disc into the slot. The drive will automatically pull the disc in and begin reading its content. To eject a disc from the drive, gently touch the eject control. 17
-
 1
1 -
2
-
3
-
4
-
5
-
6
-
7
-
8
-
9
-
10
-
11
-
12
-
13
-
 14
14 -
 15
15 -
 16
16 -
 17
17 -
 18
18 -
 19
19 -
 20
20 -
 21
21 -
 22
22 -
 23
23 -
 24
24 -
25
-
26
-
27
-
28
-
29
-
30
-
31
-
32
-
33
-
34
-
35
-
36
-
37
-
38
-
39
-
40
-
41
-
42
-
43
-
44
-
45
-
46
-
47
-
48
-
49
-
50
-
51
-
52
-
53
-
54
-
55
-
56
-
57
-
58
-
59
-
60
-
61
-
62
 |
 |

17
Using Your Studio One
Locating the Service Tag
1
1
Service Tag
Gently tilt the display upwards to reveal the
Service Tag.
Using the Optical Disc Drive
Insert the disc, with the label facing outwards
and gently push the disc into the slot. The drive
will automatically pull the disc in and begin
reading its content. To eject a disc from the
drive, gently touch the eject control.