Dell V505 All In One Inkjet Printer Setup Guide - Page 1
Dell V505 All In One Inkjet Printer Manual
 |
View all Dell V505 All In One Inkjet Printer manuals
Add to My Manuals
Save this manual to your list of manuals |
Page 1 highlights
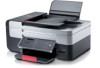
Setting Up Your Printer | | CAUTION: Before you set up and operate your Dell™ printer, see the safety instructions in your printer Product Information Guide. Also, see your User's Guide for a complete list of features. 1 Unpack your printer, and remove all tape and packaging material from the printer. (USB cable sold separately.) 2 Use the orange tape to raise the operator panel until it snaps into place. Remove, and then discard the tape. 3 Raise the paper support, extend the paper tray, and then raise the paper stop. 4 Load plain paper in the paper support, and adjust the paper guide. 5 To send and receive faxes, connect an active telephone line into the FAX connector ( ). If you are using a DSL modem for your computer, your must install a DSL filter. Contact your DSL provider for assistance. Back Cancel x Fi Start &@$ ABC DEF 1 2 3 GHI 4 JKL 5 MNO 6 ,Pause DELL V505 PQRS TUV WXYZ 7 8 9 * 0 # 6 Connect the power cord to the power supply on the back of your printer, and then connect the power cord to the wall. 7 Press the Power button on the operator panel to turn on your printer. Back Cancel x Fi Start &@$ ABC DEF 1 2 3 DELL V505 GHI 4 JKL 5 MNO 6 ,Pause PQRS TUV WXYZ 7 8 9 * 0 # 8 Use the arrow buttons and the keypad to specify your language, country, date, time, fax number, and fax name. Press the Select button to save each setting. If you need to reset the language, hold the Back and Start buttons while turning the power on. () , , , , . () . . . () . . 9 Open the printer unit. The ink cartridge carrier moves to the center. Remove the tape from both carriers. 10 Remove the tape from the ink cartridges, and then install them (black or photo on the left and color on the right). 0GY346A00 www.dell.com | support.dell.com
-
 1
1 -
 2
2
 |
 |
