Dell Wyse 3030 LT Deploying Windows 10 IoT and Windows Embedded Standard Secur - Page 9
Install the OSComponentCleanup add-on using Wyse Management Suite, Important notes
 |
View all Dell Wyse 3030 LT manuals
Add to My Manuals
Save this manual to your list of manuals |
Page 9 highlights
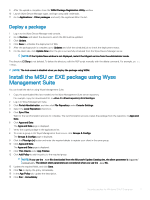
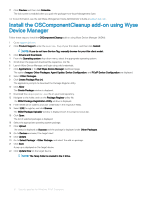
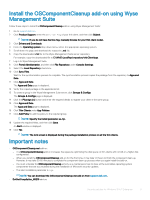
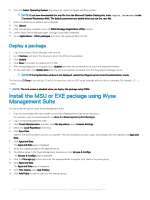
Install the OSComponentCleanup add-on using Wyse Management Suite Follow these steps to install the OSComponentCleanup add-on using Wyse Management Suite: 1 Go to support.dell.com. 2 Click Product Support, enter the Service Tag of your thin client, and then click Submit. NOTE: If you do not have Service Tag, manually browse for your thin client model. 3 Click Drivers and Downloads. 4 From the Operating system drop-down menu, select the appropriate operating system. 5 Scroll down the page and download the respective .msi file. 6 Copy the downloaded .msi file to the Wyse Management Suite server repository. For example, copy the downloaded file to C:\WMS\LocalRepo\repository\thinClientApps. 7 Log in to Wyse Management Suite. 8 Click Portal Administration, and then click File Repository under Console Settings. 9 Select the Local Repository check box. 10 Click Sync Files. Wait for the synchronization process to complete. The synchronization process copies the package from the repository to Apps and Data. 11 Click Apps and Data. The Apps and Data page is displayed. 12 Verify the copied package in the applications list. 13 To create a group in the Wyse Management Suite server, click Groups & Configs. The Groups & Configs page is displayed. 14 Click the Plus sign (+) button and enter the required details to register your client in the same group. 15 Click Apps and Data. The Apps and Data page is displayed. 16 Click Thin Clients under App Policies. 17 Click Add Policy to add the policy to the required group. NOTE: Specify the install parameter as /qn. 18 Update the required fields, and then click Save. An Alert window is displayed. 19 Click Yes. NOTE: The lock screen is displayed during the package installation process on all the thin clients. Important notes • OSComponentCleanup.msi add-on: - The OSComponentCleanup add-on increases free space by optimizing the disk space on thin clients with 32 GB or a higher disk configuration. - When you install the OSComponentCleanup add-on for the first time, it may take 1-3 hours to finish the component clean-up. However, it may take 30-60 minutes to complete the component clean-up process when you again install the add-on. - You must schedule the OSComponentCleanup activity as a maintenance task to clear all the overridden operating system components that are accumulated during the installation of Microsoft security updates. - The silent installation parameter is /qn. NOTE: You can download the OSComponentCleanup.msi add-on from support.dell.com. • DotNetCompilation_WIE10 add-on: Security patches for Windows 10 IoT Enterprise 9
-
 1
1 -
2
-
3
-
 4
4 -
 5
5 -
 6
6 -
 7
7 -
 8
8 -
 9
9 -
 10
10 -
 11
11 -
 12
12 -
 13
13
 |
 |
