Dell XPS 15 L501X Service Manual - Page 106
Entering the Service Tag in the BIOS
 |
View all Dell XPS 15 L501X manuals
Add to My Manuals
Save this manual to your list of manuals |
Page 106 highlights
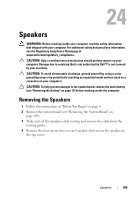
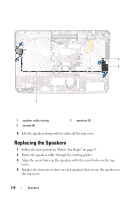
4 Connect the Bluetooth cable and AC-adapter cable to the connectors on the system board. 5 Replace the processor module (see "Replacing the Processor Module" on page 101). 6 Replace the heat sink (see "Replacing the Heat Sink" on page 96). 7 Turn the top cover over and connect the USB board cable and speaker cable to the connector on the system board. 8 Follow the instructions from step 9 to step 12 in "Replacing the Top Cover" on page 69. 9 Replace the display assembly (see "Replacing the Display Assembly" on page 52). 10 Replace the keyboard (see "Replacing the Keyboard" on page 46). 11 Replace the palm-rest assembly (see "Replacing the Palm-Rest Assembly" on page 32). 12 Replace the memory module(s) (see "Replacing the Memory Module(s)" on page 18). 13 Replace the module cover (see "Replacing the Module Cover" on page 16). 14 Replace the battery (see "Replacing the Battery" on page 14). CAUTION: Before turning on the computer, replace all screws and ensure that no stray screws remain inside the computer. Failure to do so may result in damage to the computer. 15 Turn on the computer. NOTE: After you have replaced the system board, enter the computer Service Tag into the BIOS of the replacement system board. 16 Enter the service tag (see "Entering the Service Tag in the BIOS" on page 106). Entering the Service Tag in the BIOS 1 Ensure that the AC adapter is plugged in and that the main battery is installed properly. 2 Turn on the computer. 3 Press during POST to enter the system setup program. 106 System Board
-
 1
1 -
2
-
3
-
4
-
5
-
6
-
7
-
8
-
9
-
10
-
11
-
12
-
13
-
14
-
15
-
16
-
17
-
18
-
19
-
20
-
21
-
22
-
23
-
24
-
25
-
26
-
27
-
28
-
29
-
30
-
31
-
32
-
33
-
34
-
35
-
36
-
37
-
38
-
39
-
40
-
41
-
42
-
43
-
44
-
45
-
46
-
47
-
48
-
49
-
50
-
51
-
52
-
53
-
54
-
55
-
56
-
57
-
58
-
59
-
60
-
61
-
62
-
63
-
64
-
65
-
66
-
67
-
68
-
69
-
70
-
71
-
72
-
73
-
74
-
75
-
76
-
77
-
78
-
79
-
80
-
81
-
82
-
83
-
84
-
85
-
86
-
87
-
88
-
89
-
90
-
91
-
92
-
93
-
94
-
95
-
96
-
97
-
98
-
99
-
100
-
 101
101 -
 102
102 -
 103
103 -
 104
104 -
 105
105 -
 106
106 -
 107
107 -
 108
108 -
 109
109 -
 110
110 -
 111
111 -
112
-
113
-
114
 |
 |
