Dell Z9264F-ON Open Networking Hardware Diagnostic Guide December 2021 - Page 10
BIOS settings for ONIE boot, ONIE UEFI-based installation using USB
 |
View all Dell Z9264F-ON manuals
Add to My Manuals
Save this manual to your list of manuals |
Page 10 highlights
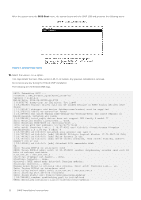
BIOS settings for ONIE boot Pre-requisites The BIOS running on your system must meet the following requirements: ● Allows a change to the boot order so the system can boot from media (USB). ● Allows a baud-rate change. This feature is optional; you do not need it if your BIOS is running at 115200 baud rate. The default baud rate for ONIE is 115200. CAUTION: ● These procedures are for x86-based targets only, particularly targets using Rangeley or Centerton CPU- based boards. ● Check the console (UART-0/1) used on the target. Connect the serial port at 115200 baud rate and check that messages display on the console. ● The log messages included in this guide are subject to change. NOTE: The following procedure is generic and does not list a particular target. Therefore, the ONIE images are specified using the _ notation. For example, the ONIE media (usb) iso image is onie-recovery-x86_64dell__-r0.iso. ONIE UEFI-based installation using USB The following steps describe how to create a bootable unified extensible firmware interface (UEFI) ONIE-based USB to install ONIE using Embed mode: To install ONIE UEFI on your system, use any existing ONIE-based system to make an ONIE UEFI-based bootable USB. To make a bootable USB, use the ONIE ISO file. 1. Boot the ONIE target in ONIE Rescue mode. Use ONIE Rescue mode to make the ONIE UEFI-bootable USB. Use the up and down arrow keys to make a selection. Press Enter to select an operating software-selected OS or enter e to edit the commands before booting. Enter c for a command line. The selected entry, displaying *, runs automatically in the operating system. GNU GRUB version 2.02~beta2+e4a1fe391 |ONIE: Install OS | |*ONIE: Rescue | |ONIE: Uninstall OS | |ONIE: Update ONIE | |ONIE: Embed ONIE | |EDA-DIAG | | | | | | | 2. Confirm that your system can reach the network. 3. Copy the ONIE ISO image to the solid-state drive (SSD) of the ONIE target. ONIE:/ # wget --quiet https://xx.xx.x.xxx/tftpboot/users//onie-recovery-x86_64dell__c2538-r0.iso To copy the image, you can use SCP, TFTP, or WGET (ftp/https). scp [email protected]:/tftpboot/onie-recovery-x86_64-dell__c2538-r0.iso . 10 ONIE installation instructions
-
 1
1 -
2
-
3
-
4
-
 5
5 -
 6
6 -
 7
7 -
 8
8 -
 9
9 -
 10
10 -
 11
11 -
 12
12 -
 13
13 -
 14
14 -
 15
15 -
16
-
17
-
18
-
19
-
20
-
21
-
22
-
23
-
24
-
25
-
26
-
27
-
28
-
29
-
30
-
31
-
32
-
33
-
34
-
35
-
36
-
37
-
38
-
39
-
40
-
41
-
42
-
43
-
44
-
45
-
46
-
47
-
48
-
49
-
50
-
51
-
52
-
53
-
54
-
55
-
56
-
57
-
58
-
59
-
60
-
61
-
62
-
63
-
64
-
65
-
66
-
67
-
68
-
69
-
70
-
71
-
72
-
73
-
74
-
75
-
76
-
77
-
78
-
79
-
80
-
81
-
82
 |
 |
