Denon AVR 2308 Owners Manual - Page 26
Preparations - no sound
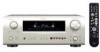 |
View all Denon AVR 2308 manuals
Add to My Manuals
Save this manual to your list of manuals |
Page 26 highlights
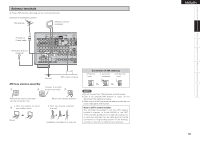
Getting Started Connections Setup Playback Remote Control Multi-Zone Information Troubleshooting ENGLISH Auto Setup Preparations 1 Connect the included setup microphone to the SETUP MIC jack on the main unit. The "Auto Setup" screen appears automatically. • This procedure lets you measure the acoustic properties of your speakers and listening room and make the optimum settings automatically. • This function provides the optimum listening environment for all listening positions in a home theater where several people view or listen to the video or audio source simultaneously. The measurements are performed by moving the setup microphone successively to the different positions where the family members sit within the listening area surrounded by the speakers, as shown in Example q. For better results, we recommend making measurements in 6 or more positions. Even if the home theater is only used by a small number of persons as shown in Example w, measuring at points around the listening position results in more effective correction. Sound receptor 2 Mount the setup microphone on a camera tripod, etc., and set it at the main listening position, with the sound receptor pointing towards the ceiling. Example q Example w ( :Measuring positions) Setup microphone b Adjust the height of the setup microphone's sound receptor so *M *M that it is at the height of the ears when listening. About the main listening position (*M) The main listening position refers to the center of the listening position, or the place where you would sit to watch or listen when alone. This position is used as the basis when measuring the distance of the speakers. To set the listening environment manually to suit your tastes, see page 26, 27. When using a subwoofer with a setting function, make the following settings before starting the auto setup procedure: • Volume: "Center" • Crossover frequency: "Maximum" • Low pass filter: "Off" • Standby mode: "Off" NOTE • Do not disconnect the setup microphone until the auto setup procedure is completed. • When using headphones, unplug the headphones before starting the auto setup procedure. 23
-
 1
1 -
2
-
3
-
4
-
5
-
6
-
7
-
8
-
9
-
10
-
11
-
12
-
13
-
14
-
15
-
16
-
17
-
18
-
19
-
20
-
 21
21 -
 22
22 -
 23
23 -
 24
24 -
 25
25 -
 26
26 -
 27
27 -
 28
28 -
 29
29 -
 30
30 -
 31
31 -
32
-
33
-
34
-
35
-
36
-
37
-
38
-
39
-
40
-
41
-
42
-
43
-
44
-
45
-
46
-
47
-
48
-
49
-
50
-
51
-
52
-
53
-
54
-
55
-
56
-
57
-
58
-
59
-
60
-
61
-
62
-
63
-
64
-
65
-
66
-
67
-
68
-
69
-
70
-
71
-
72
-
73
-
74
-
75
-
76
-
77
-
78
 |
 |
