Denon AVR 789 Owners Manual - English - Page 82
Source Control
 |
UPC - 883795000390
View all Denon AVR 789 manuals
Add to My Manuals
Save this manual to your list of manuals |
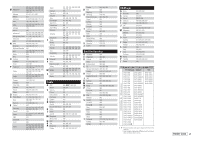
Page 82 highlights
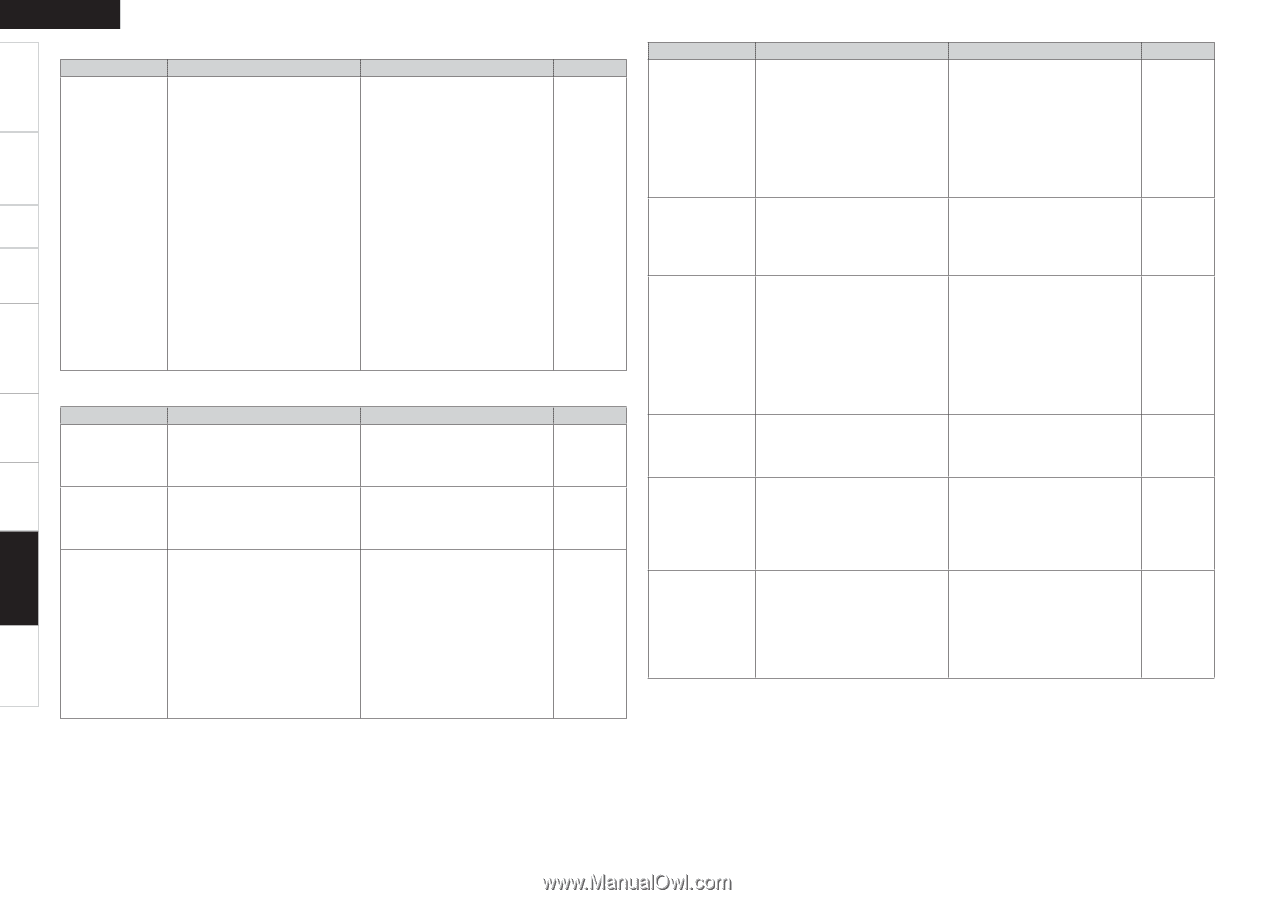
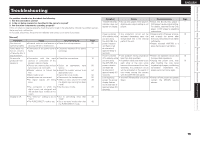
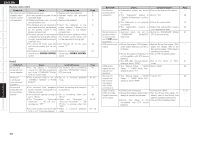
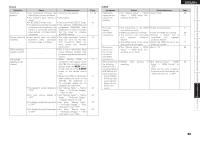
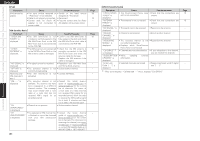
Getting Started Connections Setup Playback Remote Control Multi-zone Information Troubleshooting Specifications ENGLISH GRemote Control UnitH Symptom Cause Countermeasure Set does not work • Batteries are worn. • Replace with new batteries. properly when • You are operating outside of the • Operate within the specified remote control specified range. range. unit operated. • Obstacle between main unit and • Remove the obstacle. remote control unit. • The batteries are not inserted in • Insert the batteries in the the proper direction, as indicated proper direction, following the by the polarity marks in the polarity marks in the battery battery compartment. compartment. • The set's remote control sensor • Move the set to a place in which is exposed to strong light (direct the remote control sensor will sunlight, inverter type fluorescent not be exposed to strong light. bulb light, etc.). • The remote ID of the main unit • Set "Remote ID" for the main and remote control unit do not unit to "1". match. • Settings do not match the remote • Match the settings to the remote control unit's SOURCE CONTROL control unit's SOURCE CONTROL switch. switch. Page 3 3 3 3 3 32 61 GAudioH Symptom No sound is produced from center speaker. No sound is produced from surround speakers. No sound is produced from surround back speaker. Cause Countermeasure • You are playing a monaural • The mode is set to something source (TV, AM radio broadcast, other than "STANDARD" (Dolby/ etc.) in the "STANDARD" (Dolby/ DTS Surround). DTS Surround) mode. • The surround mode is set to • Set to a surround playback "STEREO", "DIRECT" or "PURE mode. DIRECT". Page 41 41, 42 • The surround back speaker's • Check the setting and change it power amplifier is assigned to a as necessary. different channel. • Surround back speaker setting is • Set to something other than set to "None". "None". • The "Parameter" - "Surround • Please set "Parameter" - Parameter" - "SB CH Out" "Surround Parameter" - "SB settings are "OFF". CH Out" to settings other than "OFF". • Surround mode not set to a mode • Select a surround playback for 6.1- or 7.1-channel playback. mode. 31 26 44, 45 40 ~ 42 Symptom Cause Countermeasure No sound is • Subwoofer's power not turned • Turn on the subwoofer's power. produced from on. subwoofer. • The "Subwoofer" setting at • Set to "Yes". "Speaker Configuration" is set to "No". • The subwoofer is not properly • Check the connections. connected. • The subwoofer's volume is • Adjust the subwoofer's volume turned off. to an appropriate level. No test tones are • Surround mode not set to • Set to the "STANDARD" (Dolby/ produced when "STANDARD" (Dolby/DTS DTS Surround) mode. remote control Surround). unit's TEST button is pressed. DTS sound is not • Blu-ray Disc player / DVD player's • Set the Blu-ray Disc player / DVD output. audio output setting is not set to player. For details, refer to the bitstream. Blu-ray Disc player / DVD player's operating instructions. • Blu-ray Disc player / DVD player is • Use a DTS-compatible player. not compatible with DTS sound playback. • The AVR-789's "Decode Mode" • Set to the "Auto" or "DTS" setting is set to "PCM". mode. HDMI audio • The "Manual Setup" - "HDMI • Set to "AMP". signals are not Setup" - "HDMI Audio Out" output from setting is set to "TV". speakers. No sound is • The "Manual Setup" - "HDMI • Set to "TV". output from Setup" - "HDMI Audio Out" the monitor setting is set to "AMP". connected with HDMI connections. Dolby TrueHD, • HDMI is not connected. • Connect the HDMI. DTS-HD, Dolby • Blu-ray Disc player's audio output • Set the Blu-ray Disc player. For Digital Plus audio setting is not set to bitstream. details, refer to the Blu-ray Disc is not output. player's operating instructions. • Blu-ray Disc player is not • Use a DTS-compatible player. compatible with DTS sound playback. Page - 25 10 59 41 - - 37 28 28 11, 12 - - 79
-
 1
1 -
2
-
3
-
4
-
5
-
6
-
7
-
8
-
9
-
10
-
11
-
12
-
13
-
14
-
15
-
16
-
17
-
18
-
19
-
20
-
21
-
22
-
23
-
24
-
25
-
26
-
27
-
28
-
29
-
30
-
31
-
32
-
33
-
34
-
35
-
36
-
37
-
38
-
39
-
40
-
41
-
42
-
43
-
44
-
45
-
46
-
47
-
48
-
49
-
50
-
51
-
52
-
53
-
54
-
55
-
56
-
57
-
58
-
59
-
60
-
61
-
62
-
63
-
64
-
65
-
66
-
67
-
68
-
69
-
70
-
71
-
72
-
73
-
74
-
75
-
76
-
 77
77 -
 78
78 -
 79
79 -
 80
80 -
 81
81 -
 82
82 -
 83
83 -
 84
84 -
 85
85 -
 86
86 -
 87
87 -
88
 |
 |