Denon DP 300F Owners Manual - English - Page 9
Replacing the stylus, Replacing the cartridge - dp
 |
UPC - 081757506915
View all Denon DP 300F manuals
Add to My Manuals
Save this manual to your list of manuals |
Page 9 highlights
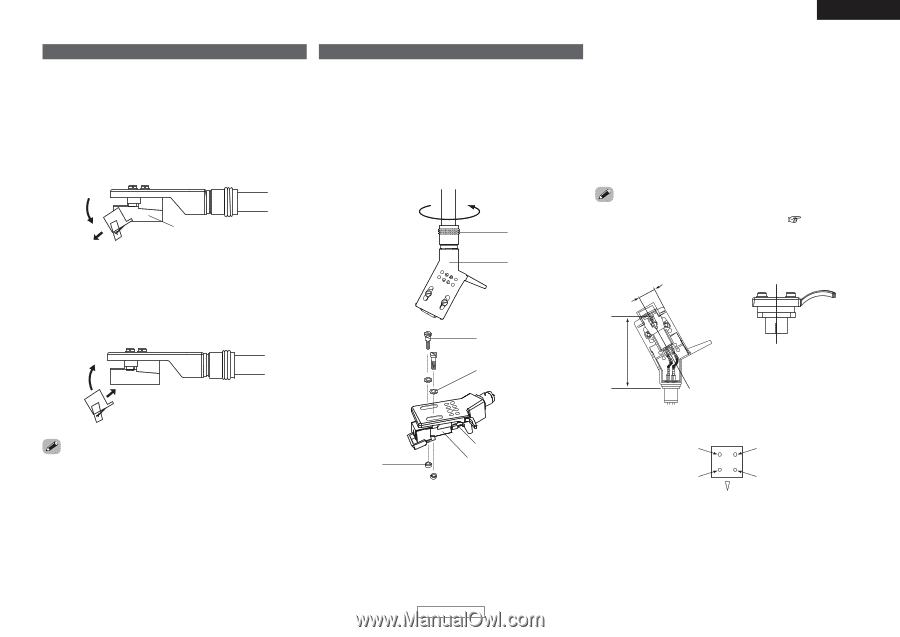
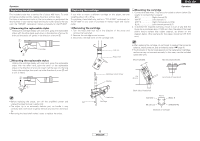
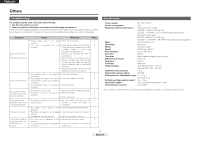
ENGLISH Operation Replacing the stylus The included stylus has a service life of about 400 hours. To avoid damaging valuable records, replace the stylus without delay. Purchase a replacement stylus at the store where you purchased the record player or your nearest repair and inquiry outlet. Specify that you want the "DSN-85" replacement stylus exclusively for the DP-300F. ¢ Removing the replaceable stylus Holding the cartridge steady with one hand, grasp the replaceable stylus with the other hand, push down in the direction of arrow q, then pull the stylus off gently in the direction of arrow w. q Replacing the cartridge If you wish to mount a different cartridge on this player, use one weighing about 4.5 to 9.5 g. To purchase a head shell only, ask for a "PCL-310BK" exclusively for the DP-300F at your store of purchase or nearest repair and inquiry outlet. ¢ Removing the cartridge 1. Turn the head shell lock nut in the direction of the arrow and remove the head shell. 2. Remove the cartridge mount screws. 3. Disconnect the lead wires on the cartridge side. Operation ¢ Mounting the cartridge 1. Connect the lead wires. They are color-coded as shown below. Be careful to connect them properly. RED Right channel (R) WHITE Left channel (L) GREEN Right channel ground (RG) BLUE Left channel ground (LG) 2. To achieve the required overhang, mount in such a way that the stylus tip is positioned about 1 ft/45 mm from the edge of the head shell's mount surface (the rubber washer), as shown on the diagram below. (The overhang for this player should be 0.75 ft/19 mm.) Cartridge w ¢ Mounting the replaceable stylus Holding the cartridge steady with one hand, grasp the replaceable stylus with the other hand, point the catch on the replaceable stylus in the direction of arrow q, insert it all the way into the long hole in the cartridge, then push up in the direction of arrow w until a click is heard. w Lock nut Head shell • After replacing the cartridge, do not forget to readjust the horizontal balance, stylus pressure, and anti-skating value ( page 3). • The thickness of the terminal depends on the replacement cartridge, and some may not connect securely. In this case, use the included spare lead wire. Mount parallel. Mount perpendicular. Cartridge mount screw Washer 1 ft/ 45 mm (Front side of head shell) q (Back side of head shell) • Before replacing the stylus, turn off the amplifier's power and Nut unplug the player's power supply cord. • The stylus tip is an extremely delicate part, so handle it very carefully. Use a soft brush to gently remove any dust from the stylus tip. • Removing the head shell makes it easy to replace the stylus. Lead wire Cartridge (WHITE) L Above (RED) R (BLUE) LG (GREEN) RG (Backside of cartridge) 6 ENGLISH
-
 1
1 -
2
-
3
-
 4
4 -
 5
5 -
 6
6 -
 7
7 -
 8
8 -
 9
9 -
 10
10 -
 11
11
 |
 |