Dewalt DC011 Instruction Manual - Page 2
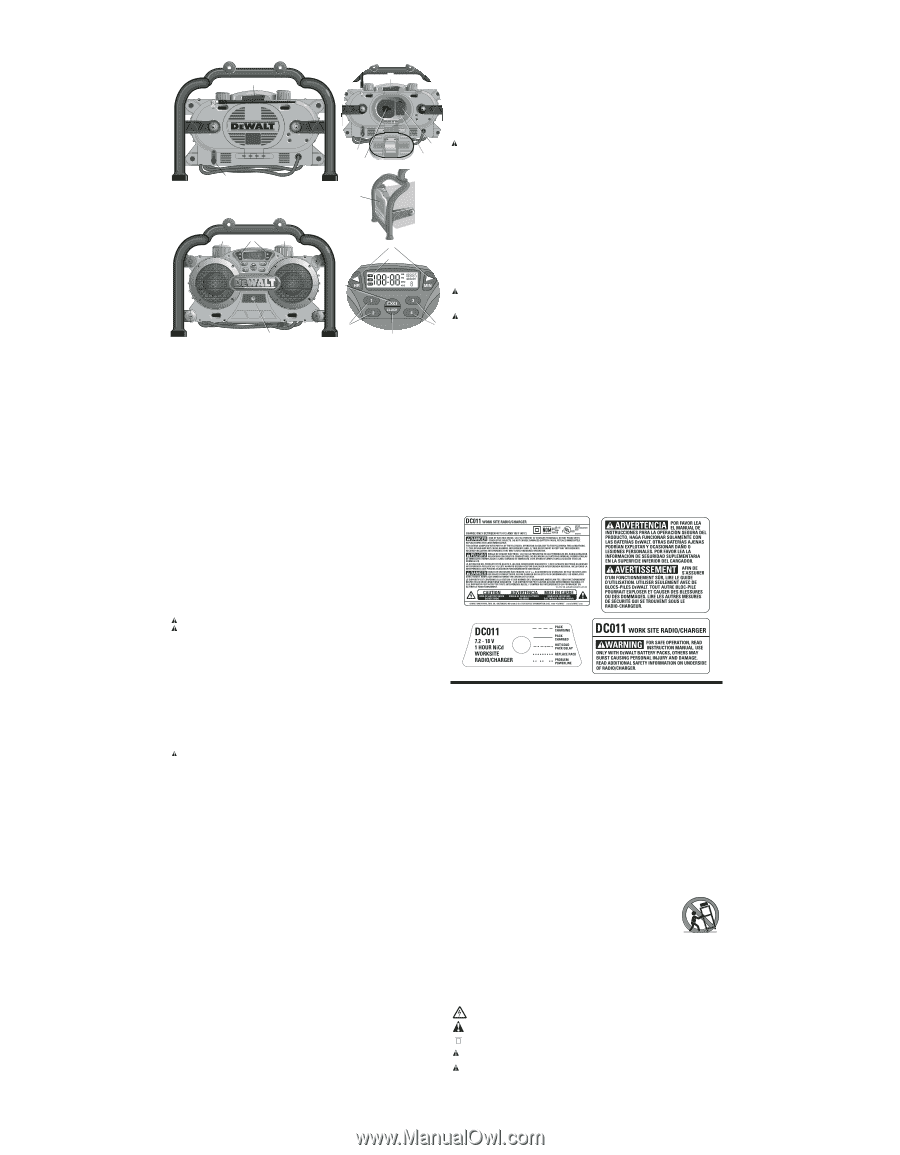
Operating The Radio Fig. 1, 2
 |
View all Dewalt DC011 manuals
Add to My Manuals
Save this manual to your list of manuals |
Page 2 highlights
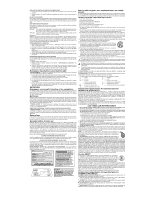
FIG 1 H H K FIG 2 A C B K I M L N C G D F F J E NOTE: A battery pack will slowly lose its charge when kept out of the radio/charger. If the battery pack has not been kept on maintenance charge, it may need to be recharged before use. A battery pack may also slowly lose its charge if left in a radio/charger that is not plugged into an appropriate AC source. WEAK BATTERY PACKS: The radio/charger can also detect a weak battery. Such batteries are still usable but should not be expected to perform as much work. In such cases, about 10 seconds after battery insertion, the radio/charger will beep rapidly 8 times to indicate a weak battery condition. The radio/charger will then go on to charge the battery to the highest capacity possible. Important Charging Notes 1. Longest life and best performance can be obtained if the battery pack is charged when the air temperature is between 65°F and 75°F (18°- 24°C). DO NOT charge the battery pack in an air temperature below +40°F (+4.5°C), or above +105°F (+40.5°C). This is important and will prevent serious damage to the battery pack. 2. The radio/charger and battery pack may become warm to touch while charging. This is a normal condition, and does not indicate a problem. To facilitate the cooling of the battery pack after use, avoid placing the radio/charger or battery pack in a warm environment such as in a metal shed, or an uninsulated trailer. 3. If the battery pack does not charge properly: a. Check current at receptacle by plugging in a lamp or other appliance. b. Check to see if receptacle is connected to a light switch which turns power off when you turn out the lights. c. Move the radio/charger and battery pack to a location where the surrounding air temperature is approximately 65°F - 75°F (18° - 24°C). d. If charging problems persist, take the tool, battery pack and radio/charger to your local service center. 4. The battery pack should be recharged when it fails to produce sufficient power on jobs which were easily done previously. DO NOT CONTINUE to use under these conditions. Follow the charging procedure. You may also charge a partially used pack whenever you desire with no adverse affect on the battery pack. 5. Under certain conditions, with the radio/charger plugged into the power supply, the exposed charging contacts inside the charger can be shorted by foreign material. Foreign materials of a conductive nature such as, but not limited to, steel wool, aluminum foil, or any buildup of metallic particles should be kept away from radio/charger cavities. Always keep the battery door closed when there is no battery pack in the cavity. Unplug radio/charger before attempting to clean. 6. Do not freeze or immerse the radio/charger in water or any other liquid. WARNING: Don't allow any liquid to get inside the radio/charger. Electric shock may result. CAUTION: Never attempt to open the battery pack for any reason. If the plastic housing of the battery pack breaks or cracks, return to a service center for recycling. COMPONENTS (FIG. 1, 2) A. Power/Volume Control B. Tuning Dial C. Arrow Buttons D. Mode Button E. Clock Button F. Memory Buttons G. LCD Display H. Battery Compartment Latch I. Charging Receptable J. Charging Light K. Auxiliary Port L. AA Battery Door M. Storage Case OPERATING THE RADIO (FIG. 1, 2) Your radio/charger is equipped with memory capacity in order to store the time and your selected memory channels. When the radio is in the OFF position, this memory capacity is powered by two (2) AA batteries that are included with the radio/charger. TO INSTALL AA BATTERIES WARNING: Do not mix batteries. When replacing batteries, replace all of them at the same time with new batteries of the same brand and type. Observe correct polarity (+ and -) when replacing batteries. Do not store or carry batteries so that metal objects can contact exposed battery terminals. 1. Turn the radio/charger off and unplug from the power source. 2. Open the battery compartment by lifting the battery compartment latch (H). 3. Unscrew the Phillips screw (N) on the AA battery door (L). 4. Press down on the battery door latch and pull to open. 5. Install the batteries according to the diagram inside the AA battery area. 6. Replace the AA battery door, insert Phillips screw and tighten. 7. Securely close the battery compartment. POWER/VOLUME ADJUSTMENT 1. To turn the radio on, turn the dial (A) clockwise until you hear a click. 2. Turn the dial (A) clockwise to increase the volume. To decrease the volume, turn counterclockwise. MODE FUNCTION To choose one of the mode functions (FM, AM, or AUX) push the mode button (D) until the desired function is found. For example, if the radio is on FM, seen in upper left portion of LCD display (G), push the mode button twice to change to AUX. TUNE OR SEEK FUNCTION There are two tuning methods and one seek method for finding the desired frequency. To Tune: Method 1: Push and hold down the right arrow button (C) to quickly move the tuner up the frequency band. Release the button when the desired channel is reached. To quickly move the tuner down the frequency band, push and hold down the left arrow button. Method 2: Turn the tuning dial (B) clockwise to move up the frequency band. Turn the tuning dial counterclockwise to move down the frequency band. To Seek: Press the right arrow button (C) once and release. The tuner frequency will increase to seek the first radio station with acceptable clarity and stop at that station. The right arrow button may be pressed again to continue seeking a radio station at higher frequencies. The left arrow button may be pressed to seek radio stations at lower frequencies. The seek function is available in AM and FM modes. TO PROGRAM THE CLOCK 1. Turn power on (see Power/Volume Adjustment). 2. Push and hold clock button (E) until the LCD display (G) begins flashing. 3. Press the appropriate arrow button (HR for hour; MIN for minute) to adjust the time. NOTE: If you do not press a button within 5 seconds, the clock programming feature will automatically return to the previous setting. 4. Once the time is set, push and hold the clock button until the time on the LCD display stops flashing. TO PROGRAM THE MEMORY BUTTONS Four FM and four AM radio stations may be independently set. After programming the buttons, pressing 1, 2, 3, or 4 will instantly change the frequency to the preset station. 1. Turn power on. 2. Set the radio to desired station (see Tune or Seek Function). 3. Press and hold one of the desired memory buttons (F). The station setting begins flashing in the LCD display (G). Continue to hold the button down until the flashing stops. The memory button is now set. 4. Repeat steps 2 and 3 to set the other memory buttons. Important Radio Notes WARNING: The storage case (M) is designed to hold up to 1 pound of material. Do not exceed 1 pound. 1. The radio will run up to 8 hours on a single battery charge using an 18 volt battery. Using batteries of lower voltage will produce less run time. 2. Reception will vary depending on location and strength of radio signal. 3. Certain generators may cause background noise. 4. AM reception will most likely be clearer when powered by a battery pack. 5. To use the auxiliary port (K), plug the output jack from a CD or cassette player into the port (Fig. 1). The sound from the external source plays through the speakers of the DC011. MAINTENANCE Service Notes This product is not user serviceable. There are no user serviceable parts inside the radio/charger. Servicing at an authorized service center is required to avoid damage to static sensitive internal components. Cleaning Many household cleaners contain chemicals which could seriously damage plastic. Also, do not use gasoline, turpentine, lacquer or paint thinner, dry cleaning fluids or similar products. Never let any liquid get inside the radio/charger; never immerse any part of the radio into a liquid. CAUTION: NEVER spray or in any other way apply lubricants or cleaning solvents inside the tool. This can seriously affect the life and performance of the tool. RADIO/CHARGER CLEANING INSTRUCTIONS WARNING: Disconnect the radio/charger from the AC outlet before cleaning. Dirt and grease may be removed from the exterior of the radio/charger using a cloth or soft non-metallic brush. Do not use water or any cleaning solutions. Repairs To assure product SAFETY and RELIABILITY, repairs, maintenance and adjustment should be performed by certified service centers or other qualified service organizations, always using identical replacement parts. Three Year Limited Warranty DEWALT will repair, without charge, any defects due to faulty materials or workmanship for three years from the date of purchase. This warranty does not cover part failure due to normal wear or tool abuse. For further detail of warranty coverage and warranty repair information, visit www.dewalt.com or call 1-800-4-DEWALT (1-800-433-9258). This warranty does not apply to accessories or damage caused where repairs have been made or attempted by others. This warranty gives you specific legal rights and you may have other rights which vary in certain states or provinces. In addition to the warranty, DEWALT tools are covered by our: 1 YEAR FREE SERVICE DEWALT will maintain the tool and replace worn parts caused by normal use, for free, any time during the first year after purchase. 90 DAY MONEY BACK GUARANTEE If you are not completely satisfied with the performance of your DEWALT Power Tool, Laser, or Nailer for any reason, you can return it within 90 days from the date of purchase with a receipt for a full refund - no questions asked. FREE WARNING LABEL REPLACEMENT: If your warning labels become illegible or are missing, call 1-800-4-DEWALT for a free replacement. SI VOUS AVEZ DES QUESTIONS OU VOUS VOULEZ NOUS FAIRE PART DE VOS COMMENTAIRES CONCERNANT CET OUTIL OU TOUT AUTRE OUTIL DEWALT, COMPOSEZ SANS FRAIS LE : 1 800 433-9258 Poste radio/chargeur de chantier à service intensif DC011 Le poste radio/chargeur de chantier à service intensif DC011 est une combinaison radio AM/FM et chargeur DEWALT. L'appareil DC011 chargera la plupart des piles DEWALT de 7,2 à 18,0 volts, sauf les piles Univolt. Les piles sont vendues séparément. Importantes consignes de sécurité 1. Lire les présentes consignes. 2. Conserver les présentes consignes. 3. Suivre à la lettre tous les avertissements. 4. Suivre toutes les directives du présent manuel. 5. Ne pas utiliser cet appareil près de l'eau. 6. Nettoyer avec un linge sec seulement. 7. Ne pas bloquer les prises d'air de ventilation; les installer selon les directives du fabricant. 8. Ne pas installer l'appareil près de sources de chaleur, telles que les radiateurs, les enreg- istreurs de chaleur, les cuisinières ou tout autre appareil (y compris les amplificateurs) produisant de la chaleur. 9. Ne pas nuire à la protection fournie par les fiches polarisées ou les broches de terre. La fiche polarisée est munie de deux lames, l'une plus large que l'autre; la fiche avec broche de terre, quant à elle, comporte deux lames et une broche de masse. La lame la plus large ou la broche de masse sont fournies en vue d'assurer la sécurité de l'utilisateur. Si la fiche fournie ne convient pas à la prise, consulter un électricien afin de faire remplacer l'ancienne prise. 10. Protéger le cordon d'alimentation en le plaçant de manière à éviter que les personnes s'y prennent les pieds ou que le cordon se plie, particulièrement au niveau des fiches, des prises de courant et des points de connexions de sortie de l'appareil. 11. N'utiliser que des pièces ou des accessoires recommandés par le fabricant. 12. N'utiliser qu'avec un chariot, un support, un trépied, une ferrure ou une table recommandés par le fabricant ou vendus avec l'appareil. Lorsqu'on utilise un chariot, prendre soin de ne pas renverser le chariot et l'appareil afin d'éviter les blessures. 13. Débrancher l'appareil lors des orages électriques ou lorsqu'on ne prévoit pas l'utiliser pendant de longues périodes. 14. Les opérations d'entretien et de réparation doivent être effectuées par le personnel qualifié seulement. Faire réparer l'appareil (y compris le cordon d'alimentation et la fiche) lorsqu'il subit des dommages quelconques, lorsque des liquides ou des matières étrangères s 'infiltrent ou pénètrent à l'intérieur de celui-ci ou encore, lorsqu'il est exposé à la pluie ou à l'humidité, ne fonctionne pas correctement ou subit une chute. 15. L'appareil ne doit pas être exposé aux égouttures ni aux éclaboussures et aucun objet rempli de liquide, tel un vase, ne doit être placé sur l'appareil. L'éclair fléché dans un triangle vise à informer l'utilisateur que certaines pièces internes de l'appareil comportent un risque de choc électrique. Le point d'exclamation dans un triangle vise à informer l'utilisateur que d'importantes directives d'entretien et de réparation sont incluses dans le manuel fourni avec l'appareil. Le symbole de double isolation (un carré dans un carré) vise à aviser le personnel de service qualifié qu'il ne doit utiliser que des pièces de rechange identiques pour cet appareil. AVERTISSEMENT : afin de réduire les risques d'incendie ou de choc électrique, ne pas exposer l'appareil à la pluie ni à l'humidité. MISE EN GARDE : afin de prévenir les risques de choc électrique, enficher complètement la lame la plus large dans la fente la plus large.
-
 1
1 -
 2
2 -
 3
3 -
 4
4 -
 5
5 -
 6
6
 |
 |