Dewalt DC495B Instruction Manual - Page 2
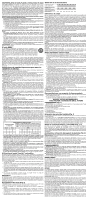
Installing and Removing the Battery Pack Fig. 3 - dc495
 |
View all Dewalt DC495B manuals
Add to My Manuals
Save this manual to your list of manuals |
Page 2 highlights
• Do not operate charger with damaged cord or plug. • Do not operate charger if it has received a sharp blow, been dropped, or otherwise damaged in any way. Take it to an authorized service center. • Do not disassemble charger; take it to an authorized service center when service or repair is required. Incorrect reassembly may result in a risk of electric shock, electrocution or fire. • Disconnect the charger from the outlet before attempting any cleaning. This will reduce the risk of electric shock. Removing the battery pack will not reduce this risk. • NEVER attempt to connect 2 chargers together. • The charger is designed to operate on standard 120V household electrical power. Do not attempt to use it on any other voltage. This does not apply to the vehicular charger. Using Automatic Tune-Up™ Mode The automatic Tune-Up™ Mode equalizes or balances the individual cells in the battery pack allowing it to function at peak capacity. Battery packs should be tuned up weekly or after 10 charge/discharge cycles or whenever the pack no longer delivers the same amount of work. To use the automatic Tune-Up™, place the battery pack in the charger and leave it for at least 8 hours. The charger will cycle through the following modes. 1. The red light will blink continuously indicating that the 1-hour charge cycle has started. 2. When the 1-hour charge cycle is complete, the light will stay on continuously and will no longer blink. This indicates that the pack is fully charged and can be used at this time. 3. If the pack is left in the charger after the initial 1-hour charge, the charger will begin the Automatic Tune-Up™ mode. This mode continues up to 8 hours or until the individual cells in the battery pack are equalized. The battery pack is ready for use and can be removed at any time during the Automatic Tune-Up™ mode. 4. Once the Automatic Tune-Up™ mode is complete, the charger will begin a maintenance charge; the red indicator will remain lit. Chargers Your tool uses a 12.0, 14.4, or 18.0 Volt DEWALT Charger. Your battery can be charged in DEWALT 1 Hour Chargers, 15 Minute Chargers or Vehicular 12 volt charger. Be sure to read all safety instructions before using your charger. Consult the chart on the back cover of this manual for compatibility of chargers and battery packs. Charging Procedure (Fig. 2) DANGER: Electrocution hazard. 120 volts present at charging terminals. Do not probe with conductive objects. Danger of electric shock or electrocution. 1. Plug the charger into an appropriate outlet before inserting battery pack. 2. Insert the battery pack into the charger, as shown in Figure 2, making sure the pack is fully seated in charger. The red (charging) light will blink continuously indicating that the charging process has started. 3. The completion of charge will be indicated by the red light remaining ON continuously. The pack is fully charged and may be used at this time or left in the charger. Indicator Light Operation FIG. 1 FIG. 2 B DW941 B DC490 B DC495 D C A F E C D A F E C A E FIG. 3 D F F Charge Indicators Some chargers are designed to detect certain problems that can arise with battery packs. Problems are indicated by the red light flashing at a fast rate. If this occurs, re-insert battery pack into the charger. If the problem persists, try a different battery pack to determine if the charger is OK. If the new pack charges correctly, then the original pack is defective and should be returned to a service center or other collection site for recycling. If the new battery pack elicits the same trouble indication as the original, have the charger tested at an authorized service center. HOT/COLD PACK DELAY Some chargers have a Hot/Cold Pack Delay feature: when the charger detects a battery that is hot, it automatically starts a Hot Pack Delay, suspending charging until the battery has cooled. After the battery has cooled, the charger automatically switches to the Pack Charging mode. This feature ensures maximum battery life. The red light flashes long, then short while in the Hot Pack Delay mode. PROBLEM POWER LINE Some chargers have a Problem Power Line indicator. When the charger is used with some portable power sources such as generators or sources that convert DC to AC, the charger may temporarily suspend operation, flashing the red light with two fast blinks followed by a pause. This indicates the power source is out of limits. LEAVING THE BATTERY PACK IN THE CHARGER The charger and battery pack can be left connected with the red light glowing indefinitely. The charger will keep the battery pack fresh and fully charged. NOTE: A battery pack will slowly lose its charge when kept out of the charger. If the battery pack has not been kept on maintenance charge, it may need to be recharged before use. A battery pack may also slowly lose its charge if left in a charger that is not plugged into an appropriate AC source. WEAK BATTERY PACKS: Chargers can also detect a weak battery pack. Such batteries are still usable but should not be expected to perform as much work. The charger will indicate to replace battery pack. Important Charging Notes 1. Longest life and best performance can be obtained if the battery pack is charged when the air temperature is between 65°F and 75°F (18°- 24°C). DO NOT charge the battery pack in an air temperature below +40°F (+4.5°C), or above +105°F (+40.5°C). This is important and will prevent serious damage to the battery pack. 2. The charger and battery pack may become warm to touch while charging. This is a normal condition, and does not indicate a problem. To facilitate the cooling of the battery pack after use, avoid placing the charger or battery pack in a warm environment such as in a metal shed, or an uninsulated trailer. 3. If the battery pack does not charge properly: a. Check current at receptacle by plugging in a lamp or other appliance; b. Check to see if receptacle is connected to a light switch which turns power off when you turn out the lights; c. Move charger and battery pack to a location where the surrounding air temperature is approximately 65°F - 75°F (18°- 24°C); d. If charging problems persist, take the tool, battery pack and charger to your local service center. 4. The battery pack should be recharged when it fails to produce sufficient power on jobs which were easily done previously. DO NOT CONTINUE to use under these conditions. Follow the charging procedure. You may also charge a partially used pack whenever you desire with no adverse affect on the battery pack. 5. Under certain conditions, with the charger plugged into the power supply, the exposed charging contacts inside the charger can be shorted by foreign material. Foreign materials of a conductive nature such as, but not limited to, grinding dust, metal chips, steel wool, aluminum foil, or any buildup of metallic particles should be kept away from charger cavities. Always unplug the charger from the power supply when there is no battery pack in the cavity. Unplug charger before attempting to clean. 6. Do not freeze or immerse charger in water or any other liquid. WARNING: Shock hazard. Don't allow any liquid to get inside charger. Electric shock may result. CAUTION: Never attempt to open the battery pack for any reason. If the plastic housing of the battery pack breaks or cracks, return to a service center for recycling. Storage Recommendations 1. The best storage place is one that is cool and dry away from direct sunlight and excess heat or cold. 2. Long storage will not harm the battery pack or charger. Under proper conditions, they can be stored for 5 years or more. SAVE THESE INSTRUCTIONS FOR FUTURE USE COMPONENTS (Fig. 1) WARNING: Never modify the power tool or any part of it. Damage or personal injury could result. A. Trigger switch/variable speed switch B. Swivel head shear C. On/Lock-off control button D. Hex wrench E. Battery pack F. Battery release buttons Variable Speed Switch (Fig. 1) To turn the tool ON, squeeze the trigger switch (A). To turn the tool OFF release the trigger. Your tool is equipped with a variable speed switch which enables you to select the best speed for a particular application. The farther you squeeze the trigger, the faster the tool will operate. Use lower speeds for cutting tight curves or following precise guideline. Higher speeds are better for gradual curves and straight line cuts. For maximum tool life, use lower speeds only for short periods of time. On/Lock-Off Control Button (Fig. 1, 4) An On/Lock control button (C) serves as a lock-off button. To select the ON position, release the trigger switch and depress the control button on the right side of the tool, as shown in Figure 4. To select Locked/Off, depress the control button on the left side of the tool. When changing the position of the control button, be sure the trigger is released. Installing and Removing the Battery Pack (Fig. 3) NOTE: Make sure your battery pack is fully charged. WARNING: To prevent inadvertant operation, lock trigger switch before removing or installing battery. To install the battery pack into the tool handle, align the base of the tool with the notch inside the tool's handle and slide the battery pack firmly into the handle until you hear the lock snap into place. To remove the battery pack from the tool, press the release buttons (F) and firmly pull the battery pack out of the tool handle. Insert it into the charger as described in the charger manual. OPERATION WARNING: To reduce the risk of serious personal injury, turn tool off and disconnect battery pack before making any adjustments or removing/installing attachments or accessories. WARNING: Cut Hazard. NEVER have any part of your body near the blades. Serious personal injury may occur. WARNING: Cut Hazard. To reduce the risk of serious personal injury, DO NOT use the shear with any kind of accessory or attachment. WARNING: Cut Hazard. Wear gloves when handling sheet metal. The edges are sharp and can cause serious personal injury. DC490, DW941 For accurate work, always clamp or anchor the material to be cut. Line up one edge of the tool's middle blade with the cutting line and advance blades into the material without forced effort or unnecessary pressure. A little practice will enable you to determine what forward pressure gives you the smoothest cutting. It is important to keep the lower surfaces of the side blades flat on the material being cut (Fig. 12). When cutting curves, do not tilt the tool; keep the side blades flat and level.The head of the shear will swivel to afford better access to the material. For best cutting efficiency, keep blades sharp. FIG. 4 DW941 DC490, DC495 C FIG. 5 H ON SOUS TENSION ENCENDIDO FIG. 6 D LOCKED VERROUILLÉ BLOQUEADO J M K G I N L J DC495 For best results, always clamp or anchor the material to be cut. Position the shear so that the material is between the two jaws. It is best to practice using the tool on scrap material in order to determine the best pressure and angle at which to hold the tool for the application. When not cutting from the edge of the material, drilling a starter hole should ease positioning of the shear. Wear gloves when handling sheet metal. The edges are sharp and can cause injury. DC490, DW941 (FIG. 1, 5, 6) To remove shear head from motor, loosen three cap screws (G) using the hex wrench (D) provided. Remove shear head (B) by pulling head firmly forward. Slight twisting action may be required if head does not slide off easily. To remove cutter blades from shear head, remove three cap screws (G) from shear housing (H). Be careful not to lose rear spacer bushing when removing middle cap screw. Remove center blade (I) from housing by tapping blade gently towards the rear. The side knives (J) and side spacers (K) will now drop out of the housing. To remove eccentric bearing assembly from shaft, use an appropriate wrench to loosen eccentric nut (L) by turning counterclockwise. To install eccentric bearing assembly onto shaft, make sure the large, thin washer (M) is first inserted over shaft. Screw eccentric bearing assembly onto shaft and tighten with appropriate wrench. Lubricate bearing (N) with a good grade of bearing grease. To install cutter blades into shear housing, place the side knives (J) and side spacers (K) into position in the shear housing (H). Insert center cap screw through side knife and side spacer with rear spacer bushing between them. Start cap screw into thread just enough to hold blades in place. DO NOT TIGHTEN. Insert spacer bushing into hole in center blade and lubricate. Install center blade into shear housing by tapping blade gently forward using a drift pin to line up hole in center blade with forward holes in housing. Insert and tighten forward cap screw making sure spacer bushing in center blade stays in position. Apply good grade of bearing grease to clevis or yoke in center blade where it rides on the eccentric bearing assembly. Insert rear cap screw into shear housing but do not completely tighten. To install shear head assembly onto drive motor, make sure all cap screws are loosened about 3 or 4 complete turns. Place shear head onto unit and alternately tighten cap screws snugly to lock head assembly in place. It may be necessary to gently tap the shear head into place if it does not readily slip onto the nose of the power unit. DC495 (FIG. 1, 7-10) To remove shear head from motor, loosen the two back cap screws (G) using the hex wrench (D) provided. Remove shear head (B) from the body by pulling head firmly forward (Fig. 7). Slight twisting action may be required if head does not slide off easily. To remove cutter blades from the shear head, completely loosen the two back cap screws and remove shear head from motor unit. Loosen the tensioning screw (O) 1/2 turn. Completely loosen all three cap screws and remove head assembly. Turn assembly over and remove top half of head and then remove the blades. To replace blades, place lower jaw (P) onto two pins (R). Apply a thin layer of grease from the packet (included) around the pin and on the top side of the blade. Place upper jaw (Q) onto pin. Apply the rest of the grease provided onto the eccentric (L) on the output shaft of the motor unit and into the area behind the upper moving blade in the shear head. Install replacement washer (S), cone side up, over the pin on top of the moving blade. Place top half of head back (T) onto bottom half (U), making sure to align the pin to the hole. Reinstall all three cap screws (G) and nuts (V), but DO NOT tighten completely. Slide shear head back onto motor unit, making sure that the eccentric engages the moving blade. Once the head is on the motor unit and aligned, tighten all three screws and follow adjustment procedure below. To ensure proper blade tension, tighten tensioning screw (O) by turning clockwise to seat the blades. Next, loosen tensioning screw by turning counterclockwise slightly to allow blade movement. NOTE: The tensioning screw should be adjusted to correspond to material thickness. Adjustment (Fig. 11, 12) SWIVEL HEAD WARNING: Turn unit off and disconnect battery pack before installing and removing accessories, before adjusting or when making repairs. To prevent inadvertant operation, lock the trigger switch when the tool is not in use and when storing the tool. To better accomodate safe cutting at any angle, the shear head can be repositioned by loosening the three cap screws. Once the screws are loosened, turn the shear head to the desired angle. Retighten the three cap screws before installing battery pack. DC490, DW941 To adjust the curl of waste material, the left side knife has elongated holes. Adjustment may be necessary after changing blades or material being cut. Loosen cap screws and tap side knife either forward or backward so that curl of waste does not hit shear housing or work material while cutting. DC495 To ensure proper blade tension, tighten tensioning screw by turning clockwise to seat the blades. Next, loosen tensioning screw by turning counterclockwise slightly to allow blade movement. NOTE: The tensioning screw should be adjusted to correspond to material thickness. Lubrication Self lubricating bearings are used in the tool and periodic relubrication is not required. However, it is recommended that, once a year, you take or send the tool to a service center for a thorough cleaning and inspection. MAINTENANCE WARNING: To reduce the risk of serious personal injury, turn tool off and disconnect battery pack before making any adjustments or removing/installing attachments or accessories. Cleaning WARNING: Blow dirt and dust out of all air vents with clean, dry air at least once a week. To minimize the risk of eye injury, always wear ANSI Z87.1 approved eye protection when performing this.
-
 1
1 -
 2
2 -
 3
3 -
 4
4 -
 5
5 -
 6
6 -
 7
7
 |
 |
