Dewalt DCD795D2 Instruction Manual - Page 13
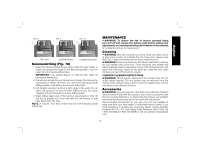
Belt Hook and Bit Clip Fig. 2, OPERATION, Installing and Removing the Battery Pack, Fig. 6
 |
View all Dewalt DCD795D2 manuals
Add to My Manuals
Save this manual to your list of manuals |
Page 13 highlights
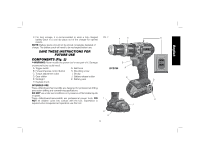
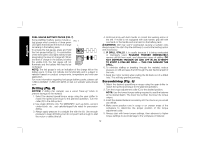
FIG. 3 FIG. 4 FIG. 5 WARNING: To reduce the risk of serious personal injury, ensure the screw holding the belt hook is secure. English IMPORTANT: When attaching or replacing the belt hook or bit clip, use only the screw (H) that is provided. Be sure to securely tighten the screw. F 1. Turn tool off and disconnect tool from power source. 2. Grasp the black sleeve of the chuck with one hand and use the other hand to secure the tool. Rotate the sleeve counterclockwise far enough to accept the desired accessory. 3. Insert the accessory about 3/4" (19 mm) into the chuck and tighten securely by rotating the chuck sleeve clockwise with one hand while holding the tool with the other. Your tool is equipped with an automatic spindle lock mechanism. This allows you to open and close the chuck with one hand. Be sure to tighten chuck with one hand on the chuck sleeve and one hand holding the tool for maximum tightness. To release the accessory, repeat steps 1 and 2 above. Belt Hook and Bit Clip (Fig. 2) WARNING: To reduce the risk of serious personal injury, turn tool off and remove the battery pack before making any adjustments or removing/installing attachments or accessories. An accidental start-up can cause injury. WARNING: To reduce the risk of serious personal injury, DO NOT suspend tool overhead or suspend objects from the belt hook. ONLY hang tool's belt hook from a work belt. The belt hook (G) and bit clip (I) can be attached to either side of the tool using only the screw (H) provided, to accommodate left- or righthanded users. If the hook or bit clip is not desired at all, it can be removed from the tool. To move belt hook or bit clip, remove the screw (H) that holds it in place then reassemble on the opposite side. Be sure to securely tighten the screw. OPERATION WARNING: To reduce the risk of serious personal injury, turn tool off and remove the battery pack before making any adjustments or removing/installing attachments or accessories. An accidental start-up can cause injury. Installing and Removing the Battery Pack (Fig. 6) FIG. 6 NOTE: For best results, make sure your battery pack is fully charged. J To install the battery pack (K) into the tool handle, align the battery pack with the rails inside the tool's handle and slide it into the handle K until the battery pack is firmly seated in the tool and ensure that it does not disengage. To remove the battery pack from the tool, press the release button (J) and firmly pull the battery pack out of the tool handle. Insert it into the charger as described in the charger section of this manual. 11
-
 1
1 -
2
-
3
-
4
-
5
-
6
-
7
-
 8
8 -
 9
9 -
 10
10 -
 11
11 -
 12
12 -
 13
13 -
 14
14 -
 15
15 -
 16
16 -
 17
17 -
 18
18 -
19
-
20
-
21
-
22
-
23
-
24
-
25
-
26
-
27
-
28
-
29
-
30
-
31
-
32
-
33
-
34
-
35
-
36
-
37
-
38
-
39
-
40
-
41
-
42
-
43
-
44
-
45
-
46
-
47
-
48
-
49
-
50
-
51
-
52
-
53
-
54
-
55
-
56
 |
 |
