Dewalt DW079KI Instruction Manual - Page 18
Detector Operation Fig. 11
 |
View all Dewalt DW079KI manuals
Add to My Manuals
Save this manual to your list of manuals |
Page 18 highlights
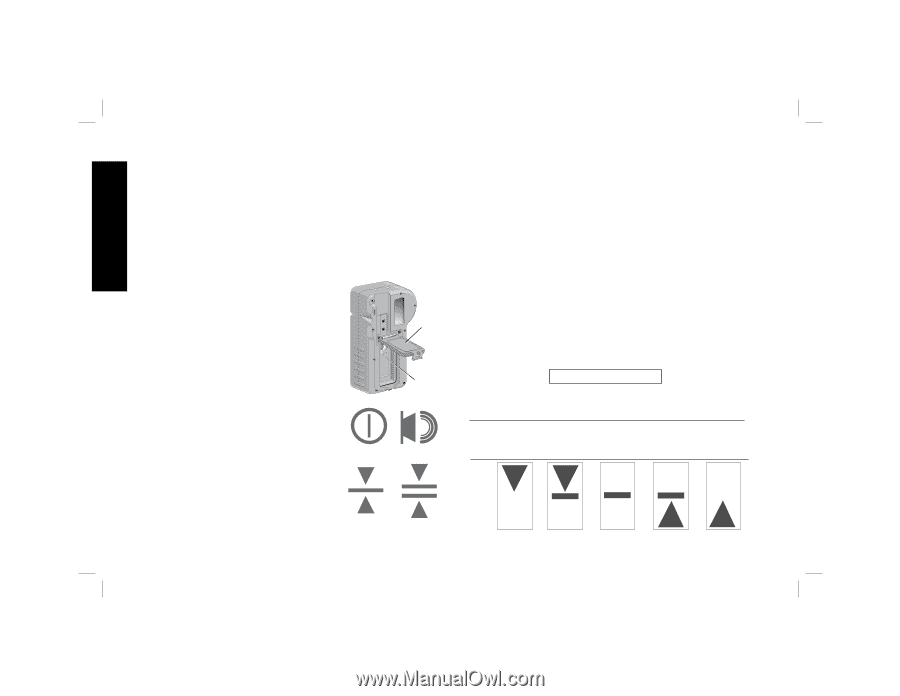
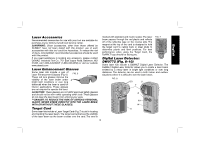
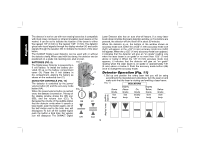
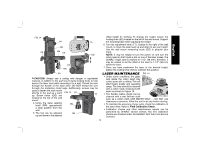
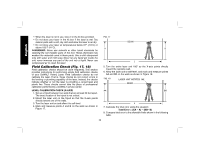
English display icons audible signals The detector is not for use with non-rotating lasers but is compatible with most rotary red-beam or infrared (invisible) beam lasers on the market. It can be set to indicate the location of the beam to either the nearest 1/8" (3 mm) or the nearest 1/25" (1 mm). The detector gives both visual signals through the display window (V) and audio signals through the speaker (W) to indicate the location of the laser beam. The DEWALT Digital Laser Detector can be used with or without the detector clamp. When used with the clamp, the detector can be positioned on a grade rod, leveling pole, stud or post. BATTERIES (FIG. 9) FIG. 9 The Digital Laser Detector is powered by a 9 volt battery. To install the battery pro- vided, lift up on the battery compartment cover (X). Place the 9 volt battery in X the compartment, aligning the battery as shown on the embossed icon (Y). DETECTOR CONTROLS (FIG. 10) The detector is controlled by the power/ volume button (Z) and the accuracy mode Y button (AA). FIG. 10 When the power/volume button is pushed once, the detector is turned on. The top of the display window shows the ON icon (BB), and the volume icon (CC). To decrease the volume of the audible signal BB CC that the detector emits when it senses a laser beam, push the button again; one of the half circles next to the horn icon will dissappear. To turn off the audible signal push the button a third time; the volume icon will dissapear. The DEWALT Digital AA1 AA2 Laser Detector also has an auto shut-off feature. If a rotary laser beam does not strike the beam detection window, or if no buttons are pressed, the detector will shut itself off in about 30 minutes. When the detector is on, the bottom of the window shows an accuracy mode icon. Either the ±1/25" (1 mm) accuracy mode icon (AA1) will appear, or the ±1/8" (3 mm) accuracy mode icon (AA2) will appear. When the ±1/25" (1 mm) accuracy mode icon appears, it indicates that the detector will give an "on grade" reading only when the laser beam is on grade or no more than 1/25" (1 mm) above or below it. When the 1/8" (3 mm) accuracy mode icon appears, it indicates that the detector will give an "on grade" reading when the laser beam is on grade or approximately 1/8" (3 mm) above or below it. Push the accuracy mode button (AA) once to change the accuracy mode. Detector Operation (Fig. 11) 1. Set up and position the rotary laser that you will be using according to the manufacturer's directions. Turn the laser on and make sure that the laser is rotating and emitting a laser beam. FIG. 11 INDICATORS Above Grade fast beep Slightly Above Grade fast beep On Grade steady tone Slightly Below Grade slow beep Below Grade slow beep 16
-
 1
1 -
2
-
3
-
4
-
5
-
6
-
7
-
8
-
9
-
10
-
11
-
12
-
 13
13 -
 14
14 -
 15
15 -
 16
16 -
 17
17 -
 18
18 -
 19
19 -
 20
20 -
 21
21 -
 22
22 -
 23
23 -
24
-
25
-
26
-
27
-
28
-
29
-
30
-
31
-
32
-
33
-
34
-
35
-
36
-
37
-
38
-
39
-
40
-
41
-
42
-
43
-
44
-
45
-
46
-
47
-
48
-
49
-
50
-
51
-
52
-
53
-
54
-
55
-
56
-
57
-
58
-
59
-
60
-
61
-
62
-
63
-
64
-
65
-
66
-
67
-
68
-
69
-
70
-
71
-
72
-
73
-
74
-
75
-
76
 |
 |