Dewalt DW266 Instruction Manual - Page 6
Depth Sensitive Units - xe
 |
View all Dewalt DW266 manuals
Add to My Manuals
Save this manual to your list of manuals |
Page 6 highlights
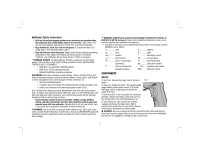
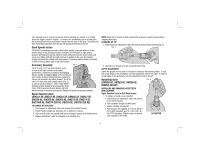
The reversing lever is used to reverse the tool for backing out screws. It is located above the trigger, shown in Figure 1. To reverse the screwdriver, turn it off and push the reversing lever to the right (when viewed from the back of the tool). To position the lever for forward operation, turn the tool off and push the lever to the left. Dead Spindle Action All DEWALT screwdrivers provide a dead output spindle to permit fasteners to be located easily in the driving accessory. Clutches are held apart by light spring pressure permitting the driving clutch to rotate without turning the driven clutch and accessory. When sufficient forward pressure is applied to the unit, the clutches engage and rotate the spindle and accessories. A reversing switch makes it possible to drive or loosen either right or left hand screws. Accessory Assembly FIG. 2 The 6.35 mm (1/4") hex drive ball lock chuck is used on all depth sensitive and drywall screwdrivers. Assemble accessories by engaging the hex spindle and tapping lightly on the accessory until it snaps in place. Usually pliers are required to remove the accessory by pulling forward. The 6.35 mm (1/4") hex drive quick change chuck (Fig. 2), is used on all Versa Clutch™ units. A ball retainer provides positive locking of all accessories in the chuck. Pull forward on the ball retainer and hold while inserting or removing accessories. Release for positive accessory retention. Depth Sensitive Units (DW251-XE, DW252-XE, DW255-XE, DW256-XE, DW257-XE, DW258-XE, DW262-XE, DW265-XE, DW272-XE, DW274-XE, DW274W-XE, DW274-220-XE, DW276-XE, DW276-220-XE) TO CHANGE BIT HOLDERS 1. Pull forward on adjustment collar and remove from clutch housing. 2. Pull bit holder straight out with pliers if it is difficult to remove. 3. Push new bit holder into spindle until ball lock snaps in groove in bit holder shank. 4. Replace adjustment collar by snapping over retaining ring. NOTE: Align ribs on inside of depth locator with grooves in clutch housing before snapping into place. CHANGING BIT TIP 1. Pull forward on adjustment collar and remove it from clutch housing (Fig. 3). FIG. 3 2. Use pliers to remove worn bit and install new bit tip. DEPTH ADJUSTMENT Follow the graphic on the collar to increase or decrease the fastening depth. To seat the screw deeper in the workpiece, turn the adjustment collar to the right. To seat the screw higher in the workpiece, turn the adjustment collar to the left. Nutsetting Units FIG. 4 (DW260-XE, DW263-XE, DW266-XE, DW266-220-XE) INSTALLING AND CHANGING NUTSETTERS AND LOCATORS Depth Sensitive Units for Drill Point Screws 1. To change or install a new nutsetter: a. Pull forward on adjustment collar and remove from clutch housing. b. Pull nutsetters straight out with pliers c. Select nutsetter size desired. d. Two locators are supplied, a 14.3 mm (9/16") ID for 3/8" nutsetters and 12.7 mm (1/2") ID for 5/16" nutsetters. Match locator to desired size nutsetter or bit holder. NUTSETTER 4
-
 1
1 -
 2
2 -
 3
3 -
 4
4 -
 5
5 -
 6
6 -
 7
7 -
 8
8 -
 9
9 -
 10
10 -
 11
11 -
 12
12
 |
 |
