Dewalt DW311K Instruction Manual - Page 2
Dual Blade Motion DW311 Only Fig. 2 - reciprocating saw
 |
View all Dewalt DW311K manuals
Add to My Manuals
Save this manual to your list of manuals |
Page 2 highlights
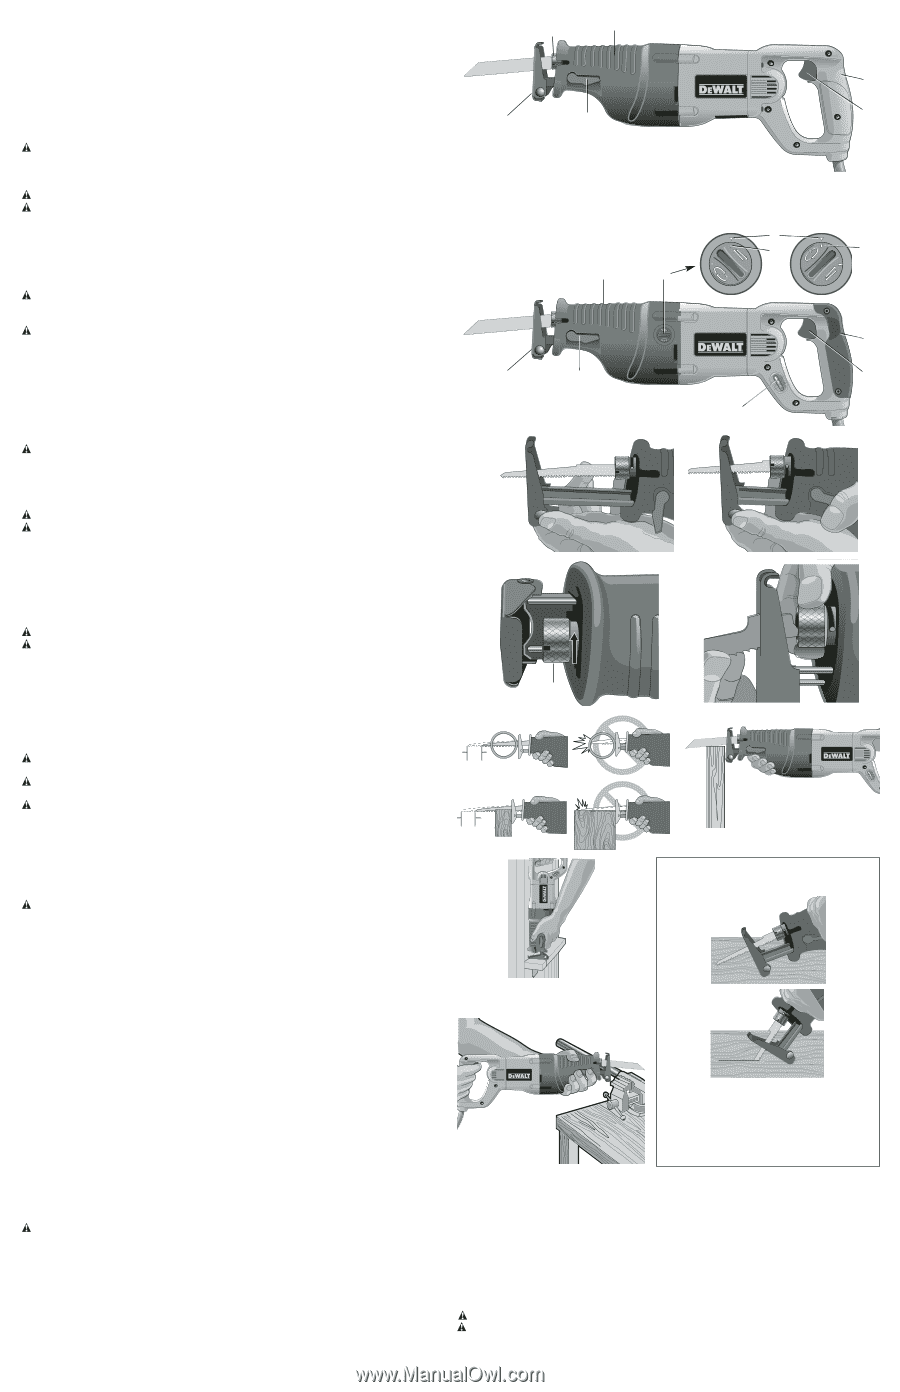
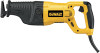
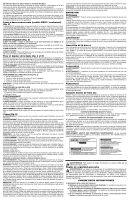
Dual Blade Motion (DW311 Only) (Fig. 2) The DW311 has dual blade motion: straight reciprocating motion or orbital motion. Straight reciprocating motion is used for all metal cutting operations and for wood cutting applications where finish is more important than speed. To set the saw for straight reciprocating motion, turn the blade action selector (E) 45˚ clockwise to align the mark (I) with the arrow on the tool (J), as shown. Orbital motion is used for fast cutting of wood. To set the saw for orbital action, turn the blade action selector 45˚ counterclockwise to align the mark (K) with the arrow on the tool (J), as shown. Adjustable Shoe (Fig. 3) CAUTION: Turn off and unplug the tool before making any adjustments or removing or installing attachments or accessories. Push the shoe release lever (C) downward and slide the shoe (D) out to the desired setting. Rotate the lever to lock shoe into position. CAUTION: Cut hazard. To prevent loss of control, never use tool without shoe. CAUTION: Risk of personal injury and property damage. Ensure the shoe is locked into position before using tool. Blade Installation and Removal (Fig. 4, 5) Different blade lengths are available. Use the appropriate blade for the application. The blade should be longer than 3-1/2" and should extend past the shoe and the thickness of the workpiece during the cut. Select the blade best suitable for the material to be cut and use the shortest blade suitable for the thickness of the material. Do not use jigsaw blades with this tool. WARNING: Cut hazard. Blade breakage may occur if the blade does not extend past the shoe and the workpiece during the cut (Fig. 4). Increased risk of personal injury, as well as damage to the shoe and workpiece may result. WARNING: Cut hazard. Turn off and unplug the tool before making any adjustments or removing or installing attachments or accessories. TO INSTALL BLADE INTO SAW (FIG. 5) 1. Point tool away from body. 2. Rotate blade clamp collar (F) to release position. 3. Insert blade shank from the front. 4. Rotate blade clamp collar to lock blade into position. NOTE: Blade can be installed upside-down to assist in flush-to cutting, see Figure 7. TO REMOVE BLADE FROM SAW WARNING: Burn hazard. Do not touch the the blade immediately after use. Contact with the blade may result in personal injury. 1. Rotate blade clamp collar (F) to release position. 2. Remove blade. Operation WARNING: Always wear eye protection while operating this or any other power tool. WARNING: Burn hazard. Do not touch the the blade immediately after use. Contact with the blade may result in personal injury. Before you begin work, ensure the material to be cut is rigid. Small workpieces should be securely clamped to the work table. PROPER HAND POSITION Grasp the underside of the hand grip (G) with one hand and the rear handle (H) with the other hand. Cutting (Fig. 6) WARNING: Always wear eye protection while operating this power tool. WARNING: Cut hazard. Exercise extra caution when cutting towards operator. Always hold saw firmly with both hands while cutting. Before cutting any type of material, be sure it is firmly anchored or clamped to prevent slipping. Place blade lightly against work to be cut, depress the trigger switch and allow it to obtain maximum speed before applying pressure. Whenever possible, the saw shoe must be held firmly against the material being cut. This will prevent the saw from jumping or vibrating and minimize blade breakage. Any cut which puts pressure on the blade, such as angle or scroll cuts, increase potential for vibration, kickback and blade breakage. NOTE: The blade cuts on the down stroke leaving the cleanest edge on the underside of the material. WARNING: Shock hazard. Use extra caution when cutting overhead and pay particular attention to overhead wires which may be hidden from view. WARNING: Use extra caution when cutting overhead and anticipate the path of falling branches and debris ahead of time. WARNING: Inspect work site for hidden gas pipes, water pipes, or electrical wires before making blind or plunge cuts. Failure to do so may result in explosion, property damage, electric shock, and/or serious personal injury. FLUSH-TO CUTTING (FIG. 7) The compact design of the saw motor housing and spindle housing permits extremely close cutting to floors, corners and other difficult areas. The blade can be installed upside-down to assist in flush-to cutting POCKET/PLUNGE CUTTING - WOOD ONLY (FIG. 8) WARNING: Shock hazard. Exercise extreme caution when blind cutting to ensure that there are no foreign objects such as electrical wire, conduit, plumbing pipes, etc., that may come in contact with the blade. NOTE: DO NOT attempt to pocket/plunge cut metal. The initial step in pocket/plunge cutting is to measure the surface area to be cut and mark clearly with a pencil, chalk or scriber. Use the appropriate blade for the application. The blade should be longer than 3-1/2" (88.9mm) and should extend past the shoe and the thickness of the workpiece during the cut. Insert blade in blade clamp. Next, tip the saw backward until the back edge of the shoe is resting on the work surface and the blade clears the work surface. Depress trigger switch to turn motor on, always permitting blade to attain maximum speed. Grip saw steadily and begin a slow, deliberate upward swing with the handle of the saw. Blade will begin to feed into material. Always be sure blade is completely through material before continuing with pocket/plunge cut. NOTE: In areas where blade visibility is limited, use the edge of the saw shoe as a guide. Lines for any given cut should be extended beyond edge of cut to be made. METAL CUTTING (FIG. 9) This unit has different metal cutting capacities depending upon type of blade used and the metal to be cut. Use a finer blade for ferrous metals and a coarse blade for non-ferrous materials. In thin gauge sheet metals it is best to clamp wood to both sides of sheet. This will insure a clean cut without excess vibration or tearing of metal. Always remember not to force cutting blade as this reduces blade life and causes costly blade breakage. Start the cut on the surface where the greatest number of teeth will contact the workpiece. NOTE: It is generally recommended that when cutting metals you should spread a thin film of oil or other lubricant along the line ahead of the saw cut for easier operation and longer blade life. MAINTENANCE Cleaning WARNING: Always wear eye protection while operating this power tool. Periodically blow out all air passages with dry-compressed air. All plastic parts should be cleaned with a soft damp cloth. Never use solvents to clean plastic parts. They could possibly dissolve or otherwise dameage the material. If replacement of the power cord is necessary, the tool should be taken to a DEWALT factory service center, a DEWALT authorized service center or other qualified service personnel in order to avoid a safety hazard. To locate an authorized service center, please contact DEWALT Industrial Tool Co., 701 East Joppa Road, Baltimore, MD 21286, call 1-800-4-DEWALT (1-800-433-9258) or visit our website www.dewalt.com. Lubrication This tool has been lubricated with a sufficient amount of high-grade lubricant for the life of this unit under normal conditions. No further lubricaton is necessary. FIG. 1 DW310 F G H D C A FIG. 2 DW311 STRAIGHT RECIP. MOTION MOUVEMENT ALTERNATIF VERTICAL MOVIMIENTO ALTERNATIVO RECTO J ORBITAL ACTION FONCTIONNEMENT ORBITAL ACCIÓN ORBITAL I K G E D C FIG. 3 H A B FIG. 4 F FIG. 5 FIG. 6 FIG. 7 FIG. 8 STARTING POSITION FOR POCKET CUTTING POSITION DE DÉPART POUR LA COUPE EN POCHE POSICIÓN DE ARRANQUE PARA CORTES INTERNOS FIG. 9 ROCK TOOL UP TO NORMAL CUTTING POSITION AFTER BLADE HAS CUT THROUGH MATERIAL. BALANCER L'OUTIL JUSQU'À SA POSITION NORMALE DE COUPE APRÈS LA PÉNÉTRATION COMPLÈTE DE LA LAME DANS LE MATÉRIAU. GIRE LA HERRAMIENTA HASTA LA POSICIÓN DE CORTE NORMAL DESPUÉS DE QUE LA HOJA HAYA CORTADO EL MATERIAL. Brush Inspection For your continued safety and electrical protection, brush inspection and replacement on this tool should only be performed by a DEWALT factory service center, a DEWALT authorized service center or other qualified service personnel. At approximately 100 hours of use, take or send your tool to your nearest authorized service center to be thoroughly cleaned and inspected. Have worn parts replaced and lubricated with fresh lubricant. Have new brushes installed and test the tool for performance. Any loss of power before the above maintenance check may indicate the need for immediate servicing of the tool. DO NOT CONTINUE TO OPERATE THE TOOL UNDER THIS CONDITION. If proper operating voltage is present, return the tool for immediate service. Accessories WARNING: Always wear eye protection while operating this power tool. WARNING: The use of any other accessory not recommended for use with this tool could be hazardous. Recommended accessories for use with your tool are available at extra cost from your local dealer or authorized service center. If you need assistance in locating any accessory, please
-
 1
1 -
 2
2 -
 3
3 -
 4
4 -
 5
5 -
 6
6
 |
 |