Dewalt DWE7480 Instruction Manual - Page 14
Dust Collection, Lubrication, STORAGE Fig. 45, 46, Miter Gauge Operation, Compound Mitering, - parts
 |
View all Dewalt DWE7480 manuals
Add to My Manuals
Save this manual to your list of manuals |
Page 14 highlights
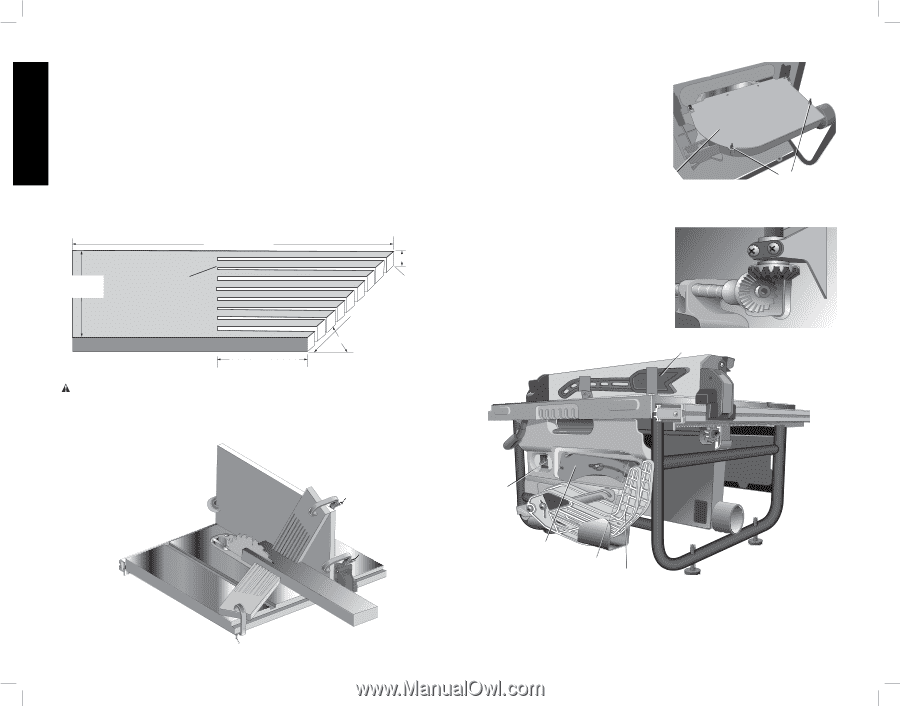
English Miter Gauge Operation Dust Collection FIG. 43 To set your miter gauge, loosen the lock handle and move the miter gauge to the desired Your table saw is equipped with a dust shroud angle. Compound Mitering and dust collection port. For best results, connect a vacuum to the port at the rear of the saw. This is a combination of bevel crosscutting and mitering. Follow the instructions for both After extended use, the saw's dust collection bevel crosscutting and mitering. system may become clogged. To clear the Featherboard Construction Featherboards are used to keep the work in contact with the fence and table, and help prevent kickbacks. Dimensions for making a typical featherboard are shown in Fig. 41. Make the featherboard from a straight piece of wood that is free of knots and cracks. Clamp the featherboard to the fence and table so that the leading edge of the featherboard will support the workpiece until the cut is complete (Fig. 42). An 8" (203 mm) high flat board can be dust collection system: 1. Unplug the saw. 2. Turn the saw on its side, so the bottom, open part of the unit is accessible. 3. Open the dust access door (UU) shown in Figure 43 by removing the wing screws (V V). Clean out the excess dust, and UU V V clamped to the rip fence and the featherboard can be clamped to the 8" (203 mm) high board. re-secure the access door with the wing FIG. 44 FIG. 41 screws. THE KERF 24" (610 mm) 3/4" (20 mm) Lubrication 1. All motor bearings are permanently lubricated at the factory and no additional lubrication is 4" (102 mm) SHOULD BE ABOUT 1/4" (6.4 mm) APART needed. 2. The height adjustment gear may require periodic cleaning and lubrication (Fig. 44). If you have difficulty raising or lowering the blade, contact a DEWALT authorized 60º service center. U FIG. 46 5" (127 mm) WARNING: Use featherboards for all non-thru sawing operations where the blade guard assembly, anti-kickback assembly and riving knife cannot be used. Always replace the blade guard assembly, anti-kickback assembly and riving knife when the non-thru sawing operation is complete. Make sure the featherboard presses only on the portion of the workpiece in front of the blade. FIG. 42 Q FF V D STORAGE (Fig. 45, 46) 1. Attach push stick (U) to fence. 2. Remove blade guard assembly (D). Refer to To Remove Blade Guard Assembly. Slide blade guard assembly into brackets as shown. 14
-
 1
1 -
2
-
3
-
4
-
5
-
6
-
7
-
8
-
 9
9 -
 10
10 -
 11
11 -
 12
12 -
 13
13 -
 14
14 -
 15
15 -
 16
16 -
 17
17 -
 18
18 -
 19
19 -
20
-
21
-
22
-
23
-
24
-
25
-
26
-
27
-
28
-
29
-
30
-
31
-
32
-
33
-
34
-
35
-
36
-
37
-
38
-
39
-
40
-
41
-
42
-
43
-
44
-
45
-
46
-
47
-
48
-
49
-
50
-
51
-
52
 |
 |