Dewalt DWFP71917 Instruction Manual - Page 8
COMPONENTS FIG. 1, OPERATION, Preparing the Tool - gasket
 |
View all Dewalt DWFP71917 manuals
Add to My Manuals
Save this manual to your list of manuals |
Page 8 highlights
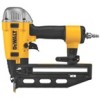
English For example, if your fastener usage averages 30 fasteners per minute, you need 50% of the tools cfm required to operate the tool at the rate of 60 fasteners per minute. In this case, be sure that your air compressor can deliver a minimum of 1.0 cfm. (28.3 lt/min) at 80 psi (5.6 kg/cm2) for optimum performance. COMPONENTS (FIG. 1) A. Trigger G. Pusher B. Trigger mode selector H. Air inlet C. Jam clearing latch I. Rear exhaust D. Contact trip J. Adjustable belt hook E. No-mar pad K. Depth adjustment wheel F. Magazine L. Pencil sharpener FIG. 1 J A I H B L E K C D F G OPERATION Preparing the Tool WARNING: Read the section titled Important Safety Instructions at the beginning of this manual. Always wear eye and ear protection when operating this tool. Keep the nailer pointed away from yourself and others. For safe operation, complete the following procedures and checks before each use of the nailer. CAUTION: NEVER spray or in any other way apply lubricants or cleaning solvents inside the tool. This can seriously affect the life and performance of the tool. NOTE: These nailers are designed to be used without oil. 1. Before you use the nailer, be sure that the compressor tanks have been properly drained. 2. Wear proper eye, hearing and respiratory protection. 3. Remove all fasteners from the magazine. 4. Check for smooth and proper operation of contact trip and pusher assemblies. Do not use tool if either assembly is not functioning properly. NEVER use a tool that has the contact trip restrained in the up position. 5. Check air supply. Ensure that air pressure does not exceed recommended operating limits, refer to Tool Specifications. 6. Connect air hose. 7. Check for audible leaks around valves and gaskets. Never use a tool that leaks or has damaged parts. WARNING: To reduce the risk of personal injury, disconnect tool from air supply before performing maintenance, clearing a jammed fastener, leaving work area, moving tool to another location or handing the tool to another person. 6
-
 1
1 -
2
-
 3
3 -
 4
4 -
 5
5 -
 6
6 -
 7
7 -
 8
8 -
 9
9 -
 10
10 -
 11
11 -
 12
12 -
 13
13 -
14
-
15
-
16
-
17
-
18
-
19
-
20
-
21
-
22
-
23
-
24
-
25
-
26
-
27
-
28
-
29
-
30
-
31
-
32
-
33
-
34
-
35
-
36
-
37
-
38
-
39
-
40
-
41
-
42
-
43
-
44
-
45
-
46
-
47
-
48
-
49
-
50
-
51
-
52
 |
 |
