Dewalt DWMT70786 Instruction Manual - Page 14
Installing/Removing Drill Bits Continued
 |
View all Dewalt DWMT70786 manuals
Add to My Manuals
Save this manual to your list of manuals |
Page 14 highlights
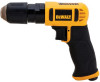
English Installing/Removing Drill Bits Continued • Tighten the chuck jaws by turning the front of the chuck clockwise, while holding the rear in place. DRILL BIT CHUCK NOTE: Whenever possible, secure the working piece in a vise or clamp prior to starting drilling. • To remove the drill bit, loosen chuck jaws by turning the front of the chuck counter-clockwise, while holding the rear in place. • Carefully remove drill bit when jaws are loose enough. OPERATING PROCEDURES START-UP (FIG. 1, PG. 2) • Turn on the air compressor and allow the air tank to be filled. • Set the air compressor regulator to 90 PSI. This air tool operates at a maximum of 90 PSI air pressure. • Adjust tool either in forward or reverse position. • Depress the trigger to start operating the tool. SHUT-DOWN (FIG. 1, PG. 2) • Release the trigger in order to stop the tool. • When changing drills or accessories, always disconnect air supply to avoid injury. • When job is completed, turn off the air compressor and store the air tool after lubrication. OPERATING INSTRUCTIONS • Mark the desired drilling location with an awl or punch to provide a seat for the tip of the bit. • Place drill bit tip on location of mark and apply pressure to trigger to start drill. If drilling metal, apply lubricant to reduce friction and glazing. • Apply constant, even pressure while guiding the drill. • Reduce pressure before cutting through workpiece. Continue depressing trigger until bit is fully removed from the drilled hole. WARNING: Use of safety glasses and a breathing mask is recommended. Drilling certain materials may create hazardous dust which may require special breathing equipment. Check before using the tool. Although the tool has a low noise level, the actual drilling process may cause a noise level such that ear protectors will be required. Safety gloves are recommended. CAUTION: Drill bit or surface may become extremely hot during drilling. DO NOT touch until cooled. 14
-
 1
1 -
2
-
3
-
4
-
5
-
6
-
7
-
8
-
 9
9 -
 10
10 -
 11
11 -
 12
12 -
 13
13 -
 14
14 -
 15
15 -
 16
16 -
 17
17 -
 18
18 -
 19
19 -
20
-
21
-
22
-
23
-
24
-
25
-
26
-
27
-
28
-
29
-
30
-
31
-
32
-
33
-
34
-
35
-
36
-
37
-
38
-
39
-
40
-
41
-
42
-
43
-
44
-
45
-
46
-
47
 |
 |
