Dirt Devil M0880DV Revision 1 (3/2002) - Page 2
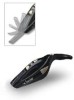
ChargingIStorage Base, Dirt Cup Release Button, Side Air Vents, Crevice Tool Release Button, Handle - filters
 |
View all Dirt Devil M0880DV manuals
Add to My Manuals
Save this manual to your list of manuals |
Page 2 highlights
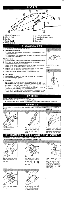
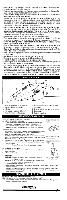
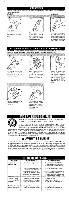
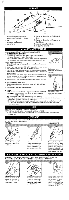
1. ChargingIStorage Base 2. Side Air Vents 3. Handle 4. Power Switch 5. Charging Light 6. Dirt Cup Release Button 7. Crevice Tool Release Button 8. Crevice Tool 9. Dust Cup TOOL REQUIRED: SCREWDRIVER AND DRILL A. CHARGINGISTORAGE BASE Designed to sit in the charging base on a flat surface (Diagram 1) or mount vertically (Diagram 2). For tidy storage, wrap excess cord on the back of the charging base and exit at either side or out the bottom. TO WALL MOUNT: 1. Place charging base against the mounting surface. Mark the centers of the holes. 2. Move base, then drill a 3/16" hole through the center of the marks. 3. Push plastic wall anchor into the drilled hole. 4. Be sure marked location is correct before drilling the second hole (adjust if necessary). Drill second hole and install other wall anchor. 5. Match up holes in storage base to wall anchors and insert screws. Be sure cord exits from one of the cord slots on the storage base. 6. Tighten the screws to hold the base flush to the mounting surface. Designed to sit on a flat surface. 0. UNlT STORAGE 1. Hold the unit by the handle and push down firmly onto the charging base. 2. Be sure the red charging light is on. C. CHARGING NOTE: Use only the charger supplied by the manufacturer to recharge. IMPORTANT: BEFORE FIRST USE, CHARGE YOUR UNlT FOR AT LEAST 24 HOURS. Power switch must be in the OFF position. Keep the charger plugged into a standard outlet at all times. It is normal for Designed to mount vertical- the charger to become warm to the touch when charging. ly on the wall. If the operating time gets shorter after repeated use, let the unit run until it stops running. Recharge for 24 hours and repeat monthly for best results. TO USE: Slide the power switch to the ON position. TO TURN UNlT OFF: Slide the power switch to the OFF position. Empty and clean the unit and filter after each use or after large pickups when the unit becomes full. TO USE TO STORE release button. line up with nozzle then press up until secure in place. IMPORTANT: FOR BEST RESULTS, CLEAN THE FILTER AFTER EACH USE. For filter replacement part # 3-088570-001, please call 1-800-321-1134. To store crevice tool: Pull down until loose. Flip crevice tool up towards unit and press until you feel it lock into place. Depress the dirt cup release button and pull nozzle away from unit. Hold nozzle over a waste- basket. Grasp filter and gently pull out. For filter replacements, call 1-800321-1134. Shake excess dirt and debris out of dust cup. Brush the dust and dirt off the filter, or shake the filter inside of the wastebasket. IMPORTANT: DO NOT WASH FILTER. Gently push filter back into dust cup. TO reattach dust cup: Align bottom first and rotate nozzle up, until it snaps into place.
-
 1
1 -
 2
2 -
 3
3 -
 4
4 -
 5
5 -
 6
6 -
 7
7 -
 8
8
 |
 |
