Dymo 1734519 Instruction Manual - Page 1
Dymo 1734519 Manual
 |
View all Dymo 1734519 manuals
Add to My Manuals
Save this manual to your list of manuals |
Page 1 highlights
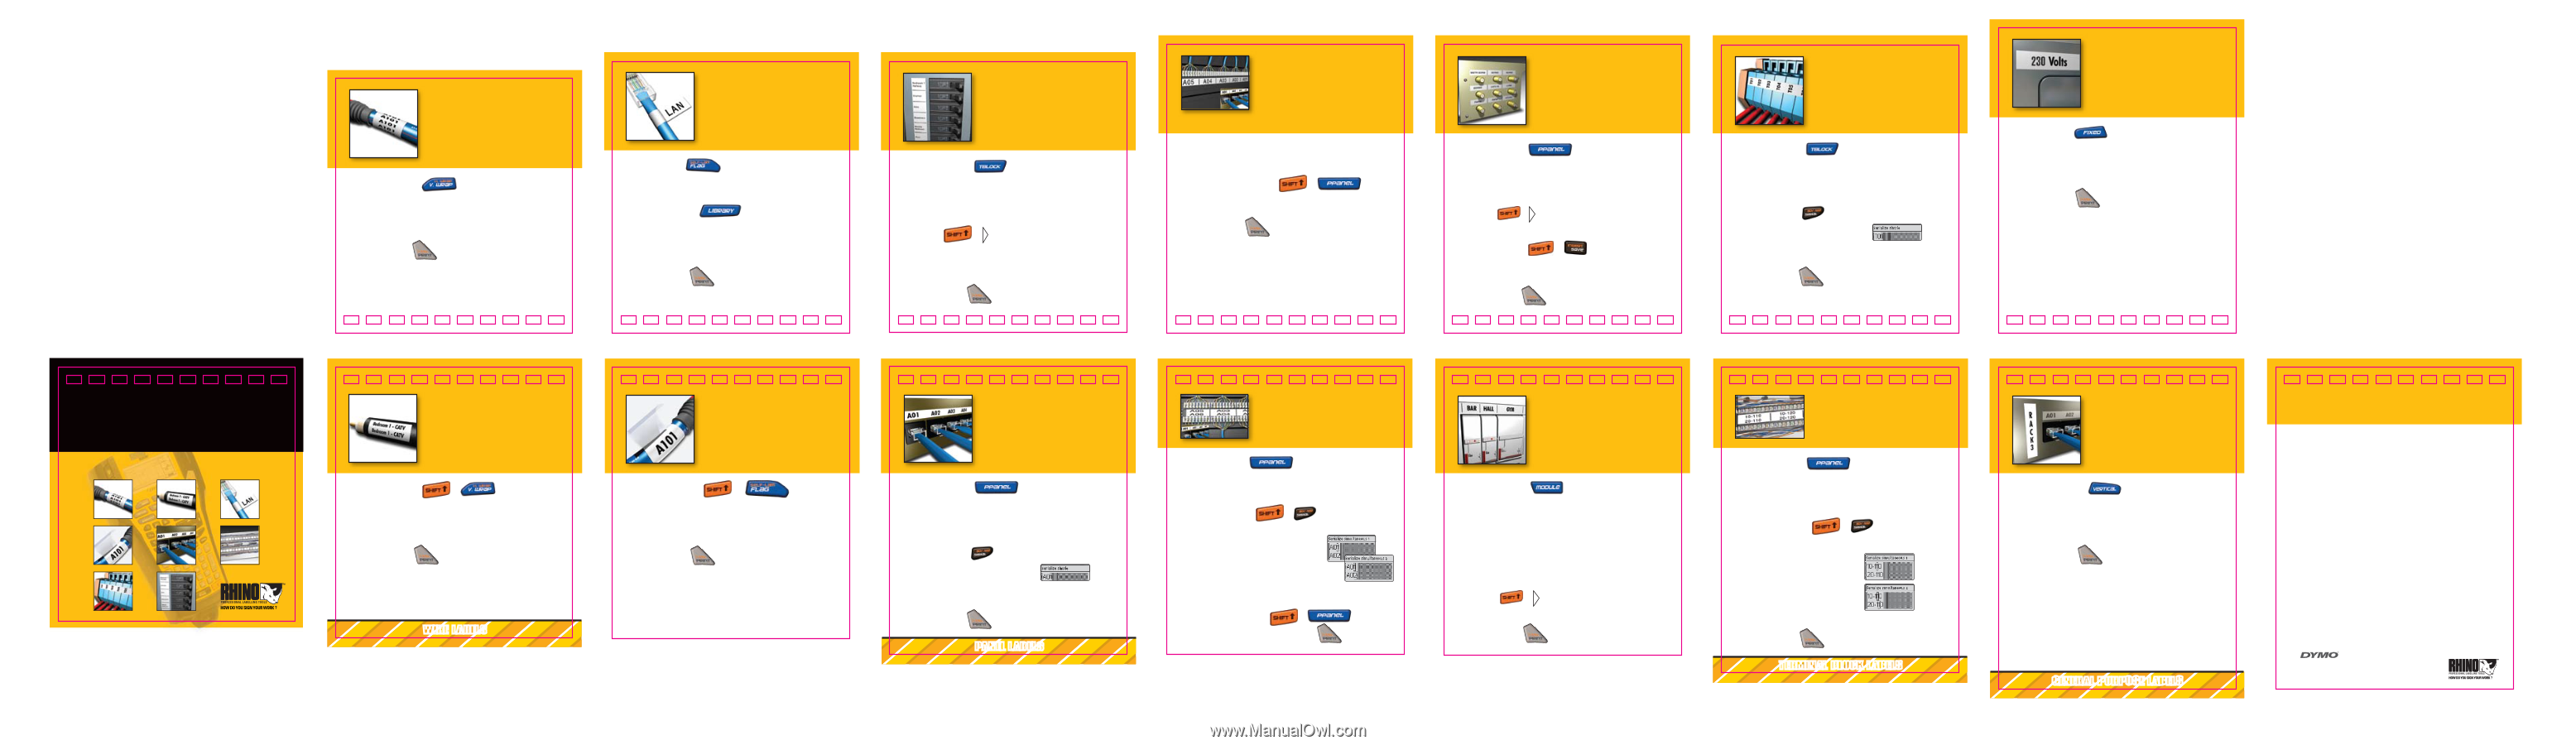
VERTICAL WRAP 1 Press V. WRAP 2 Select type of wire - COAX, press OK 3 Enter text: A101 4 Press PRINT 2 FLAG 1 Press FLAG 2 Set flag length: AUTO, press OK 3 Press LIBRARY 4 Select VOICE/DATA, press OK 5 Press L, select LAN, press OK 6 Press PRINT ELECTRICAL PANEL 1 Press TBLOCK 2 Set number of blocks: 6, and block size: 25 mm, select DONE, press OK 3 Enter text: Bedroom 1, Press ENTER, Hallway 4 Press + to move to next breaker label 5 Enter text: Kitchen 6 Repeat steps 4 - 5 until all breakers are labelled BACK OF PATCH PANEL (#1) 1 Create a Patch Panel. (see Patch Panel steps 1 - 6 on page 7) 2 Press SHIFT + PPANEL + 3 Set # of copies to 1 4 Press PRINT A/V DISTRIBUTION PANEL 1 Press PPANEL 2 Select port distance: 40 mm and # of ports: 3, Set DONE, press OK 3 Enter text: MSTR BDRM 4 Press + one time to move to the next connector 5 Repeat steps 3 - 4 until first three ports are labelled 6 Press INSERT + , select insert next label to the right, press OK 7 Repeat steps 3 - 6 until all ports are labelled TERMINAL BLOCK 1 Press TBLOCK 2 Set # of blocks: 8, and block size: 6 mm, select DONE, press OK 3 Enter text: T01 4 Press SERIAL 5 Select 1 to be serialised, press OK 6 Set the increment: 1 and # of serialisations: 8, press OK 7 Press PRINT FIXED LENGTH 1 Press FIXED 2 Set the label length: 90 mm, press OK 3 Enter text: 230 Volts 4 Press PRINT 7 Press PRINT 4 6 8 Press PRINT select all 8 10 12 14 RHINOTM 6000 PROFESSIONAL LABELLING TOOLS QUICK REFERENCE GUIDE HORIZONTAL WRAP 1 Press H. WRAP + 2 Set label length: AUTO, press OK 3 Enter text: Bedroom 1 - CATV 4 Press PRINT 3 WIRE LABELS SELFLAMINATING 1 Press SELF-LAM + 2 Set label length: AUTO, press OK 3 Type text: A101 4 Press PRINT 5 PATCH PANEL 1 Press PPANEL 2 Set port distance: 17,5 mm and # of ports: 6 (# of ports grouped together), select DONE, press OK 3 Enter text: A01 4 Press SERIAL 5 Select 1 to be serialized, press OK 6 Set increment: 1 and # of serializations: 6 (total # of ports), press OK, select DONE, press OK 7 Press PRINT select all 7 PANEL LABELS BACK OF PATCH PANEL (#2) 1 Press PPANEL 2 Set port distance: 30 mm, # of ports: 3, select DONE, press OK 3 Enter text: A01, press ENTER, A02 4 Press ADV. SER. + 5 Select SIMULTANEOUS, press OK 6 Select 1 to be the first character to be serialised, press OK 7 Select 2 to be the second character to be serialised, press OK 8 Set increment: 2 and # of serialisations: 3, press OK 9 Press SHIFT + PPANEL + 10 Set # of copies to 1, press PRINT 9 MODULE 1 Press MODULE 2 Set fuse length: 17,5 mm, # of modules: 3, multipliers: module 1, multiplier 1, module 2, multiplier 1, module 3, multiplier 2, select DONE, press OK 3 Enter text: Bar 4 Press + one time to move to the next module 5 Repeat steps 3 - 4 until all modules are labelled 6 Press PRINT 11 110 TERMINAL BLOCK 1 Press PPANEL 2 Set port distance: 30 mm and # of ports: 6, select DONE, press OK 3 Enter text: 10-110, press ENTER, 20-110 4 Press ADV. SER. + 5 Select SIMULTANEOUS, press OK 6 Select the first character to be serialised, press OK 7 Select the second character to be serialised, press OK 8 Set increment: 1 and # of serialisations: 6, press OK 9 Press PRINT 13 TERMINAL BLOCK LABELS VERTICAL 1 Press VERTICAL 2 Select label length: AUTO, press OK 3 Enter text: RACK3 4 Press PRINT 15 GENERAL PURPOSE LABELS 931666 QUICK TIPS Label Settings SETTINGS > Current Label Configuration CLR Key Returns to general mode & clears all text, formats, and font settings Navigation Arrows Moves to next / previous label = SHIFT + LEFT / RIGHT ARROWS Numeral Selections TOP / BOTTOM ARROWS (Press and hold for faster speed) Enter number Printing Multiple prints = SHIFT + PRINT Feed the tape = SHIFT + CUT Insert/Remove Labels Insert labels = SHIFT + SAVE Remove labels = SHIFT + RECALL Save/Recall Labels Save labels = SAVE Recall labels = RECALL Serialisation Simple (A1 A2 A3) = SERIAL Simultaneous (A1 B2 C3) = SHIFT + SERIAL > Simultaneous Advanced (A1 A2 B1 B2 C1 C2) = SHIFT + SERIAL > Advanced Technical Support: 020 7341 55 29 DYMO bvba, Industriepark-Noord 30, B-9100 Sint-Niklaas Belgium, A Newell Rubbermaid Company, www.sanfordbrands.com, Made in China - ©2007 DYMO
-
 1
1
 |
 |