Dymo LabelWriter® 450 Professional Label Printer for PC and Mac® Use - Page 6
Connecting your LabelWriter Printer
 |
View all Dymo LabelWriter® 450 Professional Label Printer for PC and Mac® manuals
Add to My Manuals
Save this manual to your list of manuals |
Page 6 highlights
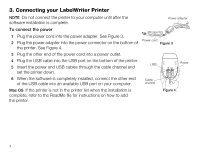
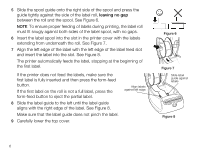
3. Connecting your LabelWriter Printer NOTE Do not connect the printer to your computer until after the software installation is complete. Power adapter To connect the power 1 Plug the power cord into the power adapter. See Figure 3. 2 Plug the power adapter into the power connector on the bottom of Power cord Figure 3 the printer. See Figure 4. 3 Plug the other end of the power cord into a power outlet. 4 Plug the USB cable into the USB port on the bottom of the printer. 5 Insert the power and USB cables through the cable channel and set the printer down. USB USB 24VDC Power 6 When the software is completely installed, connect the other end of the USB cable into an available USB port on your computer. Cable channel Mac OS If the printer is not in the printer list when the installation is complete, refer to the ReadMe file for instructions on how to add the printer. Figure 4 4
-
 1
1 -
 2
2 -
 3
3 -
 4
4 -
 5
5 -
 6
6 -
 7
7 -
 8
8 -
 9
9 -
 10
10 -
 11
11 -
 12
12 -
13
-
14
 |
 |
