Dynex DX-P9DVD11 Quick Setup Guide (English) - Page 1
Dynex DX-P9DVD11 Manual
 |
View all Dynex DX-P9DVD11 manuals
Add to My Manuals
Save this manual to your list of manuals |
Page 1 highlights
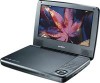
Features 7" and 9" Portable DVD Players QUICK SETUP GUIDE DX-P7DVD11 and DX-P9DVD11 Congratulations on your purchase of a high-quality Dynex product. Your DX-P7DVD11 or DX-P9DVD11 represents the state of the art in personal DVD player design and is designed for reliable and trouble-free performance. Package contents • DVD player with 7" or 9" LCD monitor • Wall power adapter (AC adapter) • Car adapter • AV cable • Quick Setup Guide 1 Display panel 2 Setup 3 Audio 4 Disc Menu 5 Options 6 Subtitle 7 Stop 8 9 10 CHR / 11 Open 12 Power On/Off 13 Volume 14 AV Out 15 16 DC In Access or exit the setup menu For DVD, select an audio language For DVD, access or exit disc menu Access options relating to the current activity or selection Selects DVD subtitle language Stops the disc Skips to the previous or next title, chapter, or track Navigates through the menus Searches backwards/forward at different speeds Confirms an entry or selection Starts, pauses, or resumes disc play Charging indicator/Power indicator Opens the disc compartment Turns on/off DVD player Increases or decreases volume Audio/ video output jack Headphone jack Power supply socket Charging the battery NOTE: During playback, if the battery low icon appears on the screen the built-in battery power is low and your player should be recharged. 1 Plug one end of the wall adapter (AC) into the DC input jack on the side of your player. 2 Plug the other end of the power adapter into a wall outlet.
-
 1
1 -
 2
2
 |
 |
