Dynex DX-WBRDVD1 Quick Setup Guide (English) - Page 1
Dynex DX-WBRDVD1 Manual
 |
View all Dynex DX-WBRDVD1 manuals
Add to My Manuals
Save this manual to your list of manuals |
Page 1 highlights
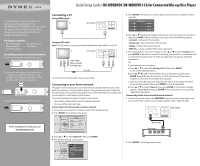
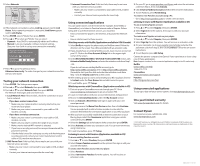
Quick Setup Guide I DX-WBRDVD1/DX-WBRDVD1-CA for Connected Blu-ray Disc Player Congratulations on your purchase of a high-quality Dynex product. Your DX-WBRDVD1/DX-WBRDVD1-CA represents the state of the art in Blu-ray Disc player design and is designed for reliable and trouble-free performance. Package contents • Blu-ray disc player • Remote control • Quick Setup Guide • AAA batteries (2) • User Guide Installing remote control batteries 1 Remove the battery compartment cover. 2 Insert two AAA batteries into the battery compartment. Make sure that the + and - symbols on the batteries match the + and - symbols in the battery compartment. 3 Replace the battery compartment cover. For the most updated User Guide, please visit www.dynexproducts.com Connecting a TV Using HDMI (best) TV Back of player Using an AV cable Note: The AV cable can only send standard-definition video (480i) to your TV. TV Back of player Yellow=Video White=Left audio Red=Right audio A/V cable To connect to a home theater, see your User Guide. Connecting to your home network This player can be connected to your wired network using the Ethernet port on the back of your player or using a wireless network. Using a wired network provides the best performance, because the attached devices connect directly to the network and are not subject to radio frequency interference. There are three types of wireless network connections: • User selects a network form a list of available networks • User uses WIFI protected Setup Connecting to the Internet with a wireless network: 1 Set up your access point or wireless router (if not already set up). 2 Press ENTER. The Settings menu opens. System Network Settings BD-Live Display Audio Language Parental Display HDMI Status HDMI preferred Format Resolution TV Aspect Film Mode(1080p24) Deep Color Connected 1080P HDMI Auto 16:9 Original Off Auto 3 Press or to select Network, then press ENTER. 4 The Wireless Settings screen opens. Language Parental System Settings Network BD-Live Display Audio Wireless Network List WiFi Protected Setup(WPS) Manual IP Settings 5 Press ENTER. The Network List screen opens showing a list of available wireless networks. Network List Hartleys Steven Linsys 6 Press or to select the wireless network you want your player to connect to, then press ENTER. A Network Setup screen opens with the following options: • Connect-Connect to this network. • Disconnect-Disconnect from this network. • Delete-Delete the current network. • WPS Pin-Create a random PIN number password. 7 If your network does not use encryption, press or to select Connect, then press ENTER. If the wireless network is working, you should see a checkmark and a connected message on the TV. If the message does not appear, repeat the steps above. OR If your network uses encryption: a Press or to select the Password field, then press ENTER. An on-screen keyboard opens. b Press or to select the first letter in the password, then press ENTER. Repeat this step to enter the rest of the password. If you make a mistake, use the clear key to delete the character. c After you enter the password, select the red "Done" in the upper left-hand corner of the keyboard, then press ENTER to close the keyboard. d Press or to select Connect, then press ENTER. A connection message appears. Select Close, then press ENTER. If the connection is not successful, repeat the steps above. Connecting to the Internet with a wired network: 1 Connect a network cable to the INTERNET jack on the back of your player and into a wired router using a commercially available LAN or Ethernet cable Back of player Network cable Wired router 2 Press ENTER. The Settings menu opens.
-
 1
1 -
 2
2
 |
 |
