EVGA 120-LF-E651-TR User Guide - Page 6
pin ATX Power ATXPOWER, pin ATX 12V Power ATX_CPU, Connecting Serial ATA Cables
 |
View all EVGA 120-LF-E651-TR manuals
Add to My Manuals
Save this manual to your list of manuals |
Page 6 highlights
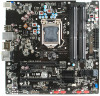
24-pin ATX Power (ATXPOWER) ATXPOWER is the main power supply connector located along the edge of the board next to the DIMM slots. Make sure that the power supply cable and pins are properly aligned with the connector on the motherboard. Firmly plug the power supply cable into the connector and make sure it is secure. Power Connector Plug power cable from system power supply to ATXPOWER Connector Pin 1 Signal +3.3V Pin 13 Signal +3.3V 1 12 2 +3.3V 14 -12V 3 GND 15 GND 4 +5V 16 PS_ON 5 GND 17 GND 6 +5V 18 GND 7 GND 19 GND 13 24 8 PWROK 20 RSVD 9 +5V_AUX 21 +5V 10 +12V 22 +5V 11 +12V 23 +5V 12 +3.3V 24 GND 4-pin ATX 12V Power (ATX_CPU) ATX_CPU the 4-pin or 8-pin ATX 12V power connection, is used to provide power to the CPU. Align the pins to the connector and press firmly until seated. If using an 8-pin connector, 4 of the pins will overhang the connector. Connecting Serial ATA Cables The Serial ATA II connector is used to connect the Serial ATA II device to the motherboard. These connectors support the thin Serial ATA II cables for primary storage devices. The current Serial ATA II interface allows up to 300MB/s data transfer rate. There are six (5) internal serial ATA connectors on this motherboard. These connections are designed to be angled to not interfere with any expansions cards. These connection points support RAID 0, RAID 1, RAID5 and RAID 10 configurations. 6
-
 1
1 -
 2
2 -
 3
3 -
 4
4 -
 5
5 -
 6
6 -
 7
7 -
 8
8 -
 9
9 -
 10
10 -
 11
11 -
 12
12 -
13
-
14
-
15
-
16
-
17
-
18
-
19
-
20
-
21
-
22
-
23
-
24
-
25
-
26
-
27
-
28
-
29
-
30
-
31
-
32
-
33
-
34
-
35
-
36
-
37
-
38
-
39
-
40
-
41
-
42
-
43
-
44
-
45
-
46
-
47
-
48
-
49
-
50
-
51
-
52
-
53
-
54
-
55
-
56
-
57
-
58
-
59
-
60
-
61
-
62
-
63
-
64
-
65
-
66
-
67
-
68
-
69
-
70
-
71
-
72
-
73
-
74
-
75
-
76
-
77
 |
 |
