EVGA GeForce GTX 480 Hydro Copper FTW Installation Guide - Page 2
Istelvs
 |
View all EVGA GeForce GTX 480 Hydro Copper FTW manuals
Add to My Manuals
Save this manual to your list of manuals |
Page 2 highlights
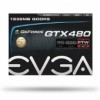
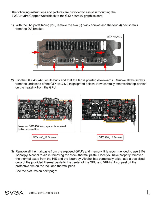
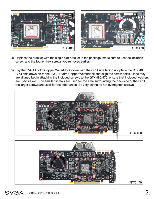
The following instructions and pictures are provided to assist in mounting the EVGA Hydro Copper Waterblock to the GTX 480/470 graphics card. 1) With the DVI ports facing you, remove the two (2) black screws and the four (4) hex screws from the DVI bracket. NM GTX 480/470 ib 0 at a 2) Flip the GTX 480/470 on its back and that the fan is pointed downwards. Remove all the screws from the underside of the GTX 480/470 (highlighted below). Now carefully remove the top portion on the heatsink from the GPU. o. • ", •s•e•e 4••.i.. • : •• r L 1- • Ont.9100te -421 • Note: on GTX 480 foam spacer is required to be removed first. GTX 480_17 Screws 4:l.::::+:6;pc..„t.5---° l i't*tTitafyi/ O.:04''. ! nst • ist, i i ri i i -44 it c, .... .--i 0 II L_R I- I - 7 41;11 ' . itif. , O. •- •-i E..el- 141 Istelvs--43-3 et - ..., . I0 . . • GTX 470_16 Screws 3) Remove all thermal paste from the exposed CPU's and memory. It is recommended to use 91% Isopropyl Alcohol to aid in removing the stock thermal paste. Once you have properly removed the thermal paste from the HIS and the Isopropyl Alcohol has completely dried, add a pea sized drop of the provided thermal paste to the center of the GPU and VRM's. Also, peel off the protective film on the included thermal pads. See the pictures on next page: vc•••,A I Intelligent Innovation 1
-
 1
1 -
 2
2 -
 3
3 -
 4
4 -
 5
5
 |
 |