EdgeStar TBC50S Owner's Manual - Page 10
Non-pressurized Mini Keg Tapping Instructions
 |
View all EdgeStar TBC50S manuals
Add to My Manuals
Save this manual to your list of manuals |
Page 10 highlights
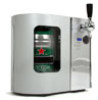
Non-pressurized Mini Keg Tapping Instructions Note that the following instructions refer to optional accessory kit (sold separately). Visit kegerator.com for more information and/or to place an order for the optional accessories. Most 5 Liter mini kegs are "non-pressurized"- though the kegs are shipped with minimal pressure inside to ensure the freshness of the beer, once they are opened, all the pressure escapes and they must be served with gravity (poured), or by re-pressurizing them (in this case, with CO2). All non-pressurized mini kegs must use the optional accessory kit's non-pressurized mini keg tap, shown following: CO2 line in connects here (CO2 flows in here) Beer line connects here (beer flows out this connector) Piercing tube (goes into the mini keg) A few notes on usage of the above tap: Before piercing the plug on the top of the keg, you must always follow the instructions marked on the keg to eliminate the excess gas and ensure that the keg has remained still long enough to avoid foaming from the ventilation opening. It's a good idea to wet the "piercing tube" with a little water prior to tapping a mini keg. This will lubricate the tube. Drive the piercing tube soundly through the rubber ring and into the mini keg when tapping it, and then secure the tap assembly onto the top of the mini keg with the spring-loaded catch. 7
-
 1
1 -
2
-
3
-
4
-
 5
5 -
 6
6 -
 7
7 -
 8
8 -
 9
9 -
 10
10 -
 11
11 -
 12
12 -
 13
13 -
 14
14 -
 15
15 -
16
-
17
-
18
-
19
 |
 |
