Electrolux E30EW85PPS Installation Instructions English - Page 6
Tip Over Hazard
 |
View all Electrolux E30EW85PPS manuals
Add to My Manuals
Save this manual to your list of manuals |
Page 6 highlights
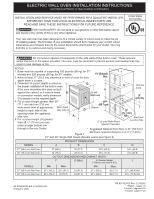
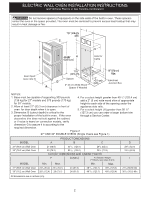
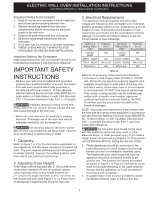
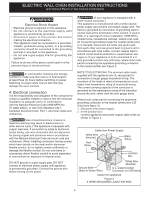
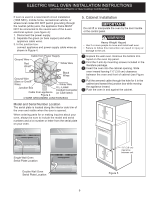
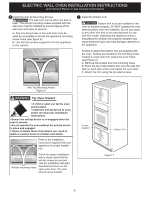
ELECTRIC WALL OVEN INSTALLATION INSTRUCTIONS (and Optional Electric or Gas Cooktop Combination) 6 Install the Anti-tip Mounting Screws The wall oven can tip when the door is open. The anti-tip mounting screws supplied with the wall oven must be installed to prevent tipping of the wall oven and injury to persons. A. The mounting holes in the side trims may be used as a template to locate the appliance mounting screw holes (see figure 6). B. Use the two screws supplied to fix the appliance to the cabinet. 7 Install the Bottom Trim Bottom trim must be installed for the oven to function properly. DO NOT operate the oven without bottom oven trim installed. Do not use wood or any other trim that is not manufactured for use with this model. Operating the appliance without manufacturer's bottom trim properly installed may cause personal injury and may damage cabinetry or the appliance. Screws to attach the bottom trim are supplied with the oven. Screws are located in the mounting holes located on each side trim, below the oven frame (see Figure 7). A. Remove the screws from the mounting holes. B. Place the top of the bottom trim over the side trim tabs on each side of the oven below the oven door. C. Attach the trim using the provided screws. Anti-Tip Mounting Holes Figure 6 Tip Over Hazard • A child or adult can tip the oven and be killed. • Install the anti-tip device to oven and/or structure per installation instructions. • Ensure the anti-tip device is re-engaged when the oven is moved. • Do not operate the oven without the anti-tip device in place and engaged. • Failure to follow these instructions can result in death or serious burns to children and adults. Refer to the installation instructions supplied with your appliance for proper installation. Anti-tip mounting holes Check for proper installation with a visual check that the anti-tip screws are present. Test the installation with light downward pressure on the open oven door. The oven should not tip forward. Screws supplied Bottom Trim Figure 7 6
-
 1
1 -
 2
2 -
 3
3 -
 4
4 -
 5
5 -
 6
6 -
 7
7 -
 8
8 -
 9
9 -
 10
10 -
 11
11 -
 12
12 -
13
-
14
-
15
-
16
-
17
-
18
-
19
-
20
-
21
-
22
-
23
-
24
 |
 |
