Electrolux E32AR75JPS Owners Guide - Page 7
Installing Door Handle - all refrigerator
 |
UPC - 012505227578
View all Electrolux E32AR75JPS manuals
Add to My Manuals
Save this manual to your list of manuals |
Page 7 highlights
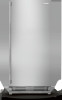
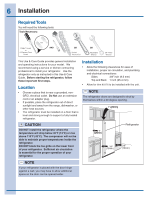
Installing Door Handle 7 Door Handle Mounting Instructions AA B 1. Remove handles from carton and any other protective packaging. 2. Position fresh food handle end caps over upper and lower preinstalled shoulder bolts (A) that are fastened into door. 3. While holding handle firmly against door, fasten upper and lower Allen set screws (B) with supplied Allen wrench until there is no gap between handle C and door. All set screws should be tightened so the screw is below the surface of the handle. The handles should be drawn tight to freezer and refrigerator doors with AA B no gaps. Opening the opposite door while tightening the Allen screw makes installation easier. The door handle may loosen over time or if it was installed improperly. If this happens, tighten the set screws on the handles. C Toe Grille Removal To remove the toe grille, use a Phillips head screwdriver and remove the two screws holding the toe grille to the cabinet. Then pull the toe grille away from the unit. Leveling • The refrigerator must have all bottom corners resting firmly on a solid floor. • The floor must be strong enough to support a fully loaded refrigerator. • It is VERY IMPORTANT for your refrigerator to be level in order to function properly. If the refrigerator is not leveled during installation, the door may be misaligned and not close or seal properly, causing cooling, frost or moisture problems. Leveling instructions continued on next page. Toe Grille Remove Screws
-
 1
1 -
 2
2 -
 3
3 -
 4
4 -
 5
5 -
 6
6 -
 7
7 -
 8
8 -
 9
9 -
 10
10 -
 11
11 -
 12
12 -
13
-
14
-
15
-
16
-
17
-
18
-
19
-
20
-
21
-
22
 |
 |
