Electrolux ECVW3662AS Complete Owners Guide English - Page 9
Install the Anti-Vibration Pad Item 9
 |
View all Electrolux ECVW3662AS manuals
Add to My Manuals
Save this manual to your list of manuals |
Page 9 highlights
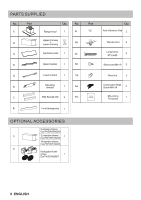
1. Install the Anti-Vibration Pad (Item 9) to the rear of the hood body (fig ). Peel off the backing and stick the sponge strips (Item 7,8) to the front and sides of the upper fan housing as shown in (fig ). 2. Carefully install the hood on the mounting bracket until it rests on the wall. Make sure to check that the hood is centered over the cook-top and between cabinets if applicable before moving to next step. 3. Install mounting screws as shown in (fig ) to prevent tilting and vibrations. Refer to Mounting Template(Item 15) 5mm . Install and secure the duct as shown in (fig 10). Assure that connections are airtight, observe all best practices, local codes, and regulations for hood exhaust venting. Lower bracket is not required for 8 feet ceiling's installation. This range hood is very heavy. Two persons are needed to lift the hood onto the mounting bracket.
-
 1
1 -
2
-
3
-
 4
4 -
 5
5 -
 6
6 -
 7
7 -
 8
8 -
 9
9 -
 10
10 -
 11
11 -
 12
12 -
 13
13 -
 14
14 -
15
-
16
-
17
 |
 |
