Electrolux EFLS627UIW Complete Owners Guide English - Page 33
Before Calling, Installation Instructions - reviews
 |
View all Electrolux EFLS627UIW manuals
Add to My Manuals
Save this manual to your list of manuals |
Page 33 highlights
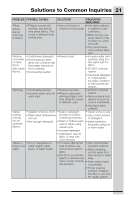
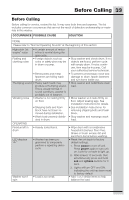
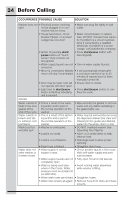
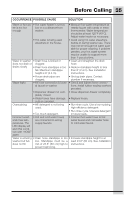
Before Calling 33 Before Calling Before calling for service, review this list. It may save both time and expense. The list includes common occurrences that are not the result of defective workmanship or materials in this washer. OCCURRENCE POSSIBLE CAUSE SOLUTION NOISE Please refer to "Normal Operating Sounds" at the beginning of this section High pitch "jet engine" noise Rattling and clanking noise • A certain amount of motor whine is normal during the spin cycle. • Foreign objects such as coins or safety pins may be in drum or pump. • Belt buckles and metal fasteners are hitting wash drum. Thumping sound • Heavy wash loads may produce a thumping sound. This is usually normal. If sound continues, washer is probably out of balance. Vibrating noise • Washer is not resting firmly on floor. • Shipping bolts and foam block have not been removed during installation. • Wash load unevenly distributed in drum. • Stop washer and check drum. If no objects are found, perform cycle with empty drum. If noise continues, item may be in pump. Call your authorized service technician. • To prevent unnecessary noise and damage to drum, fasten fasteners and turn items inside out. • Stop washer and redistribute wash load. • Move washer so it rests firmly on floor. Adjust leveling legs. See Installation Instructions for details. • See Installation Instructions for removing shipping bolts and foam block. • Stop washer and rearrange wash load. OPERATING Residue left in drum LED displays "" Washer won't spin • Heavily soiled items. • Washer has been programmed to temporarily perform a repeating demo cycle. • Load is too small. • Wipe drum with a nonabrasive household cleanser, then rinse. Shake or brush excess dirt and sand from items before washing. • Reset the unit back to factory default settings. 1. Press power to turn off unit. Press power again to turn unit on. Look for console to light up. 2. Wait at least 10 seconds, then simultaneously press and hold soil and options buttons for 3 secs. 3. Lights will turn OFF and ON, indicating the unit has been reset to factory default • Add 1 or 2 similar items to help balance the load.
-
 1
1 -
2
-
3
-
4
-
5
-
6
-
7
-
8
-
9
-
10
-
11
-
12
-
13
-
14
-
15
-
16
-
17
-
18
-
19
-
20
-
21
-
22
-
23
-
24
-
25
-
26
-
27
-
 28
28 -
 29
29 -
 30
30 -
 31
31 -
 32
32 -
 33
33 -
 34
34 -
 35
35 -
 36
36 -
 37
37 -
 38
38
 |
 |
