Electrolux EFMG527UIW Wiring Diagram English - Page 2
Diagnostic Mode Tests/Demo Mode
 |
View all Electrolux EFMG527UIW manuals
Add to My Manuals
Save this manual to your list of manuals |
Page 2 highlights
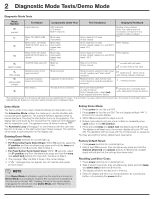
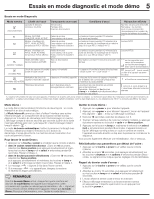
2 Diagnostic Mode Tests/Demo Mode Diagnostic Mode Tests Mode Number pre-test (select models) Test Name Components Under Test Test Conditions Displayed Feedback Lights, Buttons LED indicators LCD screen Button response Motor, NO HEAT, HUM ON Motor, NTC1 ctrl heater, HUM ON, NTC1 temp on display Motor, NTC2 ctrl heater, HUM ON, NTC2 temp on display HUM ON, Mist valve ON Motor relay Door switch Motor relay Door switch Heater relay NTC1 Motor relay Door switch Heater relay NTC2 Mist triac Valve Drum rotates for 10 mins (if door closed) Drum rotates for 10 mins (if door closed), heater is on until NTC1 reads 44 C Number of key pressed. Note: This number may not necessarily correspond to key number on table on page 1. NTC1 reading Drum rotates for 10 mins NTC2 reading (if door closed), heater is on until NTC2 reads 120 C Mist on for 10 mins (if door closed) on units with mist valve; on units without mist valve (400 models) Moisture sensor circuit open and short* Moisture sensor Moisture sensor expects to read "open circuit" condition and "short circuit" (open) and (short circuit) condition* with nothing if sensor is between (500 and 600 models) Capacitive moisture sensor circuit check Capacitive moisture sensor Moisture sensor valve read by main control board is inside the predefined threshold working correctly Error history The last 3 errors in memory Errors are most recent first (in order of history) Note: Pressing temp + select (set) keys together clears error history precedes the 2 character alarm code, alternating through the alarms *The moisture sensor is to the lower left inside the door beside the lint screen. The technician may use metal to short sensor bars. The sensor is touch safe, some materials like dry fingers or a 10k ohm resistor should have no displayed value. Demo Mode: The Demo works in two ways: Interactive Mode and Automatic Loop. The Interactive Mode enables the customer to use the interface without activating the appliance. The machine behavior appears similar to normal operation. Pressing the start button turns on the appliance. The display will count down by the second from the maximum time displayed with its respective cycle. The appliance turns off when it reaches " ". The Automatic Loop will engage if no one interacts with the user interface for 3 minutes, or the start button hasn't been pressed. The machine will simulate a cycle execution on the display only. Entering Demo Mode: 1 Press power and look for console light up. 2 For Rotary Dial Cycle Select Dryer: Within 10 seconds, select the 6th position and then simultaneously press and hold the temp and select buttons for 3 seconds. Skip to Step 4. 3 For Push Button Cycle Select Dryer: Within 10 seconds, select the 6th position and then simultaneously press and hold the temp and select (set) buttons for 3 seconds. Continue to Step 4. 4 The message " " will blink 3 times in the center display. 5 If " " message does not appear, turn off machine and repeat previous steps. NOTE Once Demo Mode is activated, every time the machine is turned on, Demo Mode is automatically recalled; this occurrence is signaled at the start-up by the text " " flashing 3 times in the center display. Unplugging the unit will not clear Demo Mode. See "Exiting Demo Mode" for more information. Exiting Demo Mode: 1 Press power to turn the unit OFF. 2 Press power to turn the unit ON. The unit display will flash " " 3 times on the numeric display. 3 Within 10 seconds perform steps 4 and 5. 4 Rotate cycle selector ring (on some models) or repeatedly press cycle button to the 6th position. 5 Press and hold temp and select (set) simultaneously for 3 seconds. The appliance will beep once, the numeric display will cycle OFF and ON. The appliance will then beep with the normal power on sequence. You may also perform factory default reset. See below. Factory Default Reset: 1 Press power and look for console light up. 2 Wait at least 10 seconds, then simultaneously press and hold the dryness (dry level) and options buttons for 3 seconds. Audible signal will indicate that the settings have been reset. Recalling Last Error Code: 1 Press power and look for console light up. 2 Wait at least 10 seconds, then simultaneously press and hold temp and select (set) buttons for 3 seconds. 3 The display will show the last error in memory. 4 Clear the display and return to normal operation by touching any button or by pressing the power button.
-
 1
1 -
 2
2 -
 3
3 -
 4
4 -
 5
5 -
 6
6 -
 7
7 -
 8
8 -
9
-
10
-
11
-
12
-
13
-
14
-
15
-
16
 |
 |
