Electrolux EI24MO45IB Product Specifications Sheet (English) - Page 2
Electrolux Major Appliances, N.A. - installation guide
 |
UPC - 012505560576
View all Electrolux EI24MO45IB manuals
Add to My Manuals
Save this manual to your list of manuals |
Page 2 highlights
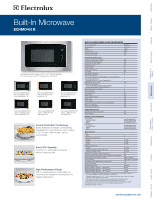
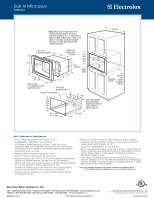
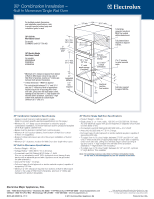
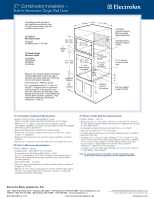
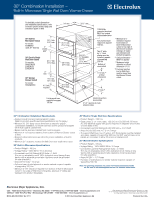
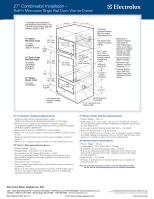
Built-In Microwave EI24MO45I B *Note: When used in combination with another Electrolux built-in product, a minimum clearance of 2 7/8" required from bottom of Built-In Microwave cutout to top edge of companion product's faceplate, leaving a 2" visible gap between both product faceplates 30" or 27" Trim Kit Faceplate 18 1/16" (30") 30" (27") 27" Power cord location (right 24 " top rear) 16 1/4" min. 13 3/8 " 16 3/8" max. rear extrusion 2" (visible gap)* 17 3/4" 2 5/16" 25 1/4" min. 25 3/8" max. 20" min. Allow at least 21" clearance for door depth when open 120V / 60Hz grounded outlet Bottom Duct Assembly 16 1/4" min. 16 3/8" max. 4" 6" Outlet should NOT be located within shaded area UNLESS 4" cabinet depth is greater than 21" 25 1/4" min. 25 3/8" max. 20" min. 30" min. Full plywood 7/8" base Faceplate overlap required to support 100 lbs. Built-In Microwave Specifications • Product Weight (Microwave with Trim Kit) - 51 Lbs. • Voltage Rating - 120V / 60 Hz / 15 or 20 Amps • Connected Load (kW Rating) @ 120 Volts = 1.5 kW (For use on adequately wired 120V, dedicated circuit having 2-wire service with a separate ground wire. Appliance must be grounded for safe operation.) • Amps @ 120 Volts = 13 Amps • Always consult local and national electric codes. • Allow 21" minimum clearance for 90° door swing. • Installation requires use of 30" or 27" Trim Kit (ordered by individual part number and shipped separate). Includes Bottom Duct Assembly. • Minimum 20" deep oven cutout dimension is critical for proper installation for oven and faceplate to fit flush against cabinet front. • Consult local building code, in the event that cutout opening may be required to be enclosed with sides, ceiling and rear partition. • Full oven base of solid plywood or similar material required, capable of supporting 100 Lbs. • Base must be level and front of cabinet square for proper operation. • Grounded outlet should NOT be located in shaded area, as indicated, unless cabinet depth is greater than 21". • Can NOT be installed above any gas wall oven. • Built-In Convection Microwave can be built in alone or is approved to be used in combination with any Electrolux Electric Single Wall Oven and / or Warmer Drawer. (Refer to model-specific Combination Installation Specification pages on web.) • When used in combination with another Electrolux built-in product, a minimum clearance of 2-7/8" required from bottom of Built-In Microwave cutout to top edge of companion product's faceplate, leaving a 2" visible gap between both product faceplates. Note: For planning purposes only. Refer to Product Installation Guide on the web at electroluxappliances.com for detailed instructions. Electrolux Major Appliances, N.A. USA • 10200 David Taylor Drive • Charlotte, NC 28262 • 1-877-4electrolux (1-877-435-3287) • electroluxappliances.com CANADA • 5855 Terry Fox Way • Mississauga, ON L5V 3E4 • 1-800-265-8352 • electroluxappliances.ca EI24MO45I 07/11 © 2011 Electrolux Home Products, Inc. High standards of quality at Electrolux Home Products, Inc. mean we are constantly working to improve our products. We reserve the right to change specifications or discontinue models without notice. Printed in the U.S.A.
-
 1
1 -
 2
2 -
 3
3 -
 4
4 -
 5
5 -
 6
6 -
 7
7 -
 8
8
 |
 |
