Electrolux EIFLW55HIW Wiring Diagram (All Languages) - Page 4
Check, Correction - cleaning
 |
UPC - 012505378607
View all Electrolux EIFLW55HIW manuals
Add to My Manuals
Save this manual to your list of manuals |
Page 4 highlights
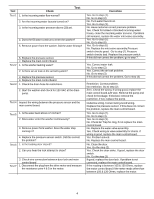
Test Check Test 1 1. Is the incoming water flow normal? Test 2. Are the incoming water faucets turned on? 3. Is the incoming water pressure above (20) psi. 4. Does the fill water continue to enter the washer? 5. Remove power from the washer. Did the water fill stop? 6. Replace the pressure sensor. 7. Replace the main control board. Test 2 1. Is the washer leaking water? 2. Is there an air leak in the air bell system? 3. Replace the pressure sensor. 4. Replace the main control board. Test 3 1. Check the drain hose for restrictions. 2. Start the washer and check for 120 VAC at the drain pump. Test 4 Inspect the wiring between the pressure sensor and the main control board. Test 5 1. Is the water level above 4.5 inches? 2. Does water enter the washer continuously? 3. Remove power from washer. Does the water stop coming in? 4. Replace the pressure sensor switch. Did this correct the problem? Test 6 1. Is the loading door closed? 2. Can you hear the lock attempt to close? Test 7 3. Check wire connection between door lock and main control board 1. Disconnect the plug from the drive motor and measure the resistance pins 4 & 5 in the motor. Correction Yes. Go to step (4). No. Go to step (2) No. Turn water faucets on. Yes. Go to step (3). No. Have customer correct pressure problem. Yes. Check for kinked or blocked incoming water hoses, clean the incoming water screens. If problem still remains, replace the water inlet valve assembly. Yes. Go to step (5). No. Go to step (6) Yes. Go to step (6) No. Replace the inlet valve assembly.Pressure switch checks good. Go to step (7).Pressure switch checks bad. Replace the pressure switch. If this did not correct the problem, go to step 7. Yes. Correct water leak. No. Go to step (2) Yes. Correct the air leak problem. No. Go to step (3) If this did not correct the problem, Go to step (4) Restriction. Correct problem. No restriction. Go to step (2). Zero. Check the wiring. If wiring good, replace the main control board.120 VAC. Remove the pump and check for blockage. If blocked, remove the restriction, if not, replace the pump. Defective wiring. Correct wiring.Good wiring. Replace the pressure sensor. If this does not correct the problem, replace the main control board. Yes. Go to step (2). No. Go to step (4). Yes. Go to step (3). No. Check Air Trap for clog, if not replace the main control board. No. Replace the water valve assembly. Yes. Check wiring to valve assembly for shorts. If wiring is good, replace the main control board. Yes. Problem solved. No. Replace the main control board. No. Close the door. Yes. Go the step (2). Yes. Check the door strike. If good, replace the door switch. No. Go the step (3) If good, replace the door lock. If problem is not corrected, replace the main control board. If the reading is between 105 & 130 Ohms, replace the motor control board.If the meter reads other than between 105 & 130 Ohms, replace the motor. 4
-
 1
1 -
 2
2 -
 3
3 -
 4
4 -
 5
5 -
 6
6 -
 7
7 -
 8
8 -
 9
9 -
 10
10 -
11
-
12
-
13
-
14
-
15
-
16
 |
 |
