Electrolux EW23CS65GB Use and Care Manual - Page 9
Connecting The Water Supply
 |
UPC - 012505694769
View all Electrolux EW23CS65GB manuals
Add to My Manuals
Save this manual to your list of manuals |
Page 9 highlights
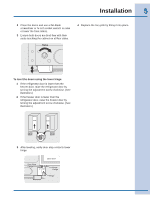
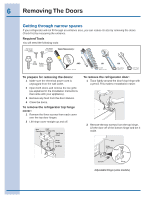
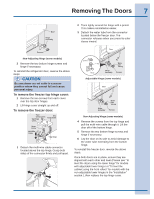
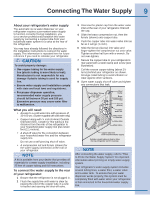
Connecting The Water Supply 9 About your refrigerator's water supply The automatic ice & water dispenser on your refrigerator requires a permanent water supply to function correctly. During installation, you (or a service professional) establish this water supply by connecting a copper tube from your household water system to a valve at the rear of the refrigerator. You may have already followed the directions in the Installation Instructions to connect the water supply. This information is repeated here for future reference if you need to relocate your refrigerator. CAUTION To avoid property damage: • Use copper tubing for the water supply line (plastic tubing is more likely to leak). Manufacturer is not responsible for any damage if plastic tubing is used for supply line. • Ensure water supply and installation comply with state and local laws and regulations. • For proper dispenser operation, recommended water supply pressure should fall between 30 psi and 100 psi. Excessive pressure may cause water filter to malfunction. What you will need: • Access to a cold water line with pressure of 30-100 psi. (System supplied with cold water only.) • Copper tubing with ¼ inch (6.4mm) Outside Diameter (OD). Length for this tubing is the distance from the rear of the refrigerator to your household water supply line plus seven feet (2.1 meters). • A shut-off valve for the connection between your household water line and the refrigerator supply line. Do not use a self-piercing shut-off valve. • A compression nut and ferrule (sleeve) for the water supply connection at the rear of your refrigerator. NOTE A kit is available from your dealer that provides all materials for a water supply installation, including 25 feet of copper tubing and full instructions. To connect the water supply to the rear of your refrigerator: 1 Ensure that the refrigerator is not plugged in. 2 Flush the supply line until water is clear by placing the end of the copper tube in a sink or bucket and opening the shut-off valve. 3 Unscrew the plastic cap from the water valve inlet at the rear of your refrigerator. Discard the cap. 4 Slide the brass compression nut, then the ferrule (sleeve) onto copper tube. 5 Push the copper tube into water valve inlet as far as it will go (¼ inch). 6 Slide the ferrule (sleeve) into valve and finger-tighten the compression nut onto valve. Tighten another half turn with a wrench. Do not over-tighten. 7 Secure the copper tube to your refrigerator's rear panel with a steel clamp and screw (see illustration). 8 Coil the excess copper tubing (about 2½ turns) behind your refrigerator as shown. Arrange coiled tubing to avoid vibration or wear against other surfaces. 9 Open water supply shut-off valve and tighten any connections that leak. Plastic Water Tubing to Ice Maker Fill Tube Steel Clamp Brass Compression Nut Ferrule (Sleeve) Copper water line Water Valve Bracket Valve Inlet Water Valve Copper water line from household water supply (Include enough tubing in loop to allow moving refrigerator out for cleaning.) NOTE After connecting the water supply, refer to "How to Prime the Water Supply System" for important information about priming an empty water supply system. Your refrigerator's water supply system includes several tubing lines, a water filter, a water valve and a water tank. To ensure that your water dispenser works properly, this system must be completely filled with water when your refrigerator is first connected to the household water supply line.
-
 1
1 -
2
-
3
-
 4
4 -
 5
5 -
 6
6 -
 7
7 -
 8
8 -
 9
9 -
 10
10 -
 11
11 -
 12
12 -
 13
13 -
 14
14 -
15
-
16
-
17
-
18
-
19
-
20
-
21
-
22
-
23
-
24
-
25
-
26
-
27
-
28
-
29
-
30
-
31
-
32
-
33
 |
 |